EN
CLEANING OPERATION
17.
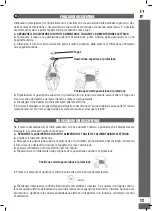
When using the disposer for food waste it is possible that grease or food particles may accumulate
in the grinding chamber or in the top protective gasket, causing foul odours. This residue
can be removed and the appliance cleaned proceeding as follows:
a.
SWITCH OFF THE FOOD WASTE DISPOSER AND REMOVE ELECTRICAL POWER
b. Remove the top protective gasket and clean the inside of the gasket with a damp sponge.
c. Clean the upper lip of the grinding chamber through the sink drain hole using a damp sponge.
d. Reposition the top protective gasket all the way into its seat. Place the plug in the sink drain hole and fill
the sink halfway with warm water.
e. Reconnect the food waste disposer to the electrical mains.
f. Operate the disposer and remove the sink plug, allowing the water to flow and remove the foul smelling
residues. Let cold water flow for a few seconds in order to rinse everything.
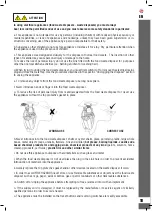
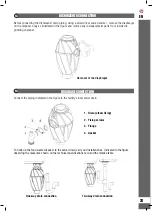
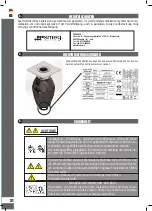
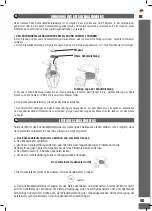
Correct position of the protective gasket
Top protective gasket
Plug
UNLOCKING OPERATION
18.
If the food waste disposer stops during use it is possible that the disposer is clogged. To unclog it proceed
as follows:
a.
Switch off the food waste disposer and remove electrical power
b. Close the water tap
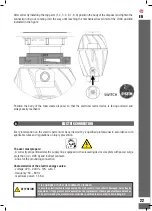
c. Remove the top protective gasket and, using long nose pliers, through
the sink drain hole, remove the object clogging the disposer.
d. Let the electric motor cool for 5-8 minutes.
e. Correctly reposition the top protective gasket in its seat.
f. Press the reset push button (switch) located on the bottom part of the disposer.
g. Reconnect the food waste disposer to the electrical mains and restart. If the motor does not restart check
the household electrical panel for any tripped breakers or blown fuses. If, after restoring correct electrical
power, the disposer does not work, contact the service centre.
Correct position of the protective gasket
26
Summary of Contents for KITFD050
Page 58: ...AR 57 SMEG SMEG...
Page 59: ...1 2 58 AR KITFD050 KITFD075 KITFD100...
Page 61: ...60 AR...
Page 62: ...6 61 AR...
Page 64: ...8 63 AR 1 2 3 4 5 6 7 8 9...
Page 65: ...9 64 AR 1 2 3 4 6 7 8 9 LOCK Id 0 03 A 220 50 60 1 5...
Page 66: ...10 12 11 65 AR 1 2 3 4 5 6 1 1 5 100 150 8 20...
Page 67: ...13 14 66 AR 1 2 3 4...
Page 68: ...15 16 67 AR PE...
Page 69: ...17 18 68 AR...
Page 70: ...19 20 69 AR 1 2 230 3 start stop...

