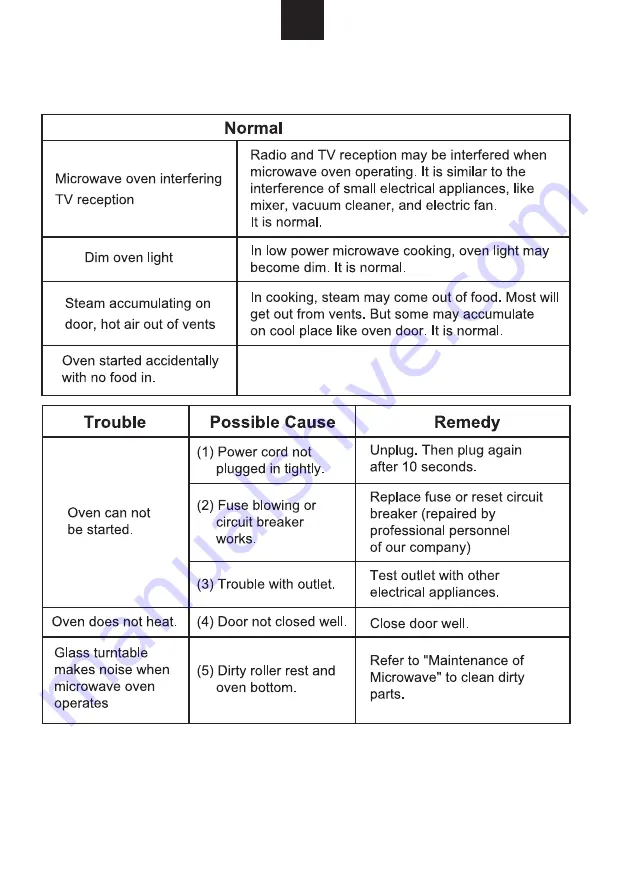
Trouble shooting
It is forbidden to run the unit without any food inside.It is very dangerous.
If something does trouble shooting; before seeking assistanace carry out the following
checks first.
EN
38
Page 1: ...A MICRO ONDES MANUEL D INSTRUCTIONS MAGNETRON OVEN GEBRUIKERSHANDLEIDING NL NO PL KUCHENKA MIKROFALOWA INSTRUKCJA OBS UGI PT FORNOS MICROONDAS MANUAL DE INSTRUCOES RU SV AR MIKROB LGEENERGI BRUGERVEJL...
Page 2: ...IONS CAREFULLY Read these instructions carefully before using your microwave oven and keep it carefully If you follow the instructions your oven will provide you with many years of good service MODEL...
Page 3: ...ant not to break or tamper with the safety interlocks b Do not place any object between the oven front face and the door or allow soil or cleaner residue to accumulate on sealing surfaces c WARNING If...
Page 4: ...y or mental capabilities or lack of experience and knowledge if they have been given supervision or instruction concerning use of the appliance in a safe way and understand the hazards involved Childr...
Page 5: ...rowave heating has ended 15 This appliance is intended to be used in household and similar applications such as staff kitchen areas in shops offices and other working environments by clients in hotels...
Page 6: ...ng children with reduced physical sensory or mental capabilities or lack of experience and knowledge unless they have been given supervision or instruction concerning use of the appliance by a person...
Page 7: ...uching heating elements Children less than 8 years of age shall be kept away unless continuously supervised 32 The microwave oven must be operated with the decorative door open for ovens with a decora...
Page 8: ...must be plugged into an outlet that is properly installed and grounded Consult a qualified electrician or serviceman if the grounding instructions are not completely understood or if doubtexists as t...
Page 9: ...r 10 minutes Wipe the oven clean using a soft dry cloth UTENSILS CAUTION Personal Injury Hazard It is hazardous for anyone other than a compentent person to carry out any service or repair operation t...
Page 10: ...plattering or a wrap for steaming Microwave safe only Follow the manufacturer s instructions Should be labeled Microwave Safe Some plastic containers soften as the food inside gets hot Boiling bags an...
Page 11: ...y 1 Turntable ring assembly 1 Instruction Manual 1 Grill Rack Only for Grill series Hub underside Glass tray Turntable ring assembly a Never place the glass tray upside down The glass tray should neve...
Page 12: ...h a plug and must only be connected to a properly installed earthed socket 6 The mains voltage must correspond to the voltage specified on the rating plate 7 The socket must be installed and connectin...
Page 13: ...imes or turn to choose the power you want and P100 P80 P50 P30 or P10 will display for each added press Then press to confirm and turn to set cooking time from 0 05to 95 00 Press again to start cookin...
Page 14: ...a better effect of grilling food you should turn the food over close the door and then if no operation the oven will continue cooking P100 P80 P50 P30 P10 G C 1 C 2 3 Grill or Combi Cooking Press once...
Page 15: ...crease 30 seconds of cooking time 3 In waiting state turn anti clockwise to set cooking time with 100 microwave power then press to start cooking 4 Quick Start 6 Defrost By Time 5 Defrost By Weight 1...
Page 16: ...250 g 350 g 450 g 200 g 300 g 400 g 50g with 450 ml cold water 100g with 800 ml cold water 200 g 400 g 600 g 250 g 350 g 450 g 1 cup 120 ml 2 cups 240 ml 3 cups 360ml 50 g 100 g A 1 Pizza A 7 Beverage...
Page 17: ...wer 9 Multi section cooking At most 2 sections can be set for cooking In multi section cooking if one section is defrosting then defrosting shall be placed in the first section Example If you want to...
Page 18: ...ss to inquire the time and the time will display for 3 seconds 11 Lock out Function for Children Lock In waiting state press for 3 seconds there will be a long beep time has been set otherwise the LED...
Page 19: ...Trouble shooting It is forbidden to run the unit without any food inside It is very dangerous If something does trouble shooting before seeking assistanace carry out the following checks first EN 38...
Page 20: ...product The symbol on the product indicates that this product may not be treated as household waste Instead it shall be handed over to the applicable collection point for the recycling of electrical...
Page 21: ...connecting cable must only be replaced by a qualified electrician If the plug is no longer accessible following installation and all pole isolating switch must be present on the installation side wit...
Page 22: ...297 357 3 36 10 BOTTON CABINET TEMPLATE 1 the BOTTOM CABINET TEMPLATE Put on the bottom plane of cabinet And make the center line of the template coincides with the bottom of cabinet Bracket Screw A T...
Page 23: ...o not trap or kink the power cord Install the oven C 3 Install the oven into the cabinet 2 2 BRACKET B two with Fix the BOTTOM And remove the BOTTOM CABINET TEMPLATE SCREW A 2 Screw A Bottom Bracket B...
Page 24: ...led against the back shell of the oven 4 4 EN 8 INSTALLATION HOLE of TRIM KIT 5 to the INSTALLATION HOLE Then fix the TRIM KIT PLASTIC COVER Screw B Installation Hole 5 Open the door fix the oven to t...