background image

Instructions for Use

63

Refrigerator (A)

Refrigerator is used for storing fresh foods for few days.

Shelf (1)

(number depends on the model)

Shelf can be optionally placed on the guides inside the appliance. It is
protected against pulling out. If you want to remove it, slightly lift up the
back part and pull it out.
Glass shelves (some models only have them) are protected with
plastic spacers. Before pulling the shelf out, spacers must be moved
towards you. Spacers can be also removed, however, it is better to
keep them for any later transport.
Quickly perishable food should be stored on the back i.e. the coldest
part of the shelves.

Bottle rack

(in some models only)

Bottle rack (number depends on
model) is intended for storing the
bottles. There are two installation
positions available (horizontal or lifted
in the front) thus enabling the
positioning of bottles on the stopper as
well.
It is protected against pulling out. If
you want to pull it out, simply lift its rear part and pull it towards you.

Warning!

If the door contains storing shelves, install the rack in such position
that the length of the bottles will not hinder the closing of the door.
The rack may carry 9 bottles of 0,75 l or more at the maximum (total
weight max. 13 kg) – note the label underneath the thermostat box
inside the appliance.

Defrost Water Outlet (2)

The interior of the refrigerator is cooled with cooling plate incorporated
in the rear wall. Under the plate there is a channel and an outlet for
defrost water.
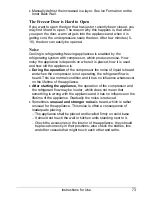
Regularly check the defrost water outlet and the channel, because
they should never be clogged (as for example with food rests). If
clogged, use a plastic straw and clean it.

Summary of Contents for CR321A

Page 1: ...erator and is used for storing fresh foods at the temperature of 0 C and higher The lower part is freezer and is used for freezing fresh foods and storing frozen foods for longer periods of time up to one year depending on the kind of foods you store The compartment is marked with four stars Before Putting Into Use 58 60 Placing and Installation 61 Description of the Appliance 62 64 Operation Cont...

Page 2: ...e kitchen unit The appliance should be professionally mounted by qualified technician and instructions are for his use only We Care for the Environment Our products use environmentally friendly packaging which can be either recycled or disposed of in an environmentally friendly manner To this end individual packaging materials are clearly marked These instructions are printed either on recycled pa...

Page 3: ...ate The appliance must be correctly connected to the mains supply see Connecting to the Mains Supply If the food has strange smell or color throw it away because it is very likely that it is spoiled and therefore dangerous to eat Disconnect the appliance from the power supply before repairing it only a qualified technician should repair it before cleaning and before replacing the light bulb Do not...

Page 4: ... out of the freezer and use it or make sure that is sufficiently cooled perhaps you have an extra appliance Disposing of the Worn Out Appliance When your appliance finally wears out dispose it of If the appliance has a lock break it in order to prevent eventual accidents danger of children get locked inside the appliance The refrigerating system of the appliance is filled with refrigerant and insu...

Page 5: ...ioned at least 3 cm away from the electric or gas cooker and at least 30 cm away from the oil or coal stove If this is not possible use an appropriate insulation Behind the appliance there should be free space at least 200 cm wide and above the appliance the high kitchen units should be at least 5 cm away from the appliance in order to assure adequate ventilation of the condenser unit Connection t...

Page 6: ...Instructions for Use 62 Description of the Appliance ...

Page 7: ... bottles There are two installation positions available horizontal or lifted in the front thus enabling the positioning of bottles on the stopper as well It is protected against pulling out If you want to pull it out simply lift its rear part and pull it towards you Warning If the door contains storing shelves install the rack in such position that the length of the bottles will not hinder the clo...

Page 8: ...in the Interior of the Refrigerator The light for illuminating the interior of the appliance is on when the door is opened The operation of the light does not depend on the position of the thermostat knob Freezer B Freezer is used for freezing fresh foods and for storing already frozen foods Freezing Compartment 4 is used for freezing fresh foods Storing Compartment 5 is used for storing packages ...

Page 9: ...colder in all compartments of the appliance At higher settings temperature in the interior of the appliance may even drop below 0 C When the ambient temperature is normal we recommend medium setting Changes of the ambient temprature affect temperature in the interior of the appliance choose correct setting of the thermostat knob In STOP 0 position the appliance does not operate the cooling system ...

Page 10: ...elicate foods should be stored in the coldest parts of the refrigerator Try not to open the door too often Set the thermostat to the setting where lower temperatures are reached Set the thermostat gradually as to avoid freezing of the foods Use a thermometer and measure the temperature in the individual compartments Place the thermostat in a glass vessel filled with water Temperature readings are ...

Page 11: ...that the food is frozen as quickly as possible Therefore we recommend the size of the package not to be too large and to be cooled before loading into the freezer The amount of fresh foods that can be loaded in the freezer within 24 hours is indicated on the rating plate freezing capacity If the loaded amount is too large the quality of freezing is reduced which affects the quality of frozen foods...

Page 12: ...ods up to 1 kg there is no need to change the thermostat setting see Temperature Selection Storing Frozen Foods Packages of frozen foods are stored in the basket If you remove the baskets you can store frozen packages directly on the cooling shelves Commercially Frozen Foods The storage time and the recommended temperature for storing commercially frozen foods are indicated on the packaging For st...

Page 13: ...ultry Game Minced meat Smoked sausages Fish lean fat Offal Defrosting Frozen Food Partially thawed or defrosted foods should be used as soon as possible Cold air preserves the food but it does not destroy microorganisms which rapidly activate after defrosting and make foods perishable Partial defrosting reduces the nutritional value of foods especially of fruits vegetables and ready made meals ...

Page 14: ...the power supply Empty the freezer and take care that the packages remain frozen Insert the enclosed pipe into the groove in the bottom of the appliance and place a vessel underneath to collect the defrost water Defrosting is accelerated if the door is left open Avoid using defrosting sprays as they may cause damage to the plastic parts and may be hazardous to health Cleaning the Appliance Disconn...

Page 15: ...enser on the rear wall Use soft non metal brush or vacuum cleaner Do not forget to clean also the defrost water receptacle above the refrigerator compressor do not remove the receptacle After cleaning connect the appliance to power supply and reload the packages Switch Off the Appliance When Not In Use If you do not intend to use the appliance for a longer period set the thermostat knob to the STO...

Page 16: ...runs to the channel and through the opening to the drain pan on the compressor automatic defrosting of the appliance is assured In case the ice formation on the inner back wall is increased 3 5 mm ice should be manually defrosted Set the thermostat knob to STOP 0 position and leave the door open Never use electric devices for defrosting and do not scrape the ice or frost layer with sharp objects A...

Page 17: ...the noise of liquid is heard and when the compressor is not operating the refrigerant flow is heard This is a normal condition and it has no influence whatsoever on the lifetime of the appliance After starting the appliance the operation of the compressor and the refrigerant flow may be louder which does not mean that something is wrong with the appliance and it has no influence on the lifetime of...

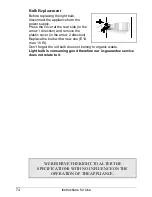
Page 18: ...arrow 1 direction and remove the plastic cover in the arrow 2 direction Replace the bulb with a new one E14 max 15 W Don t forget the old bulb does not belong to organic waste Light bulb is consuming good therefore our in guarantee service does not relate to it WE RESERVE THE RIGHT TO ALTER THE SPECIFICATIONS WITH NO INFLUENCE ON THE OPERATION OF THE APPLIANCE ...

Page 19: ...ce should be mounted and installed in compliance with these instructions current standards and regulations Mounting instructions were prepared for various types models of appliances therefore they may describe some procedures that do not apply to your appliance Mounting Dimensions and Required Air Circulation 11 Changing the Direction of Opening the Door 12 13 Mounting the Appliance 14 15 ...

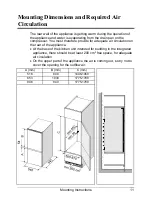
Page 20: ...or You must therefore provide for adequate air circulation on the rear of the appliance At the base of the kitchen unit intended for building in the integrated appliance there should be at least 200 cm free space for adequate air circulation On the upper part of the appliance the air is coming out so try not to cover the opening for the outflow air A mm B mm C mm 516 840 1446 1450 653 1033 1775 17...

Page 21: ...tom hinge without a plug Insert the filling plug and the washer in the reverse order into the hole for the bottom hinge on the opposite side of the appliance Put the freezer door on the bottom hinge Turn the bottom hinge of the refrigerator door by 180 insert the hinge and the washer into the hole of the corner cap on the freezer door and fasten it Use the same procedure for the top hinge of the f...

Page 22: ...hinge of the refrigerator door 3 Top strip 4 Bottom hinge of the refrigerator door 5 Top hinge of the freezer door 6 Washer 7 Bottom hinge of the freezer door 8 Bottom hinge filling plug of the freezer door 9 Slider guide 10 Corner cap with a hole 11 Corner cap without a hole ...

Page 23: ... on the kitchen unit door some 15 mm from the edge using the A 4 x 12 screws Fig 3 Remove the slide guides and separate the appliance door from the door of the kitchen unit Fix the slides and be careful not to move them while fixing Fig 4 Fix the slide guides to the original position Close the door and check the gasket it should not be creased The door should open and close smoothly Fix the applia...

Page 24: ...Mounting Instructions 15 Fig 1 Fig 2 Fig 3 Fig 4 Fig 5 Fig 6 ...

Reviews: