background image

HRX-OM-K021 


To the Customers 


Thank you for purchasing our THERMO CHILLER HRW Series (hereinafter called “This system”). 


For the long-term, safe use of this system, be sure to read and understand this manual in addition to another 

operation manual (HRX-OM-K003) thoroughly before performing operation of this system.   


z

 This manual provides only the explanation of operation procedure to use the additional function of 

Thermo-Chiller HRW***-**-D (optional model of DeviceNet

TM

 communication). For warnings, precautions, 

installation and fundamental operating procedure of this system, please refer to another operation manual 

(HRX-OM-K003). 


z

 The contents of this manual explain the additional information to following chapters of another operation 

manual (HRX-OM-K003). 

·

Chapter 5 System Operation: Addition of operating procedure to use DeviceNet

TM

 communication. 


z

 The contents of this manual and related documents supplied with this system shall be neither regarded as a 

provision of the contract nor utilized to correct or modify the existing agreements, commitments and relations. 


z

 For the details of DeviceNet

TM

 communication, please refer to communication specifications (HRX-PS-K019). 


z

 The contents of this manual and related documents supplied with this system shall be neither regarded as a 

provision of the contract nor utilized to correct or modify the existing agreements, commitments and relations. 


z

 Copying, duplicating or transferring any part of or whole contents of this manual without the prior written 

consent of SMC Corporation is strictly prohibited. 


Note: The contents of this manual are subject to change without notice. 

Summary of Contents for HRW D Series

Page 1: ...viceNet communication This manual should be used in addition to another operation manual HRX OM K003 HRW002 H HRW008 H HRW015 H HRW030 H HRW002 H1 HRW008 H1 HRW015 H1 HRW030 H1 HRW002 H2 HRW008 H2 HRW015 H2 HRW030 H2 HRW002 HS HRW008 HS HRW015 HS HRW030 HS HRW002 H1S HRW008 H1S HRW015 H1S HRW030 H1S HRW002 H2S HRW008 H2S HRW015 H2S HRW030 H2S Save This Manual Carefully for Use at Any Time 2007 SMC...

Page 2: ...of another operation manual HRX OM K003 Chapter 5 System Operation Addition of operating procedure to use DeviceNetTM communication z The contents of this manual and related documents supplied with this system shall be neither regarded as a provision of the contract nor utilized to correct or modify the existing agreements commitments and relations z For the details of DeviceNetTM communication pl...

Page 3: ...OM K021 HRW Series Table of Contents 1 Summary of HRW D 1 1 1 DEVICENET COMMUNICATION 1 2 Operation Screen 2 2 1 OPERATION SCREEN 3 2 1 1 Menu screen 1 3 2 1 2 Mode Selection screen 3 2 2 SYSTEM OPERATION 4 ...

Page 4: ......

Page 5: ...iceNet communication And the value of TEMP PV FLOW PV PRESS PV DI PV 1 and running alarm conditions are also outputted The function of DeviceNet can be used when DNET REMOTE mode is selected on communication mode setting 1 Applicable when circulating fluid automatic recovery function option is selected 2 Value of DI PV is displayed when only DI control kit option is selected For details of DeviceN...

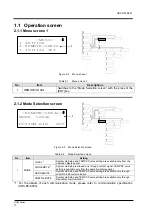
Page 6: ...tion of operating procedure to use the DeviceNet communication Selection of communication mode is conducted on Mode Selection screen shown in figure 2 1 Operating procedure for the others please refer to the operation manual HRX OM K002 Figure 2 1 Flow Chart of Operation Screen ...

Page 7: ... only from the operation display panel DIO REMOTE 1 System start stop is allowed only through contact signal TEMP SP value setting is available only from the operation display panel SER REMOTE 1 System start stop and TEMP SP value setting are available only through serial RS 485 communication 1 MODE DNET REMOTE System start stop and TEMP SP value setting are available only through DeviceNet commun...

Page 8: ...y the Menu screen 1 Figure 2 5 Menu screen 1 2 With the use of the arrow keys move the cursor to 2 REMOTE LOCAL in Menu screen 1 Figure 2 6 Menu screen 1 3 Press the ENT key The Mode Selection screen is displayed Figure 2 7 Mode Selection screen MENU 1 SETTING 2 REMOTE LOCAL 3 INITIAL SET REMOTE LOCAL MODE LOCAL CUSTOM DIO OFF MENU 1 SETTING 2 REMOTE LOCAL 3 INITIAL SET ...

Page 9: ...ction press the SEL key not ENT key With the press of the SEL key the cancellation takes effect and screen is switched to the Menu screen 1 6 Press the ENT key The selection takes effect Figure 2 10 Mode Selection screen DNET REMOTE 7 Press the SEL key to display the Menu screen 1 I 8 0 18 REMOTE LOCAL MODE DENT REMOTE CUSTOM DIO OFF REMOTE LOCAL MODE LOCAL CUSTOM DIO OFF I 8 0 18 REMOTE LOCAL MOD...

Reviews: