background image

2

(732) 730-9880

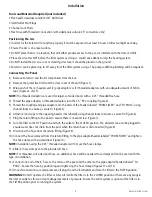
How SolarArc

2

Works:

Water flows from your pool’s filter into the bottom left corner
(inlet) of the SolarArc

2

.  A baffle built into the lower header pipe

of the SolarArc

2

forces the water up through the left half of the

unit. When the water reaches the SolarArc

2

’s upper header pipe, it

flows to the right and back down through the right half of the
SolarArc

2

.  As the water travels through the SolarArc

2

, it is heated

by the sun.  The heated water then flows out of the bottom right
corner (outlet) of the SolarArc

2

and back to your pool.

SK26 Installation Kit

A       2        1

1

2

” - 1

1

4

” Pipe Adaptors

B       2        Threaded PVC End Caps

C       4        1

1

2

” Stainless Steel Clamps

D       1        3

3

4

” Long Rubber Hose

E       1        Teflon Tape 1/2”
F        2        1

1

2

” FF PVC Couplings

G       1        6

 Flex Hose

H       2        Soft-Sided Pool Adapters

         1        Installation Manual w/Warranty Statement

A

B

C

D

E

G

H

F

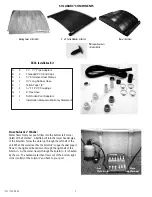
SOLARARC

2

COMPONENTS

Base 

(SC202BASE)

Glazing Cover 

(SC202COVER)

2' x 2' Solar Collector 

(SCPNL202)

Plastic push-in rivets

(SC204FASTENER)

Summary of Contents for SolarArc S202

Page 1: ...uctions can cause injury death or damage to persons or property Ensure all plugs are removed and the filter is turned to the Filter position prior to operating the Solar Arc Install the Solar Arc far enough away from the pool to prevent it from being used as a way to gain access to the pool Do not install the Solar Arc in a traffic area as it could become a tripping hazard Do NOT allow children to...

Page 2: ...water travels through the SolarArc2 it is heated by the sun The heated water then flows out of the bottom right corner outlet of the SolarArc2 and back to your pool SK26 Installation Kit A 2 11 2 11 4 Pipe Adaptors B 2 Threaded PVC End Caps C 4 11 2 Stainless Steel Clamps D 1 33 4 Long Rubber Hose E 1 Teflon Tape 1 2 F 2 11 2 FF PVC Couplings G 1 6 Flex Hose H 2 Soft Sided Pool Adapters 1 Installa...

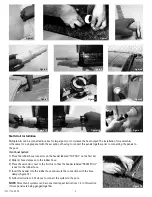
Page 3: ...he header labeled FROM FILTER and TO POOL using channel locks to ensure a secure fit Figure 5 6 Attach 2 end caps to the opposing header not labeled using channel locks to ensure a secure fit Figure 6 7 Plug the return fitting to the pool to ensure there is no water loss Figure 7 8 Turn the filter to the OFF position and turn the valve to the CLOSED position The skimmer can also be plugged to ensu...

Page 4: ... on the first Arc 2 Slide 2 hose clamps onto the rubber hose 3 Place the second Arc next to the first Arc so that the header labeled FROM POOL is next to the rubber hose 4 Insert the header into the rubber hose and secure the connection with the hose clamps Figure 13 5 Follow instructions 2 13 above to connect the system to the pool NOTE More than 2 systems can be connected repeat instructions 1 4...

Page 5: ...tion and turn the valve to the CLOSED position The skimmer can also be plugged to ensure water does not drain from the pool when the return hose is disconnected Figure 8 3 Loosen the hose clamps or threaded coupling for some soft sided hoses that connect the pool hoses to the pipe adapters of the collector 4 Loosen the end caps to allow the water to drain out of the headers 5 Turn the unit on its ...

Page 6: ... in transit unless damage to shipping container is noted at time of delivery on the transport company s delivery bill SMARTPOOL LLC SHALL IN NO WAY BE LIABLE OR RESPONSIBLE UNDER ANY CIRCUMSTANCES OR IN ANY AMOUNT FOR ANY CONSEQUENTIAL OR INCIDENTAL DAMAGES OR FOR ANY INJURY OR DAMAGES TO PERSON OR PROPERTY USING OR USED IN CONNECTION WITH THIS PRODUCT OR FOR LOSS OF PROFITS OR OTHER COSTS OR EXPE...

Reviews: