Smarthome LampLinc Plus 2000SLS Manual Download Page 4

Setting the Primary Address

Each LampLinc requires a primary PLC address to operate. It ships from the factory
with “A1” as the default address; it will also have this address after performing a fac-
tory reset. Any of the 256 PLC addresses can be programmed.
The LampLinc does not use flimsy code wheels or dials to set its primary address.
Instead, it will accept the first address it finds on the powerline once the programming
mode is started. Any PLC-compatible transmitter can be used to set the primary
address.

1.

Press and hold the Set Button

above the green

indicator on the right side of the module for 5 sec-

onds until the Green Status LED begins flashing

and the lamp goes to 100% brightness. 

2. Within 30 seconds, 

transmit the desired primary

address

(house code and unit code) from any

transmitter. When LampLinc receives the address,

the lamp's light will blink.

3. Set the Local Control Feature by 

sending an ON or

OFF

Command (see page 9 for more details).

a) Sending an 

“ON”

command immediately after

the house and unit code will activate the load

detect feature. (Recommended)

b) Sending an 

“OFF”

command immediately after

the house and unit code will disable the load

detect feature (recommended for lamps with

compact fluorescent bulbs).

4. Once the LampLinc has received a valid address and either an “ON” or “OFF”,

the light controlled by the LampLinc will blink and the Green Status LED will

stop flashing.

Controlling the Lamp Remotely

The LampLinc responds to any of the 256 PLC/X10 addresses. The LampLinc will
respond to ON, OFF, ALL LIGHTS ON, ALL UNITS OFF, PRESET DIM, BRIGHT, and DIM
commands. The LampLinc can be controlled remotely from any compatible transmitter
by sending its base address (e.g., M6) and the command.

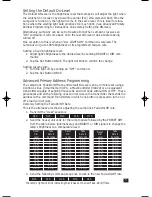
Setting the Fade-On/Off Rate (Optional)

The “Fade-On/Off” is the speed at which LampLinc brings
the brightness of the light up or down when the module is
turned on locally or receives a powerline carrier (PLC) ON or
OFF command to its primary address. The Fade-On/Off is
adjustable from .1 seconds to nine minutes. The factory
default is about three seconds. It may be changed at the
module or remotely. (See Advanced Primary Address
Programming for instructions on REMOTELY setting the
Fade-On/Off Rate.)

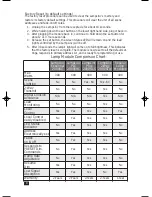
At the module, the Fade-On/Off: adjustable from .1 to nine seconds:

1. Turn on and 

adjust the lights brightness

so that the brighter the light, the

faster the Fade-On/Off. Refer to the table for more details.

2. Tap the 

Set Button TWICE

The light will blink to confirm the change.

4

Brightness

Level

90-100%

77-87%

65-74%

52-61%

39-48%

26-35%

13-23%

1-10%

0%

Fade Rate

in Seconds

0.1

0.2

0.3

0.5

2.0

4.5

6.5

8.5

9.0

Tip: 

If you have trouble com-

municating to the

LampLinc, there may be a

lot of signal activity on the

powerline. Unplug trans-

mitters that send signals

that might be intercepted

by the module during the

programming sequences.

RF transceivers, computer

controllers, and X10 ther-

mostats should be

unplugged to avoid inter-

ference.

LampLink Plus& PLC for web (Mar04).qxd  3/15/2004  9:58 AM  Page 4

Summary of Contents for LampLinc Plus 2000SLS

Page 1: ...LampLincTM Intelligent lamp modules packed with features For models 2000SLS LampLinc Plus 2000SLS3 LampLinc Plus with ground pin 2000SHL LampLinc PLC 2000SHL3 LampLinc PLC with ground pin ...

Page 2: ...0 watts Responds to 65 different X10 PLC PowerLine Carrier signals Plus models only 32 levels of dimming and 32 fading on off rates No tools or hardwiring into the electrical system Pass through receptacle on the front for other un controlled electrical devices Green Status LED indicator shows powerline activity Codes are electronically set no code wheels and remembered even if unplugged Two year ...

Page 3: ...2 Send the X10 PLC signal from any transmitter within 30 seconds 3 Send an ON to enable local control OR 4 Send an OFF to disable local control see page 4 for more detailed instructions Setting the Fade On Off Rate 1 Turn on the lamp 2 Seconds 2 Adjust the dim level Brighter faster dimming 3 Double tap the Set Button press it TWICE quickly see page 4 for more detailed instructions Setting the On D...

Page 4: ...een Status LED will stop flashing Controlling the Lamp Remotely The LampLinc responds to any of the 256 PLC X10 addresses The LampLinc will respond to ON OFF ALL LIGHTS ON ALL UNITS OFF PRESET DIM BRIGHT and DIM commands The LampLinc can be controlled remotely from any compatible transmitter by sending its base address e g M6 and the command Setting the Fade On Off Rate Optional The Fade On Off is...

Page 5: ...ault On Level can be remotely set using a ControLinc Duo Smarthome 4071 a Maxi Controller 4020 or an equivalent transmitter capable of sending Housecode and Unit Code without ON or OFF These procedures and all the following ones will not work with a transmitter that sends the address with a command Transmitters in which one button is pressed to turn on or off a load will not work Remotely Setting ...

Page 6: ... Smarthome products SwitchLinc 2 Way and Plus Dimmers SwitchLinc RX Plus Dimmers KeypadLincTM with Integrated Dimmer SwitchLinc 2 Way Switches ToggleLincTM 2 Way and Plus Dimmers SwitchLinc Timer ApplianceLincTM 2 Way Plus Modules SwitchLinc Relay 2 Way The scenes for all these modules can be setup simultaneously using the same pro gramming sequence Signals sent by transmit enabled Smarthome produ...

Page 7: ...new Fade On Off Rate has been set Other Options All LampLinc models only Disable Programming Once the LampLinc is set up it can be programmed to lockout any changes Any changes made at the module by pressing the Set Button or remotely will be ignored Please note that all LampLinc and SwitchLinc that are plugged in or electri cally active will be locked out 1 Send the following command sequence to ...

Page 8: ...t the factory reset is complete The module is now reset to all the default set tings responds to primary address A 1 and is ready for programming or use LampLinc Essential 2000SC LampLinc PLC 2000SHL LampLinc Plus 2000SLS LampLinc 2 Way 2000STW Regular Lamp Modules Max Watts 300 400 400 400 300 Scene Lighting No No Yes 64 Yes 64 No 2 Way Transmit No No No Yes No Signal Collision Avoidance N A N A ...

Page 9: ...t of a duplex wall receptacle if plugged into the top outlet If possible use the bottom outlet for the lamp module so that the other outlet is accessible for other use For convenience a pass through receptacle has been supplied on the lamp module so you don t lose a receptacle If the LampLinc is plugged into a receptacle controlled by a wall switch consider leaving the switch on at all times This ...

Page 10: ... in my North American wall outlet Problem Solution Check scene membership and remove any unwanted scenes from LampLinc or perform a Factory Reset to clear it Install an PLC Signal Blocker in the home to keep PLC signals from neighboring homes from interfering Set a new fade on rate Increase brightness press set button twice Re set the primary address by sending the house and unit code fol lowed by...

Page 11: ... design power supplies build in traps to filter out and kill electrical noise Unfortunately the PLC signals looks like electrical noise to these devices The result is that a large percent of the transmitted signal is lost to these devices leaving less for the receivers The most common sources of signal loss are Televisions Computer systems Audio Video gear Computer UPS s and power strips Power sup...

Page 12: ... of Seller s liability with respect to this product For repair or replacement during the warranty period call Smarthome customer service to receive an RA return authorization number properly package the product with the RA clearly printed on the outside of the package and send the product along with all other required materials to Smarthome Inc ATTN Receiving Dept 16542 Millikan Ave Irvine CA 9260...

Reviews: