background image

Chapter 3

Inserting objects in Whiteboard


mode

smarttech.com/kb/170973

12

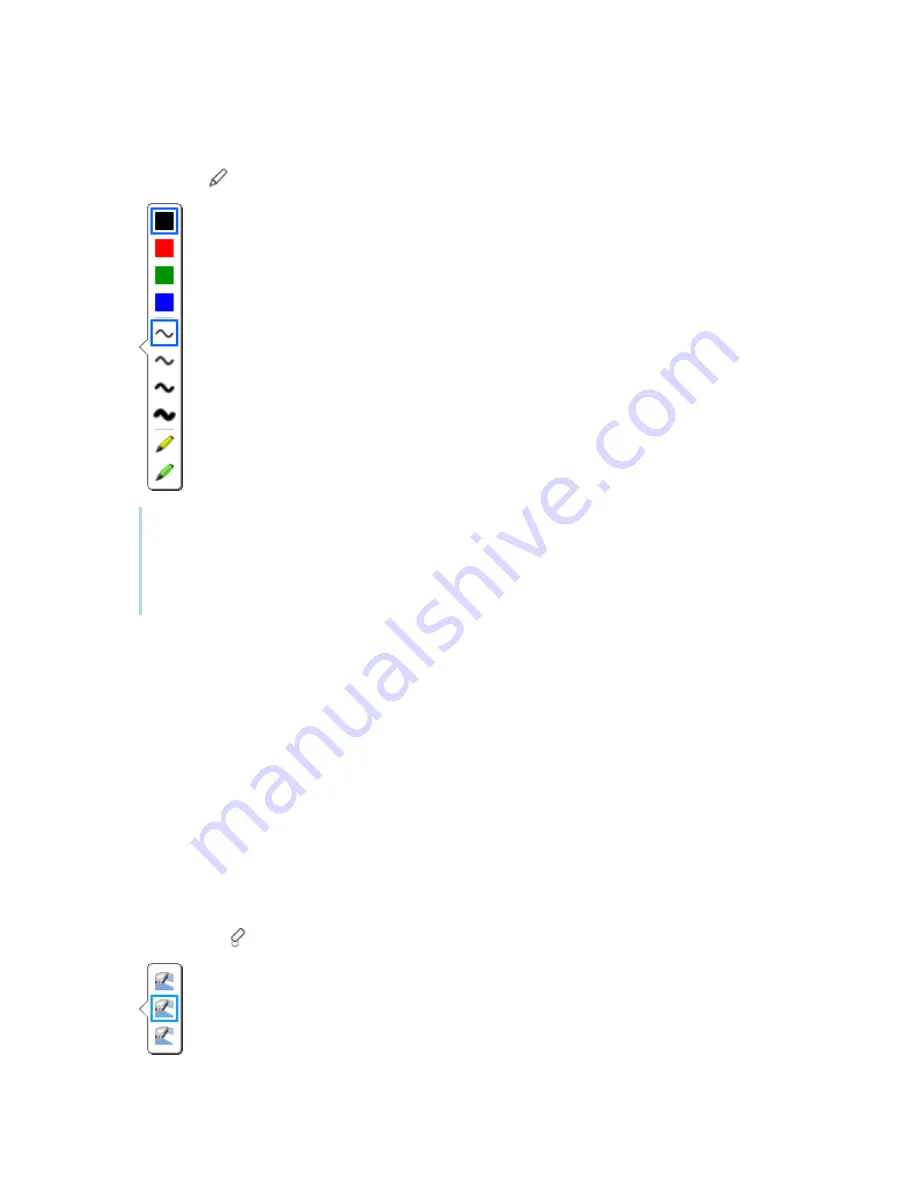
To write or draw in digital ink when not connected to a SMART interactive display


1.  Press 

Pen

 on the SMART Business Toolbar, and then select a color and line thickness.

Tips


o

You can also select a transparent yellow or green highlighter.


o

You can write or draw in either calligraphic ink or regular ink (see 

Changing Whiteboard 

mode settings

 on page


56).


2.  Write or draw in digital ink.

Erasing digital ink

You can erase digital ink using your interactive display’s eraser or the Eraser tool.

To erase digital ink when connected to a SMART interactive product


Use the SMART interactive product’s eraser and SMART


Ink (see 

About the other SMART


software 

on your computer

 on page


7).

To erase digital ink when not connected to a SMART interactive product


1.  Press 

Eraser

 on the SMART Business Toolbar, and then select an eraser size.

Summary of Contents for Meeting Pro 4

Page 1: ...smarttech com kb 170973 1 SMART Meeting Pro 4 User guide Personal license...

Page 2: ...tlook are either registered trademarks or trademarks of Microsoft Corporation in the United States and or other countries All other third party product and company names may be trademarks of their res...

Page 3: ...in digital ink 11 Erasing digital ink 12 Creating shapes and lines 13 Typing editing and formatting text 14 Converting handwriting to typed text 15 Inserting images 16 Inserting PowerPoint presentati...

Page 4: ...files 44 Saving files 45 Printing files 46 Emailing files 47 Chapter 7 Sharing content using the Business Gallery 49 Finding and using content in the Business Gallery 49 Using stock content 50 Adding...

Page 5: ...Sorter 6 About the other SMART software on your computer 7 Resources for users 7 Help 7 Training 7 Support center and knowledge base 7 This chapter introduces you to SMART Meeting Pro software and to...

Page 6: ...ing notes presentations or other materials to share during the session Save any materials you create in a Whiteboard file and attach the file to your Microsoft Outlook meeting invitation During the se...

Page 7: ...Apps screen and then scroll to and select SMART Technologies SMART System Menu OR In Windows 10 operating system press Start and then scroll to and select SMART Technologies SMART System Menu To exit...

Page 8: ...mode you re using Tool Command Action Desktop mode Whiteboard mode Pan Pan and zoom in or out No Yes1 Select Select move and manipulate objects on a Whiteboard page Yes Yes Pen Select pen colors and w...

Page 9: ...mmand No Yes Normal View Restore the Whiteboard page to Normal view No Yes2 Previous Page Display the previous page of the current file You can also press the PAGE UP key on your keyboard No Yes3 Next...

Page 10: ...board view and to view the Business Gallery Insert Allows you to add blank pages images and links to your file Object Allows you to lock group flip order and change the properties of objects Help Prov...

Page 11: ...n meetings and connect with others Resources for users In addition to this guide other resources are available for SMART Meeting Pro software users Help For more information about SMART Meeting Pro so...

Page 12: ...tive display To view the computer s desktop and use its applications press Desktop on the SMART Business Toolbar to enter Desktop mode Tip If you re using a room license and there are multiple interac...

Page 13: ...isplays If the computer is connected to multiple interactive displays you can move applications from one display to another using the Organizer or the Window Shift buttons Moving applications across d...

Page 14: ...se in a multiple display system you can use the Window Shift buttons to move an application to another display Because applications can appear on only one display at a time this feature allows you to...

Page 15: ...rting PDF files 17 You can insert the following types of objects in SMART Meeting Pro software l Digital ink l Shapes and lines l Text l Images l PowerPoint presentations l PDF files Writing and drawi...

Page 16: ...ligraphic ink or regular ink see Changing Whiteboard mode settings on page 56 2 Write or draw in digital ink Erasing digital ink You can erase digital ink using your interactive display s eraser or th...

Page 17: ...nd lines To create a shape 1 Press Shapes on the SMART Business Toolbar and then select a shape Note If you don t select a shape SMART Meeting Pro software uses the last shape or line you selected 2 C...

Page 18: ...SHIFT key as you draw the line To resize a line while maintaining its angle hold down the SHIFT key as you resize the line Typing editing and formatting text In Whiteboard mode you can create typed te...

Page 19: ...ey Tips o You don t need to change the position of rotated text before you edit it Double click the text object to make it rotate to a horizontal position making it easier to edit As soon as you press...

Page 20: ...s as typed text Note You can also select multiple handwritten words and then convert them all to typed text Inserting images You can easily insert images in Whiteboard pages where you can then move si...

Page 21: ...ach slide in the PowerPoint file on its own page Navigate from slide to slide by pressing Next Page and Previous Page in the Page Sorter see Displaying pages on page 34 OR If you re displaying pages i...

Page 22: ...MART Meeting Pro software places all pages in the PDF file on a single page in the Whiteboard file If you re displaying pages in Unbound Workspace you can navigate PDF pages by pressing Next Bookmark...

Page 23: ...3 Locking objects 24 Cutting copying and pasting objects 25 Cloning objects 25 Resizing objects 26 Using the resize handle 26 Using the scale gesture 27 Rotating objects 28 Using the rotation handle 2...

Page 24: ...bject is a rotation handle see Rotating objects on page 28 The downward arrow in the object s upper right corner is a menu arrow Press the menu arrow to display a menu of commands Note Pressing an obj...

Page 25: ...t Select All Selection rectangles appear around all objects on the page Note If some of the objects are locked see Locking objects on page 24 you select only the unlocked objects Changing objects prop...

Page 26: ...Line Style Select a line style solid dashed and more The Start and End properties let you put arrowheads circles squares or diamonds at the beginning or end of a line No No Yes No No Transparency Sele...

Page 27: ...want to move 2 Drag the object or objects into the Page Sorter and onto the thumbnail of the page you want to move the objects to Rearranging stacked objects If objects overlap on a page you can rear...

Page 28: ...ackward in the stack 1 Select the object 2 Select the object s menu arrow and then select Order Send Backward Locking objects You can lock an object to prevent its modification movement or rotation Yo...

Page 29: ...e object s menu arrow and then select Cut Note If the object is locked select Edit Cut see Locking objects on the previous page 3 If you want to paste the object onto a different page display that pag...

Page 30: ...CTRL key selecting the object and then dragging the object Resizing objects You can resize objects on a page Note Locked objects cannot be resized see Locking objects on page 24 Using the resize handl...

Page 31: ...he lower right corner of the selection rectangle 3 Drag the resize handle to increase or decrease the objects size Using the scale gesture You can also make objects larger or smaller with the scale ge...

Page 32: ...n handle Note Locked objects cannot be rotated see Locking objects on page 24 Using the rotation handle To rotate an object 1 Select the object 2 Press the object s rotation handle and then drag it in...

Page 33: ...bjects 2 Using one finger on each hand press the screen at opposite ends of one of the objects 3 Move your fingers in a circle Flipping objects You can flip an object on a page Note Locked objects can...

Page 34: ...ite or draw multiple lines SMART Meeting Pro software automatically combines the lines into a single object For example if you write the letters of a word SMART Meeting Pro software combines the indiv...

Page 35: ...bsite link to a file To unlink an object 1 Right click the object and then select Link The Insert Link dialog box appears 2 Press Remove Link 3 Press OK Creating standalone links As an alternative to...

Page 36: ...ick the object and then select Delete Deleting objects Although you can erase digital ink see Erasing digital ink on page 12 you remove some types of objects such as text shapes lines and images by de...

Page 37: ...g bookmarks 42 Rearranging pages 43 Deleting pages 43 Whiteboard files consist of one or more pages You can create additional pages rearrange pages and delete pages You can also display pages in diffe...

Page 38: ...u can display any page in a Whiteboard file using the Page Sorter or Organizer You can display the next or previous page using buttons To display a page using the Page Sorter Press the thumbnail of th...

Page 39: ...face elements You can still access commonly used commands using the minimized SMART Business Toolbar Note Depending on how you or the system administrator configured SMART Meeting Pro software pages m...

Page 40: ...t and making all the content visible at the same time in the viewable area Unbound Workspace Pages have no defined boundaries and the page area can be significantly larger than the viewable area Brain...

Page 41: ...3 37 Zooming To zoom in or out using the Zoom In and Zoom Out buttons Press Zoom In to zoom in OR Press Zoom Out to zoom out To zoom in or out using multitouch gestures Drag your fingers away from eac...

Page 42: ...m kb 170973 38 To return to 100 magnification Double click the whiteboard area OR Press Zoom to 100 Tip If the page contains more content than can be displayed at 100 magnification double click the wh...

Page 43: ...teboard mode smarttech com kb 170973 39 Panning while zooming To pan while zooming 1 Drag your fingers away from each other to zoom in OR Drag your fingers toward each other to zoom out 2 Move your fi...

Page 44: ...radar view o Use the buttons at the bottom of the radar view window to insert and navigate bookmarks o You can move the radar view window by pressing and dragging its top side o You can resize the rad...

Page 45: ...sn t visible press Show Radar View on the SMART Business Toolbar 2 Pan and zoom to the location where you want to insert the bookmark 3 Press Add Bookmark To rename a bookmark 1 If radar view isn t vi...

Page 46: ...the Next Bookmark and Previous Bookmark buttons Navigate to the next bookmark by pressing Next Bookmark OR Navigate to the previous bookmark by pressing Previous Bookmark Note If you navigate to a boo...

Page 47: ...ss Toolbar and then select the Pages tab 2 Press the thumbnail of the page you want to move in the file A blue border appears around the thumbnail 3 Drag the thumbnail to its new position in the Pages...

Page 48: ...ate or open another Whiteboard file any time you like Notes l SMART Meeting Pro software creates new files in the fcw format but you can save the files in various formats see Saving files on the next...

Page 49: ...your files in any of the above formats as well as in image formats jpg bmp png and gif Notes l SMART Meeting Pro 4 0 and later software and SMART Meeting Pro PE software can open fcw files l If you a...

Page 50: ...the features of the original file To save an existing file with a new name or location 1 Select File Save As The Save As dialog box appears 2 Browse to the folder where you want to save the file 3 Ty...

Page 51: ...se the email feature you must have Microsoft Exchange integration enabled or your computer s default email client configured Please see the system administrator to confirm availability of these featur...

Page 52: ...A dialog box appears 2 Type a name for the Whiteboard file in the File name box 3 Select a file format from the File type drop down list Note You can attach the Whiteboard file in fcw pdf ppt and ppt...

Page 53: ...in the Business Gallery or search for content by keywords You can also contribute your own content to the Business Gallery This makes SMART Meeting Pro software a simple but effective way to share co...

Page 54: ...The Business Gallery contains an extensive collection of stock content including templates for brainstorming decision making and meeting management and shapes and icons for flow charts and notes You...

Page 55: ...cations so that only specified users can view add change and delete the content in them For example you could create a network location for accounting content and secure it so that only users in the a...

Page 56: ...see Inserting images on page 16 l Shapes see Creating shapes and lines on page 13 After you have added an item you can change its name and keywords to make it more searchable or delete it from the Bus...

Page 57: ...ress OK Exporting your content After you have created your folders and added content to them you can export your content This is useful when you have set up content on one room computer and want to tr...

Page 58: ...Meeting Pro software You can change the following administrator settings l General settings l Whiteboard mode settings l Business Gallery settings Important You must have administrator rights to acces...

Page 59: ...ppears 4 Type your current password and new password in the appropriate text boxes 5 Press OK Changing general settings You can change general settings for SMART Meeting Pro software including the fol...

Page 60: ...d a meeting This control is not applicable to personal licenses In exit dialog box select Log off option Select the check box to log off by default when users end a meeting This control is not applica...

Page 61: ...sers want all content to be visible at the same time in the viewable area SMART recommends that you select Unbound Workspace Default whiteboard layout Select Normal to display Whiteboard pages in Norm...

Page 62: ...s If you disable automatic saving users Whiteboard files will not be automatically saved and recovered if the software stops running unexpectedly 4 Press OK Changing Business Gallery settings You can...

Page 63: ...to be saved N A Additional gallery folders To add a new content folder press Add and then browse to and select the folder To change an existing folder select it press Edit and then browse to and selec...

Page 64: ...og box appears 2 Select the shortcut type in the Shortcut type drop down list 3 Type a name for the shortcut in the Name box 4 Press Browse browse to and select the application file document file or f...

Page 65: ...will point to the new path in the Programs button menu the next time you start SMART Meeting Pro software To modify a shortcut s name 1 Access the Menu Customization window 2 Select the shortcut in t...

Page 66: ...ator where you want it to appear The new separator appears in the Programs button menu the next time you start SMART Meeting Pro software To restore default settings Access the Menu Customization wind...

Page 67: ...r join online meetings and present your SMART Meeting Pro software personal license files to others at those meetings Others can write draw and erase digital ink in your files To start Bridgit softwar...

Page 68: ...smarttech com kb 170973 SMART Technologies smarttech com support smarttech com contactsupport...

Reviews: