background image

4

2000i-DVS Installation Guide

The NEC VT465 Projector

CAUTION

Do 

not

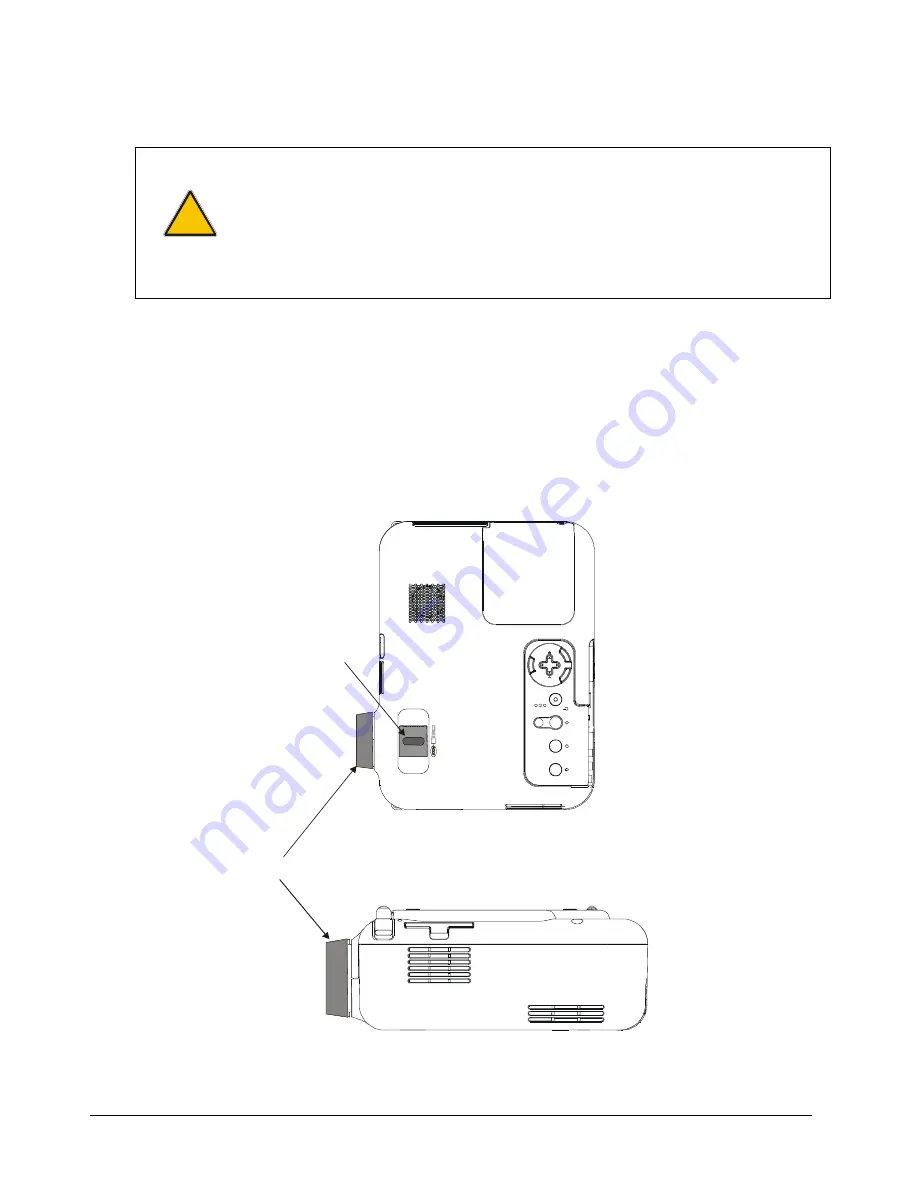
 adjust the blue ring that surrounds the short-throw, customized projector

lenses, even though the 

NEC VT465 User’s Manual 

states that you should use this

ring to obtain the best focus. You must disregard this information. If you move the

blue ring, you may cause the lenses to separate. 

Rather, use the Zoom lever on the projector, which has been modified to adjust the

image focus. Again, contrary to the 

NEC VT465 User’s Manual

, the Zoom lever will

not adjust the image size on the screen. 

The NEC VT465 projector is secured upside-down on the projector platform. For optimal performance
in the 2000i, the projector has been changed in two significant ways from the description of how it
works in the 

NEC VT465 User’s Manual

:

  The Zoom lever does 

not

 change the size of the projected image. Instead, it functions as a Focus

lever. 

  The blue ring no longer adjusts focus, and you should not move it under any circumstances.

Moving this ring may cause the lenses to separate.

Do not move this ring!

Bottom View (Upside-Down)

Side View

Adjust focus with this lever

VI

D

EO

S-V

ID

EO

AU

TO

AD

J.

RG

B

EN

TE

R

C

AN

CE

L

SE

LE

C

T

ME

NU

LA

M

P

ST

AT

US

PO

W

ER

ON

/S

TA

ND B

Y

Summary of Contents for 2000i-DVS

Page 1: ...Interactive Whiteboard Guide Installation ...

Page 2: ... this equipment in a residential area is likely to cause harmful interference in which case the user will be required to correct the interference at his own expense SMART Board DViT X Port Notebook and the SMART logo are trademarks of SMART Technologies Inc Windows is either a registered trademark or a trademark of Microsoft Corporation in the U S and or other countries All other third party produ...

Page 3: ... Kinder direkt in den Lichtstrahl blicken キャビネット内のプロジェクターは 高輝度光源です ビーム光線を覗き込んだり 直接 見たりしないでください お子様がビーム光源を覗き込まないように注意してください WARNING Lock the casters and extend the anti tip feet before you use the unit Otherwise the 2000i could tip over Bloquez les roulettes et étendez les pieds avant d utiliser l appareil Autrement le 2000i risque de basculer et de tomber Bloquee las ruedas y extienda los pies aju...

Page 4: ...TISSEMENT pour les clients européens Le 2000i doit être utilisé uniquement avec les systèmes de distribution d alimentation européens TN et TT Le 2000i ne convient pas aux systèmes de distribution d alimentation plus anciens de type IP utilisés dans certains pays européens Ce système type IT est largement utilisé isolé de la terre dans certaines installations en France avec une impédance à la terr...

Page 5: ... Move the unit with care Quick stops excessive force and uneven surfaces can overturn the unit 2 When you transport the 2000i only ship it in an upright position and never lay the interactive whiteboard face down 3 If you transport the 2000i over a distance we strongly urge you to completely repackage it using the original packaging This packaging was designed with optimal shock and vibration prot...

Page 6: ... during electrical storms or if you won t use it for an extended period of time 11 This product has a three wire grounding type plug which will only fit into an AC grounding type power outlet Make sure an AC socket outlet is near the 2000i and remains easily accessible during use If you are unable to insert the plug into the outlet have your electrician replace the obsolete outlet Do not circumven...

Page 7: ...librating the Cameras DViT Technology 23 Connecting a Guest Laptop 23 Connecting a VCR or DVD Player 24 Connecting an External Sound System 25 Connecting an External Monitor or Projector 26 Basic Operations 27 Starting Up the 2000i 27 Startup Scenarios 28 Putting the 2000i on Standby 29 Adjusting the Height of the Interactive Whiteboard 30 Adjusting the Volume 31 Changing the Display Source for th...

Page 8: ......

Page 9: ...e and to send this information to the computer which translates it as mouse clicks or electronic ink Features A touch sensitive rear projection interactive whiteboard that enables you to do everything you can do at a computer workstation open files conference with others create new documents or edit existing ones visit Internet sites play video clips etc simply by touching the screen You can also ...

Page 10: ...ing to Know Your 2000i Major Components of the 2000i Projector Lockable Casters x 4 Your Computer Storage Tray Extendable Anti Tip Feet x 4 SMART Pen Tray Control Panel Laptop Shelf Height Adjustment Handle Removable View Port Projector ...

Page 11: ...ded styluses have black tips because the digital cameras can more readily detect dark objects If you need to use a different stylus choose one with a dark tip Press the top pen tray button to make the SMART Keyboard appear for on screen typing and handwriting recognition Press the bottom button to make the next contact with the interactive whiteboard a right click You can reconfigure these buttons...

Page 12: ... lever will not adjust the image size on the screen The NEC VT465 projector is secured upside down on the projector platform For optimal performance in the 2000i the projector has been changed in two significant ways from the description of how it works in the NEC VT465 User s Manual The Zoom lever does not change the size of the projected image Instead it functions as a Focus lever The blue ring ...

Page 13: ...he projected image for rear projection 3 Select Image Auto Keystone Off to ensure optimal image quality 4 Select Advanced High Speed Fan Mode Off While this is a default setting it s sufficiently important to warrant special mention 5 Select Advanced Page2 Auto Adjust On to automatically determine the best resolution for the current RGB input signal compensating for resolution differences among va...

Page 14: ... which the screen appears black even though the projector lamp remains on allowing you to quickly restore the display by pressing any button on the Control Panel After three minutes the lamp cools down for 60 seconds and then powers off You can skip this three minute reversible standby period by pressing and holding the Lamp Off button for three seconds To power up the projector lamp press the Lam...

Page 15: ...olume Down button to decrease the volume The 2000i retains your settings for each source The default volume is 0 To restore this default press the and buttons simultaneously Source Buttons You can use the source buttons to switch the video and audio sources for the projector and cabinet audio amplifier Please note that switching sources takes a few seconds and all buttons on the Control Panel are ...

Page 16: ...packing Instructions 2 Unpack the remaining contents of the shipping carton and wheel the unit to a location that s within reach of a power source NOTE Leave enough space around the unit to comfortably perform the following assembly and connection procedures 3 Lock the casters by pressing down on the caster lock tab unlock the casters by pressing up on this tab as shown in the figure below A Locke...

Page 17: ...er Bloquee las ruedas y extienda los pies ajustables antes de utilizar la unidad De no hacerlo la pantalla 2000i podría volcarse Sichern Sie die Rollenbremsen und fahren Sie die Sicherheitsstützen aus bevor Sie das Gerät verwenden Andernfalls könnte das 2000i umkippen ユニットをご使用になる前に キャスターをロックして 脚を伸ばしてください それ 以外の場合は 2000i がひっくり返る可能性があります 5 Remove the bag that surrounds the projector 6 Remove the loc...

Page 18: ...male country specific AC cable Computer and Power Cables 3 Connect the Computer 1 Video Out cable to the Monitor Video connector 4 Connect the Computer 1 Audio cable to the Audio Line OUT connector 5 Connect the Computer 1 Serial cable to an available COM port NOTE To connect a computer that has no available serial port connect the SMART USB adapter between the Computer 1 Serial cable and the USB ...

Page 19: ...alignment on the interactive screen Then install the SMART Board software CD configure the COM port and perform a brief orientation procedure To do this complete the procedures on the pages that follow NOTE You should leave the computer and the projector on at all times so the projector is either in use with the lamp illuminated or in standby mode However you can set the computer to save power dur...

Page 20: ...dows taskbar point to Settings and select Control Panel 2 Double click Display and click the Screen Saver tab 3 Under Energy saving features of monitor click the Settings or Power button The Power Management Properties or Power Option Properties dialog box appears 4 Select After 1 hour from the Turn off monitor list NOTE This is a recommended setting You can select any duration you want 5 In the T...

Page 21: ...reen Complete the four adjustment procedures that follow only as required For the first three adjusting image roll adjusting the image laterally and adjusting the image size you must watch the image on the back of the screen while making adjustments You ll also need to remove the view port cover attached with hook and loop fastener strips to access the adjustment hardware at the rear of the unit L...

Page 22: ...the view port Position for Adjusting Image Roll 2 While carefully observing the bottom edge of the image at the right side use the supplied 7 16 nut driver to loosen or tighten the nut that s located on the right side of the projector plate as required see the following figure Using the Nut Driver to Adjust Roll Roll Adjustment ...

Page 23: ...ed image through the view port Position for Adjusting the Image Laterally 2 Using the supplied 7 16 nut driver loosen the two nuts that are located on the left side of the projector plate Using the Nut Driver to Adjust the Image Laterally 3 Slide the projector plate to the right or left and then tighten the two nuts ...

Page 24: ...the three Torx M4 security screws that secure the projector to the projector plate NOTE You ll find these screws on the top of the projector plate one at the front of the projector and two at the back Loosen the Three Hex Screws to Change Image Size To access the single screw at the front of the projector you must reach through the view port to the front of the projector and maneuver the security ...

Page 25: ...ey through the access hole watch it from the back to see when it engages with the screw 3 Slide the projector backward or forward to alter the image size 4 When the image is a good size tighten all three screws that you previously loosened NOTE Screen Removed for Clarity Access Hole for Screw at the Front of the Projector ...

Page 26: ...vered with a plastic cap on the right side of the Electronics Tray Loosening the Bolt to Move the Image Up or Down 3 Remove the plastic cap that covers the access hole If the cap seems tight carefully pry it off with a screwdriver inserting the screwdriver into the small opening at the top of the cap 4 Loosen and tighten the bolt inside the access hole with the supplied 7 16 nut driver to adjust t...

Page 27: ...nt handle for laptop use or higher up on the frame for use with a videoconferencing camera You can also install the shelf on either side of the unit Shelf Height Option To install the videoconferencing laptop shelf 1 Remove the plastic hole covers at the location where you want to mount the shelf Removing the Hole Covers Videoconferencing Height Laptop Height ...

Page 28: ... If the computer resolution is set to anything other than this optimal resolution you may not see the entire image or the image may be too small to fill the screen even with further adjustments To set your computer resolution to match the projector resolution Windows operating system NOTES You may need to perform the following procedure using your computer monitor as resolution differences can imp...

Page 29: ...oftware At the end of the installation you can choose to put a shortcut to SMART Board software in your Startup Folder We recommend that you do so Then the SMART Board tools will always be open and your interactive whiteboard will be fully functional whenever you start up your system 2 Click Yes to insert a shortcut to SMART Board software in the Startup folder or click No to prevent SMART Board s...

Page 30: ...sitive You can write over any projected application with a pen tray stylus To orient the interactive whiteboard Click the SMART Board icon and select Orient and then follow the on screen instructions You can also access this feature by clicking the Orient button on the Boards tab of the SMART Board Control Panel To change the orientation precision 1 Click the SMART Board icon and select Control Pa...

Page 31: ...the Advanced button The Edit Advanced Board Settings dialog box opens 3 Press the DViT Settings tab 4 Press the Calibrate button The four point calibration screen appears 5 Press and hold your finger on the center of each target until the target moves After you press the final target a message appears followed immediately by the orientation screen 6 Complete the orientation procedure 7 Press OK Th...

Page 32: ... the Projector NOTE If you re using an S video cable connect it to the S video Out connector on the VCR DVD player and then plug the other end directly into the S video IN connector on the projector 4 Connect standard red and white RCA stereo audio cables not provided from the RCA Audio outputs on the VCR DVD player to the two Auxiliary Audio IN jacks on the rear of the 2000i Keep your right and l...

Page 33: ...D player and press the Play button Connecting an External Sound System To deliver preamplified or low level sound to an external room sound system Connect standard red and white RCA audio cables not provided from the RCA Audio inputs on the external sound system to the two Audio OUT jacks on the rear of the 2000i Keep your right and left channel connections correct for stereo sound Connecting Audi...

Page 34: ...tor To direct the RGB output from the host computer or guest laptop to an external projector or monitor Connect an HD DB15 video cable not provided from the external projector or monitor to the RGB OUT port on the back of the projector This connection is for RGB output only ...

Page 35: ... entering your user name and password at the logon screen NOTE To preserve the computer s hard drive s and the projector lamp you may want to put the computer hard drive and the monitor interactive screen into standby mode Refer to page 11 for instructions To start up the 2000i 1 If the screen is black press the Lamp On button on the Control Panel to power up the projector lamp The On LED indicato...

Page 36: ...reen remains 1 Turn the computer on or press the computer s reset button The logon screen appears 2 Log on as usual using the connected keyboard Screen is black On LED is blinking slowly No action is necessary The projector lamp is in the process of powering up and the logon screen will appear after approximately 60 seconds Screen is black Off LED is blinking rapidly The projector lamp is in rever...

Page 37: ...tton on the Control Panel After three minutes the lamp powers off and cools down for 60 seconds To skip the three minute reversible period press and hold the Lamp Off button for three seconds Release the button and the lamp powers off and enters a 60 second cool down period Perform this procedure at the end of a meeting or presentation and at the end of the day If you prefer you can also shut down...

Page 38: ...m height of 83 210 8 cm from the floor When you reach the top and bottom limits of the adjustment range you can t turn the handle any further To gauge the height of the unit as you turn the height adjustment handle or to adjust it to a particular height watch the height finder that is located on the side of the unit just above the handle Height Finder Location of the Height Finder NOTE If the comp...

Page 39: ... is 69 175 3 cm from the floor Be careful not to lower the unit on top of your computer Adjusting the Volume Volume adjustments are made for the active display source and are made independently of other sources When you switch to another input source the 2000i retains settings you made for the first input source for when you switch back Volume Up Volume Down To adjust the volume 1 Press and hold t...

Page 40: ...rnal computer source is active you can also make Notebook software and the SMART Board tools instantly appear by pressing the Notebook software button on the Control Panel Internal Host Computer Guest Laptop VCR DVD Player Notebook Software NOTE Switching sources takes a few seconds and during that time all buttons on the Control Panel are disabled To switch to the connected VCR or DVD player Pres...

Page 41: ...ient the interactive whiteboard you re ready to use the 2000i To get the most from your interactive whiteboard you should have both the SMART Board tools and Notebook software open and running SMART Board Tools The SMART Board tools provide all the SMART Board functionality beyond basic touch control and pen tray button use Specifically the SMART Board tools provide you with annotation and tool co...

Page 42: ...lette includes a number of tools that you won t find in your pen tray such as tools for producing a right mouse click displaying a large pointer producing a spotlight capturing your annotations and restoring cleared annotations You can edit the default palette of tools and save this customized palette in a user profile that you can activate each time you use the interactive whiteboard Right Click ...

Page 43: ...cks up a pen tray stylus the other person can use their finger to write in the same color To enable disable Multipointer Mode 1 Press the SMART Board icon in the system tray and select Control Panel The SMART Board Control Panel opens 2 In the Boards tab press the Advanced button The Edit Advanced Board Settings dialog box opens 3 Press the DViT Settings tab 4 Select the Enable Multipointer Mode c...

Page 44: ...t cloth Dry erase ink contains solvents that work to remove permanent ink If any trace of the original permanent ink remains spray the area with standard glass or whiteboard cleaner and wipe clean The back of the interactive whiteboard screen is well protected from handling by its location on the inside of the unit However if it must be dusted or if a mark has been made on its surface dab it gentl...

Page 45: ...3000 hours of eco mode operation as the projector will turn off automatically and go into standby mode after 2100 hours normal mode or 3100 hours eco mode To find out how many hours of lamp use remain go to the projector menu press the Menu button on the remote control or projector and select Information Page3 Remaining Lamp Time Replacing the used lamp with a new lamp automatically clears the lam...

Page 46: ...se fluids will damage the diffusion coating and permanently reduce the display quality WARNING To avoid an electric shock do not remove any screws except the two lamp case screws Pour éviter tout risque de choc électrique ne retirez aucune vis à l exception des deux vis d accès aux lampes Para evitar descargas eléctricas no quite ningún tornillo excepto los de las dos lámparas Um einen elektrische...

Page 47: ...ble General Inquiries Main Switchboard 1 888 42 SMART toll free in Canada U S or 1 403 245 0333 all other countries Fax 1 403 228 2500 E mail info smarttech com Address SMART Technologies Inc Suite 600 1177 11th Avenue SW Calgary AB CANADA T2R 1K9 Returning Defective Merchandise All Rear Projection SMART Board 2000i interactive whiteboards are covered by a one year limited equipment warranty The i...

Page 48: ...are responsible for transporting the product to and from the service center Registration A User Registration card was included with your 2000i To help us serve you fill in and mail this card to SMART Technologies Inc or register online at www smarttech com registration ...

Page 49: ...ntrol Panel Features 6 Customer Support 39 D DViT technology 1 E External Monitor or Projector Connecting a 26 External Sound System 25 Connecting a 25 F Features 1 Floating Tools 34 Clear Annotations Button 34 Restore Annotations Button 34 G Guest Laptop 23 Guest Laptop Connection 23 H Host Computer 10 Connecting a 10 I Image Adjustment Adjusting Roll 14 Adjusting the Image Laterally 15 Changing ...

Page 50: ...Shutting Down the 2000i 29 SMART Board Cleaning 36 Configuring 21 Orienting 21 SMART Board Software 21 SMART Board Tools 33 Source Buttons 7 Starting Up the 2000i 27 Startup Scenarios 28 S video 24 Switching from the Host Computer to a Guest Laptop 32 Switching to the Host Computer 32 Switching to the VCR or DVD player 32 T Tip Feet Extending 8 U Using the SMART Board 33 V VCR or DVD Connecting a ...

Page 51: ... Calgary AB CANADA T2R 1K9 Main Switchboard 1 888 42 SMART Canada U S or 1 403 245 0333 all other countries Support Tel 1 866 518 6791 Canada U S or 1 403 228 5940 all other countries Support Fax 1 403 806 1256 support smarttech com www smarttech com ...

Reviews: