


12
PMWT-660/680 Installation Guide
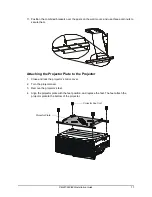
5. Insert the four No. 8-32 × 1" TORX screws through the four small holes in the projector plate,
and anchor them in the projector’s matching screw holes
by hand
until they are snug. Then,
using the supplied TR20 TORX security hex key, tighten the screws another half turn.
Attaching the Projector to the Projector Support
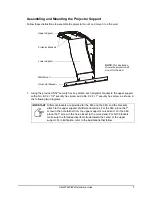
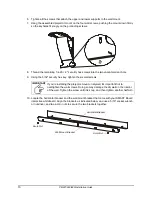
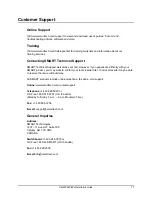
1. While an assistant supports the projector from below, align the projector plate with the
projector brackets that extend from the upper support of the projector wall mount. Position the
projector so that each bracket’s screw holes are visible through the slots in the projector
plate’s vertical flanges.
CAUTION
Do not overtighten these screws, and do not use a power tool to insert them. If
you do, you could damage your projector. These screws are not the main
attachment between the projector and the projector plate. They make the
projector less susceptible to theft and provide a backup support in case the feet
attachments fail. It’s normal for the screws to protrude a significant distance
after you’ve tightened them.
Slot in Projector Plate
Screw Hole in
Projector Bracket
Summary of Contents for PMWT-660
Page 21: ......


