background image

Coding Transmitters

Note:

  \There is no need to store buttons individually into 

memory. By coding a transmitter into the openers 

memory it automatically defaults to Button 1 for full 

access and Button 2 for pedestrian mode.

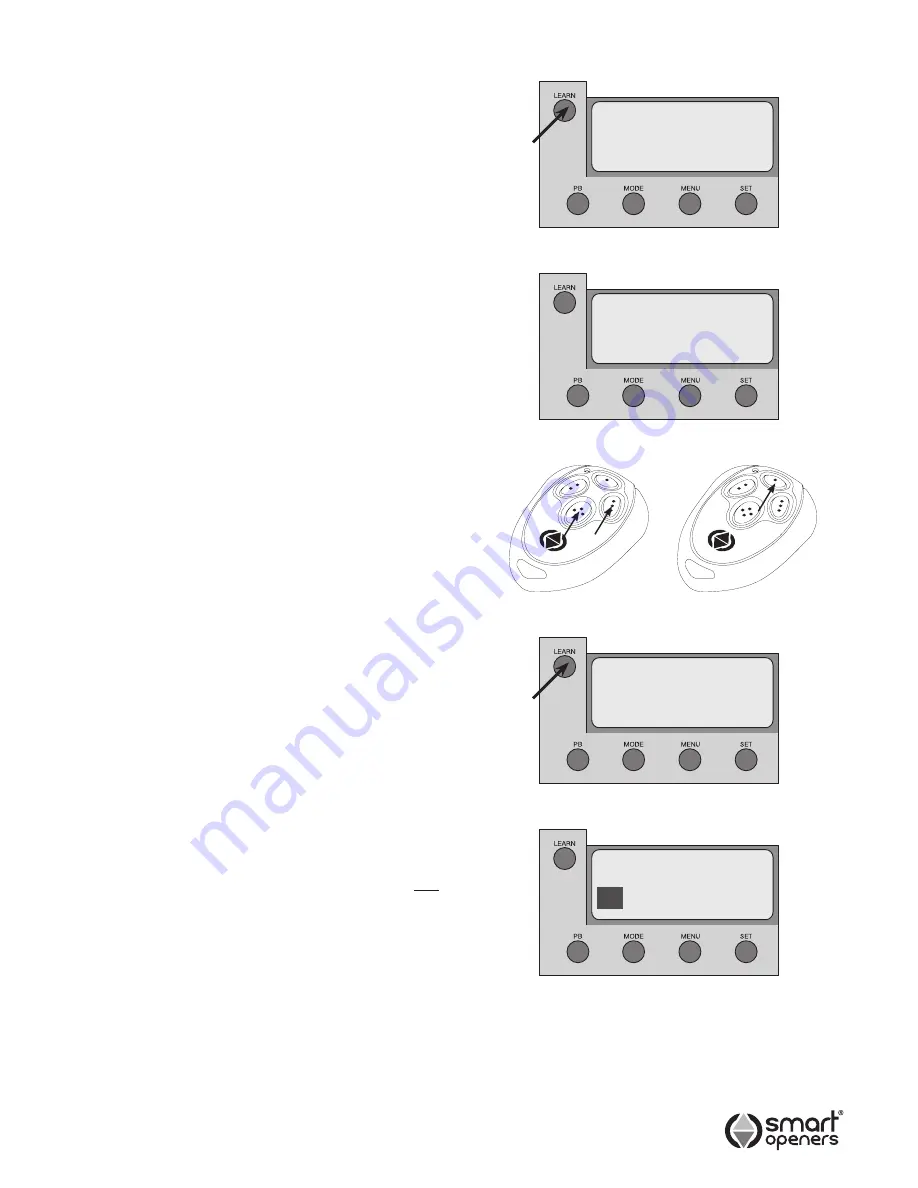
1.

   Press LEARN, the LCD displays 

Code Learn

Press any button on the transmitter, the LCD will 

display 

Remote 001

2.

   Press the same button again, the display will show 

Code Set

.

Note:  

Code Learn

 will display for 5 secs after last TX 

is coded to store additional TXs. If maximum code 

storage capacity is reached (200 transmitters) the 

display will show 

Code Full

.

Remote TX Coding (Hands Free Learning) 

It is possible to code a new transmitter via an already coded 

remote without being in contact with the control panel. 

1. 

Ensure Hands Free Learning is enabled (page 14).

2.   

Press TX Buttons 3 + 4 together for 2 secs. The 

opener will beep to signal Code Learn Mode.

3.   

Press any button on new transmitter twice (Fig. 9). 

The opener will beep to confirm code learned.

Deleting One Transmitter


1.

   Press and hold LEARN for 5 seconds. The LCD will 

display 

Del Remote All

2.

   Press SET to scroll up or PB to scroll down to the 

desired transmitter number - 

Remote 023

3.

   Press and hold LEARN for 3 secs to confirm. The 

stored code has now been deleted.

Replacing One Transmitter


1.

   Press LEARN. The LCD will display 

Code Learn

.

2.

   Press transmitter button once, the LCD will display 

the previously deleted number e.g. 

Remote 023

Press Button again to confirm.

Deleting All Transmitters


1.

   Press and hold LEARN for 5 seconds. The LCD will 

display 

Del Remote All

2.

   Press and hold LEARN dor 3 secs to confirm. All 

stored codes have now been deleted.

Transmitter Button Allocation


The Smart Slider is factory preset with TX Button 1 operating 

full access (PB) and Button 2 for Pedestrian Mode (PD). 

Note:

  The following procedure alters these settings for ALL 

coded transmitters.

1.

   Press MENU for 3 secs. Press SET to cycle through 

to Transmitter Allocation menu (Fig. 11). The LCD will 

display functions on the first line and button allocation 

on the second.

2.

   Press PB to cycle through buttons 1–4 (0 to disable).

Note:

  To allocate 

ALL BUTTONS

 to the same function 

press and hold PB until display show 

All

.

3.

   Press MENU to allocate the button and move to the 

next function and repeat as required.

4.

  Press MODE to save and exit to normal operation.

Note:  

If a button is already allocated to one function it will 

not be available for any other.

Code Learn

PB PD OP CL

01

 04 00 00

Remote 001

Del Remote
All

Fig. 7

Fig. 8

Fig. 10

Fig. 11

-9-

Existing 

Remote

Uncoded 

Remote

Fig. 9

Summary of Contents for Smart Slider

Page 1: ... THE SAFETY OF ALL PERSONS INSTALLING AND USING THIS OPENER TO FOLLOW THE INSTALLATION INSTRUCTIONS AND SAFETY WARNINGS FAILURE TO COMPLY MAY RESULT IN SERIOUS PERSONAL INJURY AND OR PROPERTY DAMAGE AND FAILURE OF THE OPENER SYSTEM INSTALLATION MANUAL V2 08 ...

Page 2: ... Specifications Warranty 2 3 3 4 5 7 7 8 9 11 11 11 12 12 12 13 13 14 14 14 15 15 16 16 16 17 To the extent that they may be lawfully excluded Smart Openers Pty Ltd hereby expressly excludes all conditions and warranties statutory or otherwise which may be implied by law as conditions or warranties of purchase of a Smart Openers Pty Ltd Gate Opener Smart Openers Pty Ltd hereby further disclaims an...

Page 3: ...aim whatsoever suffered by any person as a result whether directly or indirectly from failure to install the system correctly and in accordance with the relevant safety standards and installation manual For a more detailed list of the Safety Warnings and safety issues associated with the installation and use of a Smart Slider gate opener refer to the safety warnings in the OWNERS MANUAL No Package...

Page 4: ...or for pulse magnetic lock 14 Connector for DC flashing light or similar 5A max 15 Connector for DC courtesy light or similar 5A max 16 Connector for solar panel or external DC charger 17 Connector for controller power from transformer Welcome to Smart Openers 1 2 3 4 5 LEARN P B MODE MENU SET 6 7 8 Com Push Btn Pedestrian Stop Close Open M2 Open Limit Com M2 Close Limit M1 Open Limit Com M1 Close...

Page 5: ...re understood before attempting to install the Smart Slider 7 Before starting the installation carefully analyse all the risks relating to automating the gate Verify that the gate to be automated is in a sound condition and that the mechanisms are in good working order observe the safety margins and minimum distances 8 Evaluate with particular care the safety devices to be installed and where to i...

Page 6: ...nion gear and mark the fixing holes The rack should start about 25mm from the edge of the gate Fig 2 2 Repeat the above for the entire length of the gate 3 Ensure that all rack sections mesh together for smooth operation Fixing The Limit Cam 1 Disengage the opener by releasing the key latch and moving the manual release arm out at a 90 angle 2 Move the gate to the desired open position Place a lim...

Page 7: ...under the driveway Note The opener allows either Motor 1 or Motor 2 to open first therefore the side that has the master is not fixed Motor 1 acts as the Master controller therefore no cable connections need to be modified for motor control and limits Connect 5 core cable from Motor 2 to Motor 1 controller as per wiring diagram Fig 4 Fig 4 LEARN P B MODE MENU SET Com Push Btn Pedestrian Stop Close...

Page 8: ...Quick Reference Guide Use the table below as a reference to guide you through the menu system and parameters Sliding Gate SC Vx xx Positions Not Set Fig 5 Fig 6 Menu Item Factory Default Options 1 Motor Single Motor Single Dual 2 Installation Right Hand Right Left 3 Pedestrian Mode Off On Off 4 Lock Pulse Pulse Hold Magnetic 5 Obstruction Setting 03 00 09 6 Open Speed 80 50 100 by 5 7 Close Speed ...

Page 9: ... and hold LEARN for 3 secs to confirm The stored code has now been deleted Replacing One Transmitter 1 Press LEARN The LCD will display Code Learn 2 Press transmitter button once the LCD will display the previously deleted number e g Remote 023 Press Button again to confirm Deleting All Transmitters 1 Press and hold LEARN for 5 seconds The LCD will display Del Remote All 2 Press and hold LEARN dor...

Page 10: ... speed until it reaches the open limit switch It will then close automatically until the closed limit is reached 3 The gate will now automatically measure time current and force margin required to close and open It will open then close at full speed then open again and return to the closed position 4 Display will show Set Up Complete Fig 14 After 5 seconds the display will will change to normal op...

Page 11: ...gate at half speed until it reaches the open limit switch Then Motor 2 will open the second gate leaf at half speed until it reaches the open limit switch Then Motor 1 will close the gate until the closed limit is reached followed by Motor 2 3 The gate will now automatically measure time current and force margin required to close and open It will open at half speed then close at full speed then op...

Page 12: ... to motor start Hold Mode output 12V once motor has stopped Setting Obstruction Margin The Obstruction Force Margin sensitivity is extremely important for user safety Make sure that where possible the minimum or default force required to allow the gate to travel without phantom reversing is used Smart Openers strongly recommend that the gate is properly serviced rather than increasing the force ma...

Page 13: ...ay 5 Press PB or transmitter button 1 Motor 2 will start to close 6 When the gate leaf reaches the desired point where you would like Motor 1 to commence closing press button again 7 Motor 1 will start to close and this time delay will be stored in memory Note If an error is made during this procedure i e unwanted delay time press PB or transmitter button while the gate is moving to cancel the tim...

Page 14: ...it Setting Auto Close Timer Delay Auto Close Time delay is used with Auto Close Mode to allow the gate to close automatically after the timer has elapsed Note Auto Close Mode must be enabled to use this function 1 Press MENU for 3 secs then SET to cycle though to Auto Close Delay 2 Press and hold MENU to increase or PB to decrease delay time in 5 sec increments Max 400 secs 3 Press SET to confirm ...

Page 15: ...off 2 To Re engage the Gate Your Smart Slider is equipped with an automatic re engagement mechanism By closing the latch and locking it into place the opener gearbox automatically re engages The opener will automatically recognise the gates position between the travel limits on the next operation Important Information for the User Once the Smart Slider opener has been installed the user must be in...

Page 16: ...rest to the end user No setting or adjustments contained in this manual should be carried out by the end user It is important for the installer to show their clients correct operational use of the Smart Slider including the use of the manual disengagement lever Inform the owner about the need for regular and accurate maintenance especially regarding a regular check of the safety and reversing devi...

Page 17: ...ulting from wear and tear c blown fuses loss or damage caused by electrical surges power surges or power spikes d loss or damage due to theft fire flood rain water lightning storms any acts of God contamination or pollution e door or gate not in safe and correct working order and condition f evidence of unauthorised repairs g any cost relating to damage caused deliberately or by misuse negligence ...

Page 18: ... 18 Notes ...

Page 19: ... 19 Notes ...

Page 20: ... an ongoing commitment to product quality and innovation Smart Openers reserves the right to change and alter specifications and model numbers and types without notice D N SLIM208170909 Smart Openers Pty Ltd PO Box 6666 GCMC Qld 9726 Tel 1300 366 547 Fax 1300 366 972 Email enquiries smartopeners com Web www smartopeners com ...

Reviews: