background image


CONTROL VIA ETHERNET 


StretcherPro

HD


TCP/IP


control


is


a


feature


that


allows


mode


switching


and


other


configurations


to


be


con

trolled


remotely


via


HTTP.


Manage


your


StretcherPro

HD


with


ease


on


your


LAN


or


from


anywhere


in


the


world.


First


you


must


find


the


IP


address


for


the


StretcherPro

HD


.


Finder.exe


(Smart


IP

Finder)


is


conveniently


available


on


our


web

site;


please


visit


www.smartavi.com/helpful

links.html


for


this


and


our


full


list


of


com

patible


third

party


software.


Download


and


execute


the


IP


address


Finder


software


for


your


product.


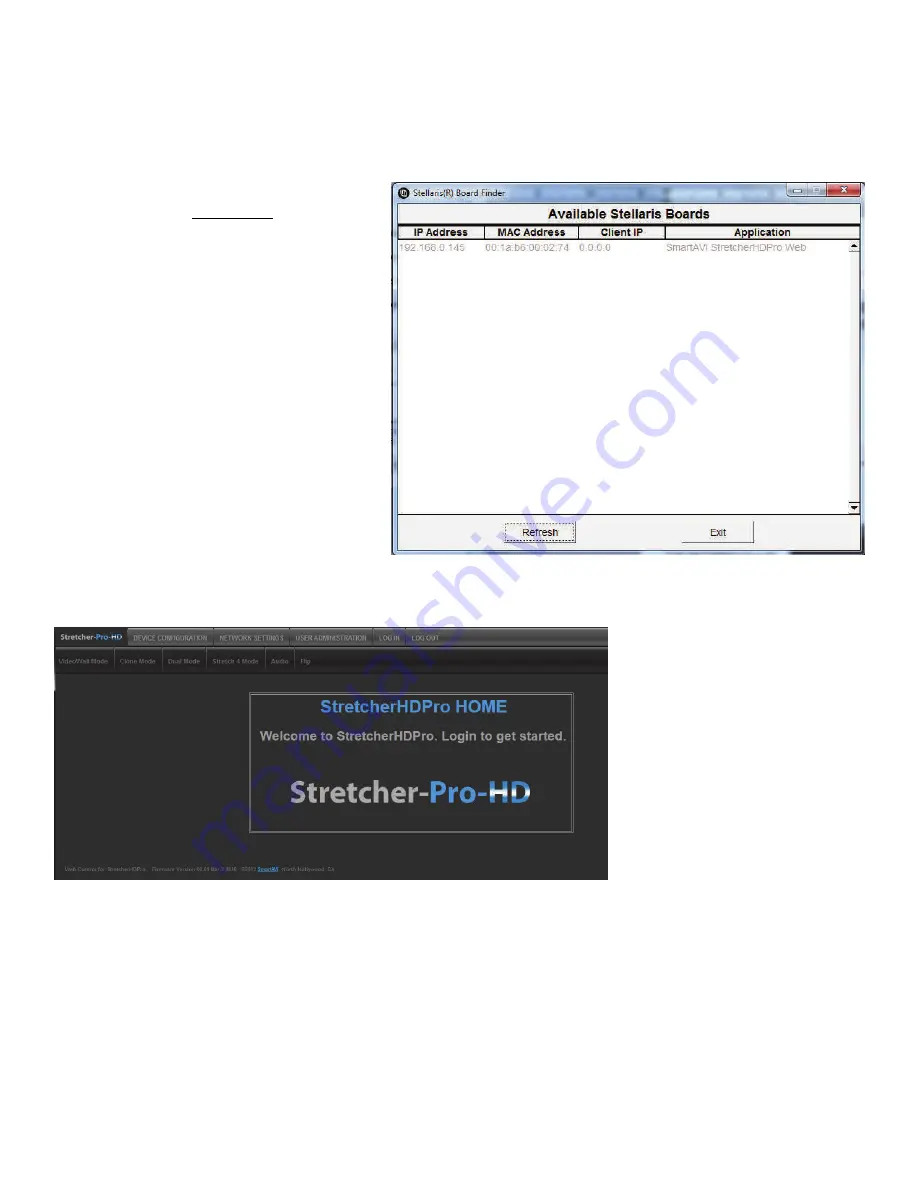
The


StretcherPro

HD


and


its


IP


address


should


appear


in


the


display


as


shown


in


Figure


9

1.


Figure


9

1


Figure


9

2


Enter


the


IP


address


into


a


web


browser


of


your


choice.


You


should


see


the


StretcherPro

HD


Home/Welcome


page


as


shown


in


Figure


9

2.


Click


the


LOG


IN


tab.


The


username


and


password


are


case


sensitive


and


can


be


changed.


The


default


user

name


and


password


are:


Username:


admin


Pasword:


1234


Summary of Contents for StretcherPro-HD

Page 1: ...1 Made in U S A www SmartAVI com 1 800 AVI 2131 StretcherPro HD User Manual HDMI DVI D 2x2 Video Wall Controller ...

Page 2: ... FRONT PANEL CONTROL 6 RS 232 CONTROL 7 IR REMOTE CONTROL 8 CONTROL VIA ETHERNET 9 LIMITED WARRANTY STATEMENT 10 Figure 2 1 WHAT S IN THE BOX PART NO QTY DESCRIPTION STRP HDS 1 StretcherPro HD CCPWR06 1 Power supply cord RMT 4KWL 1 IR Remote Control SM EYE NY 1 IR receiver 1 Quick Start Guide EN QKVM EAR P 2 Rack Mounting Brackets ...

Page 3: ...eo Wall mode dual horizontal 2x1 dual vertical 1x2 or clone the image 1 1 FEATURES Stand Alone Unit Requiring no Additional Hardware or Software Plug and play ready 4 Screen Multilayout Digital Signage Video Wall Controller Supports DVI D Input with converters Learns any EDID Internal EDID database Multiple configurations HDCP and HDMI 1 4 compliant Supports IR and RS 232 APPLICATIONS Video Walls ...

Page 4: ...gle Link Range 1080p Format HDMI 1 4 DVI Compliance Single link DVI D 2 0 Output Cable Length Up to 20 ft HDCP Compliance 1 0 2 0 Input Interface 1 HDMI Output Interface 4 HDMI Connector Type A 19 pin female CONTROL Front Panel Buttons RS 232 DB9 female Remote Control IR TCP IP Ethernet Control POWER Requirements 100 240 VAC MECHANICAL Height 1 875 in Width 17 in Depth 10 75 in Weight 4 4 lbs ...

Page 5: ...DMI monitors and TVs or HDMI to DVI adapters for DVI displays Connect the upper left display to port 1 the upper right display to port 2 the lower left display to port 3 and the lower right display to port 4 4 Connect the IR receiver to the IR input jack at the back of the StretcherPro HD 5 Optionally connect an RS 232 cable from the PC to the RS 232 port of the unit for additional control 6 Optio...

Page 6: ...zontally arranged screens two times over creating a unique and flexible horizontal display option DUAL VERTICAL Users can route the input image over two vertically arranged screens two times over creating a unique and flexible vertical display option Front Panel Buttons To switch to Video Wall mode press the WALL button To switch to Clone mode press the CLONE button To switch to Dual Horizontal mo...

Page 7: ...should see the name of your adapter and the COM port number in use Setting up the Terminal Application Run the terminal client of your choice such as HyperTerminal or PuTTY Select the correct COM port on the PC Use the following connection settings 115200 N 8 1 no flow control Once the connection is established type And hit Enter The StretcherPro HD should respond with a firmware version number an...

Page 8: ...NE ESC Exit OSD menu Navigate up thru the OSD options Navigate down thru the OSD options Select or execute Navigate OSD options Navigate OSD options INPUT OUTPUT E1 Internal EDID 1 E2 Internal EDID 2 EL Learn EDID from display on output 1 W 1 Wall Mode Press W then press 1 Q P I Clone Mode ...

Page 9: ... visit www smartavi com helpful links html for this and our full list of com patible third party software Download and execute the IP address Finder software for your product The StretcherPro HD and its IP address should appear in the display as shown in Figure 9 1 Figure 9 1 Figure 9 2 Enter the IP address into a web browser of your choice You should see the StretcherPro HD Home Welcome page as s...

Page 10: ...rt AVI Any replacement product could be new or like new provided that it has functionality at least equal to that of the product being replaced Smart AVI limited warranty is valid in any country where the covered product is distributed by Smart AVI B Limitations of warranty To the extant allowed by local law neither Smart AVI nor its third party suppliers make any other warranty or condition of an...

Page 11: ...warranties of merchant ability and fitness for particular purpose SmartAVI will not be liable for errors contained herein or for inci dental or consequential damages in connection with the furnishing performance or use of this material No part of this document may be photocopied reproduced or translated into another language without prior written consent from SmartAVI Technologies Inc 20160823 ...

Reviews: