


Page
3
Page
4
ASSEMBLY INSTRUCTIONS
WARNING: Risk of electrocution and severe burns.
DO NOT plug in the work light before completing assembly.
NEVER
operate the light with the lens cover off and the
halogen lamp exposed.
CAUTION
: DO NOT touch the bulb at any time.
Use a soft cloth. Oil from skin may damage bulb.
Your portable halogen work light requires some assembly.
F
ollow the following steps to complete the final assembl
y.
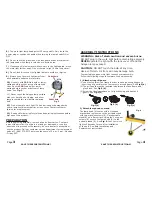
1) Attach wire grill guard
2) Attach lamp head to stand
The lamp head (A) comes with a U-shaped
bracket and is mounted to the portable stand
with two machine screws (E). Place portable
stand(B) on a flat surface. Using the 2 wing nut
screws (E), secure the lamp head (A) to the
portable stand (B). See
Fig. 4
. Your new work
light will be ready for use after installation
of the bulb. See Bulb Installation and
Replacement instructions.
SAVE THESE INSTRUCTIONS!
SAVE THESE INSTRUCTIONS!
5)
The work light lamp head gets HOT very quickly. Only touch the
power plug or cushioned handle when turning the lamp heads ON or
OFF.
6)
Do not touch the glass lens, wire lens guard or any metal part of
the lamp head when lamp is turned on to avoid burns.
7)
If exposed skin feels warm while you are in the lighted area, move
the work light farther away. Do not remain in light if skin feels warm.
8)
Do not look directly at the lighted lamps to avoid eye injuries.
9)
Always keep the work light away from
an
y flammable surfaces or materials.
10)
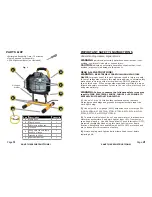
Use only with
300
-Watt bulb or lower
wattage bulb in socket at top of lamp head.
Use only with
300
-Watt bulb or lower
wattage bulb in socket at bottom of lamp
head. See
Fig. 2
.
11) Never touch the halogen lamp surface
with your bare hands. Unplug, and allow
lamp to completely cool before replacing
bulb.
12)
Do not operate work light if it has a missing or damaged wire
guard, lamp containment barrier or lens cover. Contact customer
service for a replacement.
13)
Read and follow all safety rules and operating instructions before
first use of this product.
PREPARATION
Before beginning assembly, remove all parts from carton. Compare
parts with parts list. If any part is missing or damaged, or you are
unsure how to proceed with assembly, do not attempt to assemble or
use the product. Call our customer service department for replacement
parts at 1 (888) 575-5272 between the hours of 9 a.m
.-5 p.m., Monday
-Friday PST.
300W bulb
Fig. 2
300W bulb
Fig. 4
E
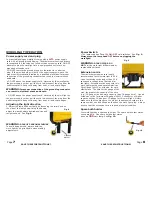
(1) you must unscrew the frame in order to have an enough space to
insert the grill guard into the four corners around frame; See
Fig.3(a)
(2) The grill guard must be inserted in between the face frame and
glass lens; See
Fig.3(b)
(3) Screw the face frame back on to light housing and tighten it
gently. See
Fig.3(c)
Fig.3(c)
Fig.3(b)
Fig.3(a)


