background image

SCREEN SETUP

1

SCREEN INFLATION

2

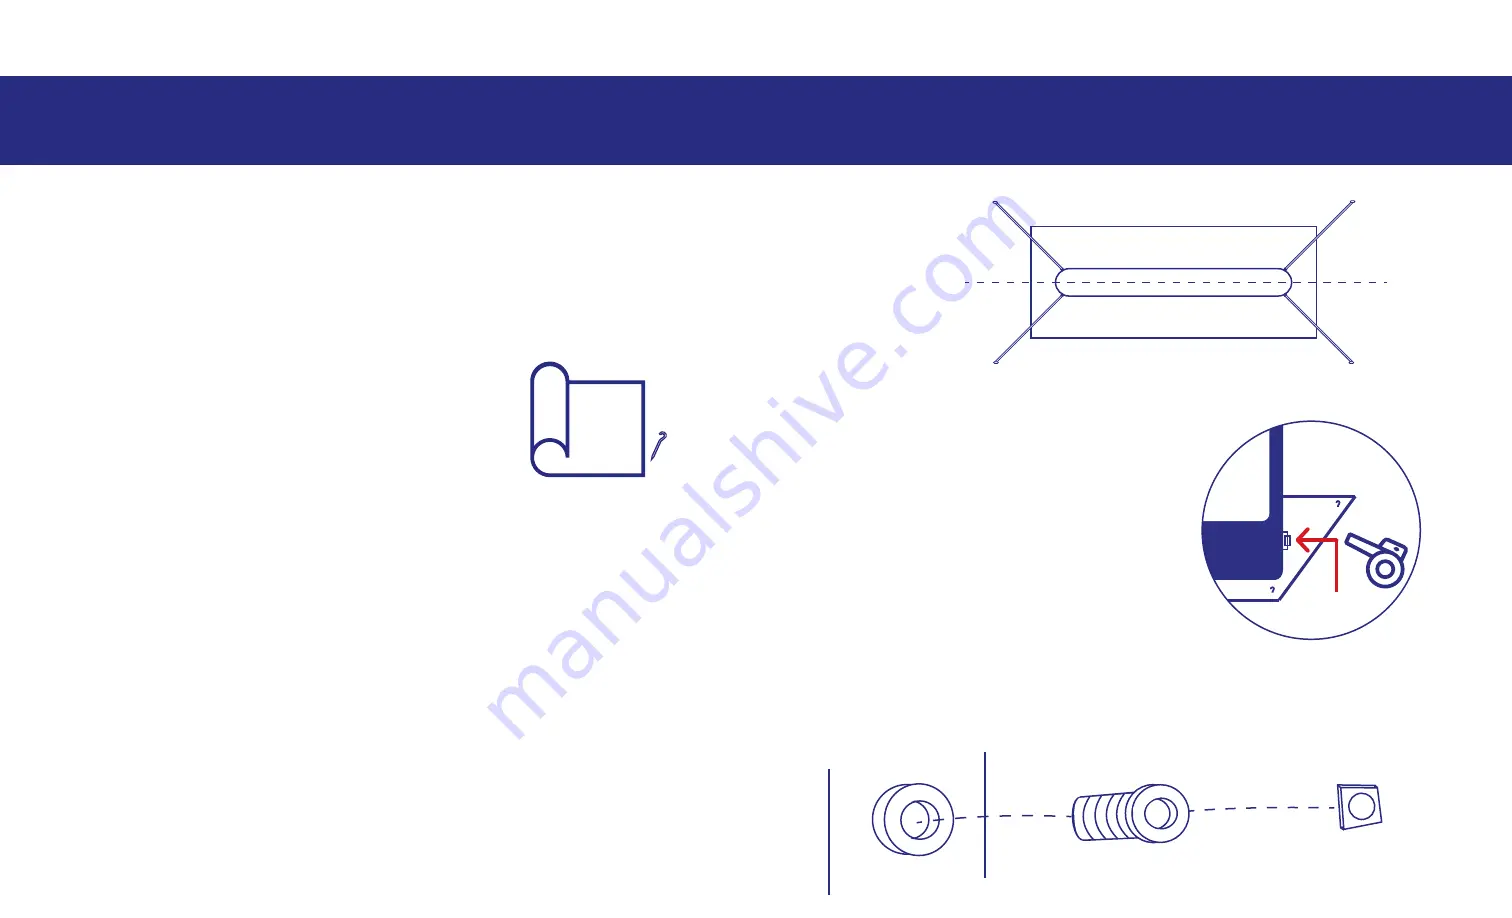
2. For added protection, we recommend the 

use of a tarp placed between the screen and 

the ground. This can be secured with small 

tent pegs. (protective tarp and pegs supplied 

as an option) 

Your screen has two one-way 

values – located on the left and 

right at the rear of the screen. 

Each valve can be fully removed 

for deflation or used via the 

access cap in the centre of the 

value for inflation. 

3. Remove the screen from the carry bag and unroll onto protective 

tarp or setup area. 

4. Remove the long tethers from the bag. Attach to the four D-rings 

located at the top of the inflatable screen (there are 2 on the left and 

2 on the right) using the metal clip end of the tether to attached to 

the D-rings on the screen. You may also have shorter tethers that 

can be secured to the bottom D-rings on the screen. 

 
5. Make sure there is plenty of slack in the tethers. 

 
6. Walk out about 2 to 3m with each tether in approximately 

45-degree angle from the screen. Then attach supplied pegs to the 

end of the tethers and drive the pegs into the ground. 


1. Decide on a location with enough space for the screen, projector 

and speakers, that is relatively flat. Allow for space either side of the 

screen area for tether points.

 (see video setup section on placement distances for projector) 

1. Make sure both valves are inserted and remove the inner access 

cap on one side.

Valves

Top view

Screen 

Valve

End-cap

Summary of Contents for HandiTheatre Home

Page 1: ...mble MORE FUN MORE MAGIC MORE ENTERTAINMENT Need further assistance Contact us Phone number 61 3 9729 6300 Website www smartdigital com au Facebook smart digital australia pty ltd Instagram SmartDigit...

Page 2: ...STEP BY STEP 1SCREEN SETUP VIDEO SETUP 3 5 CHECK LIST 7 SCREEN DEFLATION 2SCREEN INFLATION 4 AUDIO VISUAL SETUP 6SETUP PLAN VIDEO SETUP SCREEN PACKUP 8 10TROUBLE SHOOTING 9 11SCREEN CARE...

Page 3: ...PACKAGE INCLUDES Inflatable screen Inflation Blower Soundbar Speaker Projector LED Audio Cables Tethers HDMI Cable Protective tarp Stakes or Red White optional Projector Stand optional 4 8 optional...

Page 4: ...atable screen there are 2 on the left and 2 on the right using the metal clip end of the tether to attached to the D rings on the screen You may also have shorter tethers that can be secured to the bo...

Page 5: ...of setup and the threw distance place the projector at the appropriate distance from the screen on a stable surface this may be a projector table or stool For rear projection setup it is recommended t...

Page 6: ...ocess will vary depending on the projector model 8 For projectors with inbuilt apps or streaming you may not need to connect an external media source from step 3 but you will need to connect the proje...

Page 7: ...lp in adjusting the image to fit the screen 4 Use the keystone if your image seems bigger at the top or at the bottom to achieve a perfect rectangle 5 If using rear projection flip the image Normally...

Page 8: ...ver the rest of the screen frame 3 Fold the screen in half lengthways from top to bottom with the white screen surface front on the inside 4 The air pump can be used to help deflation and remove most...

Page 9: ...u have selected the correct input mode eg if using Bluetooth make sure speaker is in bluetooth mode or if using aux input make sure speaker is in aux input mode 11 TROUBLESHOOTING 10 Problem Resolutio...

Page 10: ...ut the following day when the weather is better once set up the screen will dry out usually within around 30 minutes If the screen was very wet this may take a little longer Cleaning the screen frame...

Reviews: