background image

8.


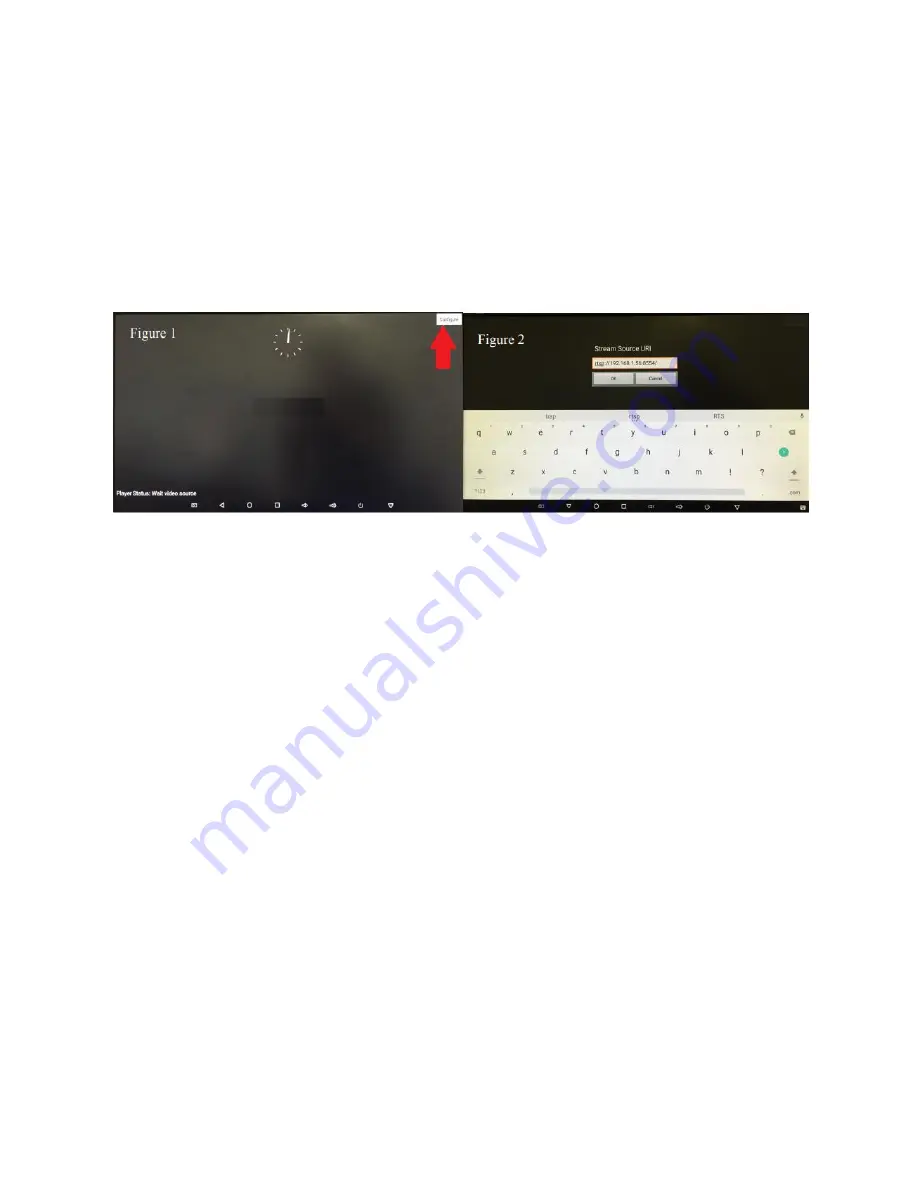
When you see the Player status screen on the On Screen Display (OSD), use the supplied IR 
remote control or a USB keyboard & USB mouse to select Configure in the upper right corner of 
the screen. (See Figure 1).  

9.


Once Configure is selected, select Source. Enter the IP address for your streaming source 
formatted like the example shown in Figure 2. And select OK. 

a.


Please note that the IP address format usually consists of the following: 

rtsp://xxx.xxx.x.xxx:8554/


where x is the numerical value for the device’s IP address.


10.


Start the E300 encoder and the video stream. See the SaviStreamer E300 manual for how to do 
this. 


Figure 1 and Figure 2. 


SaviStreamerGUI


SaviStreamerGUI is our free software used to connect our D300 Decoder to E300 Encoders for 

streaming.  


Getting Started: 


To ensure proper installation, please: 


Use at least Windows XP Professional (w/ Server Pack 2-3), Windows 2003, or Vista 
operating systems.


Log into your system as system administrator


Turn off Windows Firewall or select SaviStreamer Manager under firewall exceptions tab in 
control panel.


If you do not wish to turn off firewalls or make an exception for SaviStreamer Manager, 

please contact SmartAVI’s technical support for alternative processes.


Installation:  


SaviStreamerGUI requires Java version 8 to be installed onto the PC that will be used to manage 

the software. Once Java is installed, install our SaviStreamerGUI software. SaviStreamerGUI will be split 
into two different parts: Encoders will display on the left side, and Decoders will display on the right 

side. Simply select the appropriate Encoder’s bubble to assign the D300 Decoder (refer to Figure 3)

Once assigned, double click the name of the D300 

Decoder and a new menu will appear. Click on ‘Start 

Playing’ to begin streaming the video input of the selected E300 Encoder. Please note that once a D300 

Decoder has been assigned to an E300 Encoder, further setup will not be needed if the devices are 
power cycled as it will be saved into memory of the D300 Decoder to automatically reconnect. 

Summary of Contents for SaviDcor D300

Page 1: ......

Page 2: ... MP 10 L5 1 up to 4K 2K 60fps H 264 AVC HP L5 1 up to 4K 2K 30fps H 264 MVC up to 1080P 60fps MPEG 4 ASP L5 1 up to 1080P 60fps WMV VC 1 SP MP AP up to 1080P 60fps AVS P16 AVS AVS P2 JiZhun Profile up to 1080P 60fps MPEG 2 MP HL up to 1080P 60fps MPEG 1 MP HL up to 1080P 60fps RealVIDEO 8 9 10 up to 1080P 60fps Support MKV WMV MPG MPEG DAT AVI MOV ISO MP4 RM AUDIO Audio Decoding MP3 AAC WMA RM FLA...

Page 3: ...your encoder ready and set up and note the IP address See the SaviStreamer E300 Encoder manual for how to do this 2 Connect the RJ45 connector on the D300 Decoder to your network with a CAT 5e 6 cable or connect via WiFi Please be sure to have all devices within the same network 3 Connect the HDMI connector on the D300 Decoder to a display 4 Optionally connect a USB keyboard mouse to the D300 5 Po...

Page 4: ... into your system as system administrator Turn off Windows Firewall or select SaviStreamer Manager under firewall exceptions tab in control panel If you do not wish to turn off firewalls or make an exception for SaviStreamer Manager please contact SmartAVI s technical support for alternative processes Installation SaviStreamerGUI requires Java version 8 to be installed onto the PC that will be use...

Page 5: ...al software Simply enter in the IP address of the G300 Gateway and it will auto detect any D300 Decoder and E300 Encoders Once on the web click on the tab next to Encoders Decoders this is the serial number of the D300 Decoder that is detected A new window will then pop up select Decoder and input the IP address of the E300 Encoder into the source field Click Start Playing and the D300 Decoder wil...

Page 6: ...ect Factory data reset 4 Select RESET MBX 5 Select ERASE EVERYTHING 6 This will begin the factory reset causing the device to reboot and display the SaviDecoder D300 screen a few times Please note The screen will flash multiple times and may take a few minutes to complete the reboot The LCD screen on the front will display boot until the process completes and the splash screen that shows SaviStrea...

Reviews: