INTRODUCTION
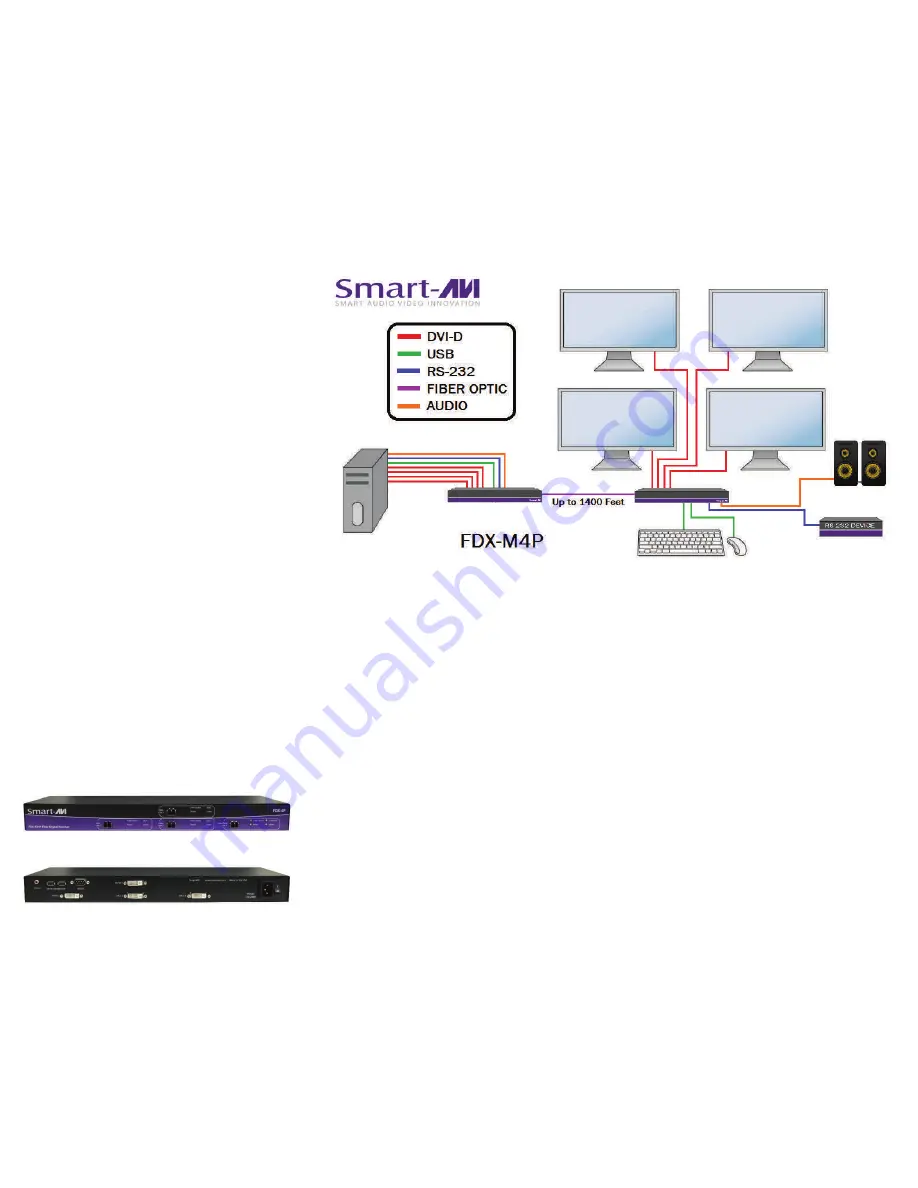
The FDX-M4P consists of a transmitter and
receiver that extend four DVI-D outputs,
audio, USB keyboard, USB mouse and RS-
232. For exceptional quality and security,
fiber optic extension is the best solution. The
FDX-M4P can go the distance with multi-
mode fiber optic cabling that can reach up to
1,400 feet.
FEATURES
Quad channel DVI-D, audio and USB
keyboard and mouse with RS-232 control
Top Signal Quality over Multimode Fiber
(up to 1,400 feet)
Video Resolutions up to 1920 x 1200
WUXGA at 60Hz
Customizable/Programmable DDC Table
for Mac/PC
Supports all USB 2.0 and 1.1 Keyboards
and Mice
Fiber Plug Type LC
Compatible With all Major KVM Switches
Supports Mac, PC, and Linux DVI
Uses universal DVI Single Link
connectors
Zero pixel loss with TMDS signal
correction
Rack Mountable Solution
Plug-and-play
INSTALLATION DIAGRAM
HARDWARE INSTALLATION
1. Turn off the computer, displays, speakers and any peripheral devices.
2. Connect the USB cable, RS-232 cable and audio cable from the computer and to the FDX-
TXM4P.
3. Do not connect the DVI inputs from the computer to the FDX-TXM4P.
4. Connect the DVI displays to the DVI connectors on the FDX-RXM4P. (DVI monitors recom-
mended.)
5. Connect USB mouse and keyboard to the USB connectors on the FDX-RXM4P.
6. Connect speakers to the audio connector on the FDX-RXM4P.
7. Connect an RS-232 device to the FDX-RXM4P.
8. Connect the FDX-TXM4P to the FDX-RXM4P with multimode fiber-optic cables.
9. Power on the computer, displays, speakers and any peripheral devices.
10. Connect the power cords and power on the FDX-TXM4P and the FDX-RXM4P. The status
LEDs will flash. It will take up to 30 seconds for the FDX-M4P to learn the EDID settings from
the connected DVI displays. Once the EDID settings are learned the LEDs will stop flashing.
11. Connect the computer’s DVI inputs to the FDX-TXM4P.
WARNING: Be careful not to cross the Video Link Fiber Optic cables. Video Link 1 on the FDX-
TXM4P must be connected to Video Link 1 on the FDX-RXM4P. TX Video Link 2 must connect to
RX Video Link 2 , 3 to 3, etc.
Note: HDMI monitors with DVI to HDMI adapters may work with DVI EDID settings loaded.
FRONT
REAR


