background image

4-Port Dual-Head DVI-D KVM Switch with Audio and USB 2.0 Sharing 

5

INSTALLATION

1.  Ensure that power is disconnected from DVN-4DUO.
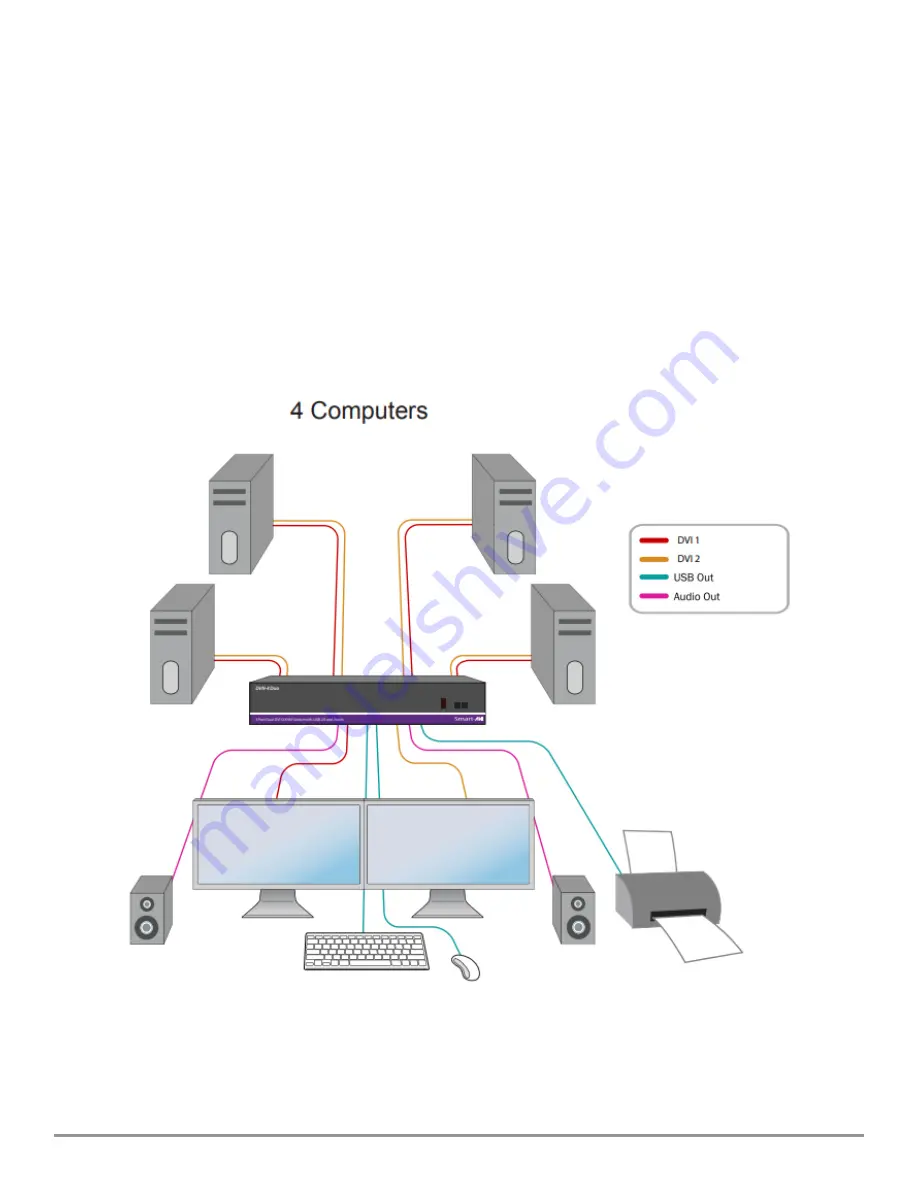
2.  Connect the DVI cables, USB cables (male-A to male-B), and audio cables from the computers to the 

respective ports on the DVN-4DUO.

3.  Optionally connect RS-232 for control functions.
4.  Connect the USB keyboard & mouse to the two USB ports labeled for keyboard & mouse.
5.  Optionally connect USB peripherals to the 2 USB ports labeled USB 2.0.
6.  Connect the speakers to the Audio Out port.
7.  Connect the display monitors to the DVI OUT connector on the DVN-4DUO.
8.  Power on the DVN-4DUO. 

Note: 

The 2 USB ports on the right are dedicated for keyboard and mouse with full emulation. The 2

on the left are for other USB peripherals (flash drives, printers, etc.) 

Summary of Contents for DVN-4DUO

Page 1: ...DVN 4DUO 4 Port dual head DVI D KVM Switch with USB and Audio USER MANUAL Designed and Manufactured in the USA 1 800 284 2131 www smartavi com ...

Page 2: ...______________________________________________________________________________________ DISABLE UNUSED PORTS________________________________________________________________________________ CUSTOM HOTKEY TRIGGERS____________________________________________________________________________ ESTABLISHING AN RS 232 CONNECTION______________________________________________________________ TROUBLESHOOTING__...

Page 3: ...put Interface 1 3 5 mm Stereo Audio Impedance 600 Ohm Frequency Response 20 Hz to 20 kHz Nominal Level 0 1 0 V Common Mode Rejection at 60 dB USB Signal Type USB 2 0 1 1 and 1 0 w internal hub Input Interface 4 USB Type B female Output Interface 2 USB Type A female for K M emulation 2 for USB 2 0 Transparent CONTROL Front Panel Buttons RS 232 DB9 Female 115200 N 8 1 No flow control Hot Keys Via Ke...

Page 4: ... D KVM Switch with Audio and USB 2 0 Sharing 4 What s in the box DVN 4Duo FRONT DVN 4DUO BACK PART NO Q TY DESCRIPTION DVN 4DUO S 1 4 Port Dual Head DVI KVM Switch with USB and Audio PS5VDC4A 1 Power Adapter 1 User Manual ...

Page 5: ...232 for control functions 4 Connect the USB keyboard mouse to the two USB ports labeled for keyboard mouse 5 Optionally connect USB peripherals to the 2 USB ports labeled USB 2 0 6 Connect the speakers to the Audio Out port 7 Connect the display monitors to the DVI OUT connector on the DVN 4DUO 8 Power on the DVN 4DUO Note The 2 USB ports on the right are dedicated for keyboard and mouse with full...

Page 6: ... for remote control of the DVN 4DUO See the section on establishing an RS 232 connection in this manual Set the connection to 115200 N 8 1 No flow control RS 232 commands are listed below COMMANDS HOTKEYS RS 232 CONTROL Switch all USB devices audio and video CTRL CTRL port ENTER Please note there is no m for this command m port ENTER Switch Audio Only CTRL CTRL a port ENTER a port ENTER Switch KVM...

Page 7: ...fore you start Controlling a Smart AVI device via RS 232 requires an RS 232 card installed on your computer or a USB to RS 232 adapter Below are instructions on how to create an RS 232 connection between a PC and the Smart AVI device Use terminal client software such as the PuTTY to connect to the Smart AVI device Make sure to use communication settings 115200 bps N 8 1 No flow control Check the d...

Page 8: ...f the Smart AVI device 3 Use Windows Control Panel Device Manager to identify the Com port number See instructions and Figure 7 2 below 4 Power on the device If you are using a USB to COM port adapter on a Windows PC and need to identify the COM port used do the following 1 Click on the start button 2 Click on Control Panel 3 Click on Device Manager 4 Click on the arrow next to Ports COM LPT You s...

Page 9: ...les connecting the unit and the computers are properly connected Try connecting the USB on the computer to a different port Make sure that the keyboard works when directly connected to the computer Replace the keyboard Mouse is not working Check if the mouse is properly connected to the unit Try connecting the USB on the computer to a different port Make sure that the mouse works when directly con...

Page 10: ... defective product to SmartAVI Any replacement product could be new or like new provided that it has functionality at least equal to that of the product being replaced SmartAVI limited warranty is valid in any country where the covered product is distributed by SmartAVI B Limitations of warranty To the extant allowed by local law neither SmartAVI nor its third party suppliers make any other warran...

Page 11: ...and fitness for particular purpose SmartAVI will not be liable for errors contained herein or for incidental or consequential damages in connection with the furnishing performance or use of this material No part of this document may be photocopied reproduced or translated into another language without prior written consent from SmartAVI Inc 20180109 Tel 800 AVI 2131 702 800 0005 2455 W Cheyenne Av...

Reviews: