Slick MP550-4 User Manual Download Page 7

Note: to delete a file press the [    ] button.

Music player settings:

You can choose the equalization mode that fits your preferences. To do 

so, browse to “settings” > “Music” > “EQ Select” and choose one of

the 6 available modes: 

• 

Normal

• 

MS PlayFX

• 

Rock

• 

Pop

• 

Classic

• 

Jazz

The playing order of the tracks depends on the selected 

mode. By default, the mode is set to “Normal”. 

You can change to a different mode

browsing to “settings” > “Music” > “ Play Mode”, and choosing 

“Order” (sequential order) or “Shuffle” (random).

You can also set the repeat mode by 

browsing to “settings” > “Music” > “Repeat Mode” and selecting your preferred mode:

• 

“Once” - Plays the current file and stops.

• 

“Repeat One” - Repeat current track.

• 

“Folder Once” - Plays files inside the current folder and stops.

• 

“Folder Repeat” - Repeats the files inside the current folder.

• 

“All Once” - Plays all the files once.

• 

“All Repeat” - Plays all the files continuously.

• 

“Intro” - Plays the first 10 seconds and skips to the next file.

To know the amount of free memory, browse to “settings” > “System” > “About”.

To return to the main menu press and HOLD the button.
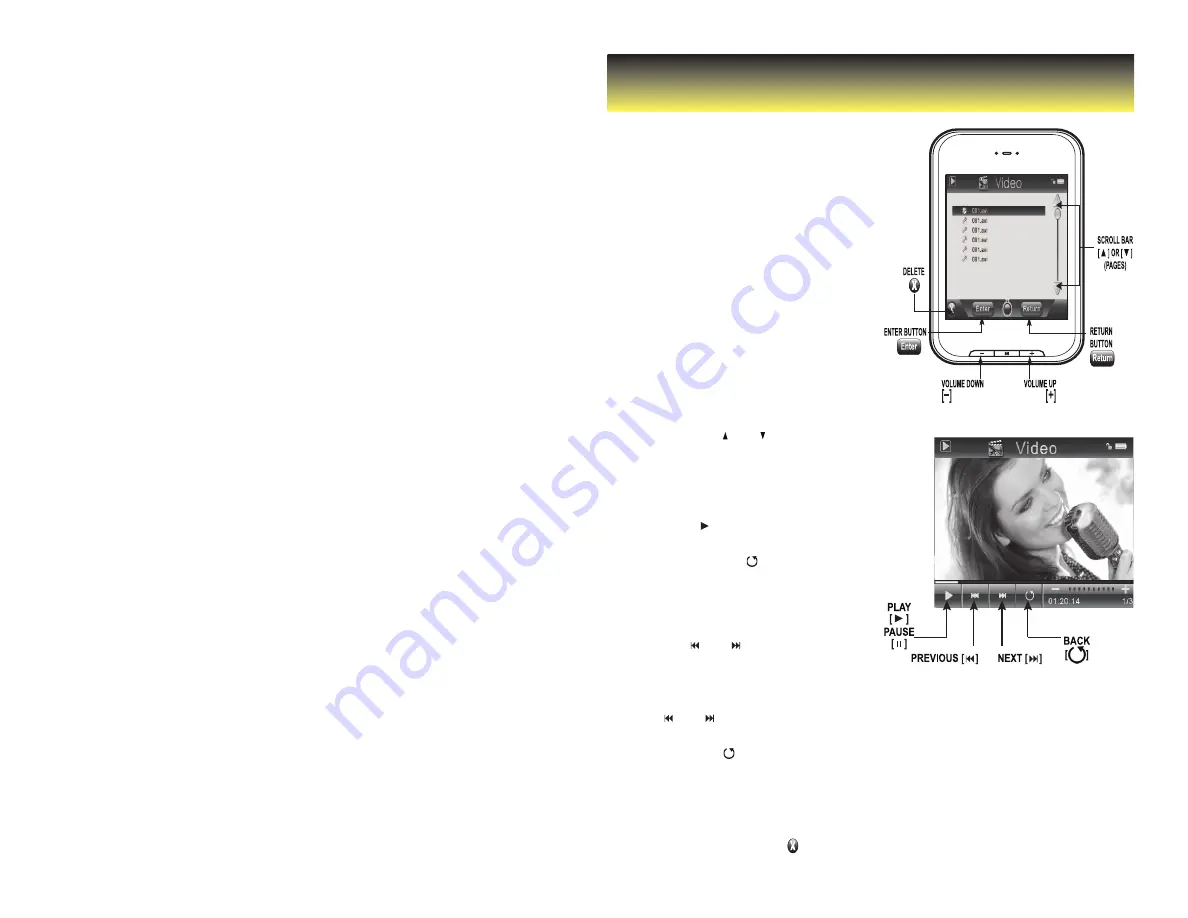
Video

You can play AVI / WMV / MPG / VOB 

/ ASF videos that you previously

converted to the AVI format (XVID with 

MP2 audio and 320 x 240 resolution),

using the easy software tool 

included inside the bundled CD.

Note:  you must convert a video to the 

correct format before transferring

to the player.

Playing Videos:

1.  Select “video” from the main menu.

2.  Touch the video file you would 

like to watch, and press the or                   

[ M ] button to begin playback. 


3.  Press the [ I I ] button to pause 

playback, to resume playback 

press the [    ] button.

4.  To return to the previous 

screen, press the [    ] button.

5.  Press and HOLD the or [ M ] button 

to go back to the main menu.

Note: Use the [    ] or [    ] buttons from 

the scroll bar to move to the next

or previous page of files or folders.

Searching forward and back:

1.  Use the [    ] or [    ] buttons to 

skip to the previous/next video.

2.  You can fast forward or rewind 

a video by pressing and holding 

the [    ] or [    ] buttons.

3.  To return to the video file 

list, press the [    ] button.

4.  To return to the main 

menu, press and HOLD the 

Return or [ M ] button.

Summary of Contents for MP550-4

Page 1: ...slicK MP550 4 Multimedia Player photosr ecord video music settings card drive...

Page 2: ...CDs onto your computer 8 Moving music from your computer to your MP3 Player 8 Using the Video Converter 9 To install the Video Converter 9 Converting videos 10 Photos 11 Viewing Photos 11 Record 12 R...

Page 3: ...display turns on To turn the player off slide and hold the POWER switch to the right until the display turns off Lock unlock function The Lock function prevents you from accidentally pressing the but...

Page 4: ...tarts to install the driver automatically Wait for the system to finish the installation When it has finished MP3 will be created in My Computer Important to avoid any data loss always perform a safe...

Page 5: ...up to 8 GB of additional memory to your MP3 Player To insert the not included Mini SD card 1 Insert the Mini SD card into the card slot at the bottom of your player with the with the metal contacts fa...

Page 6: ...e Record listen to clips you recorded with the built in microphone Dir List explore the file directories on your player Update refresh the music list Listening to music 1 Select music from the main me...

Page 7: ...ow the amount of free memory browse to settings System About To return to the main menu press and HOLD the button Video You can play AVI WMV MPG VOB ASF videos that you previously converted to the AVI...

Page 8: ...checkboxes to select which tracks to Rip 5 Click Start Rip Click the Rip tab Click Start Rip Moving music from your computer to your MP3 Player Windows Media Player gives you an easy way to add or Syn...

Page 9: ...ect format Use the Video Converter provided on the included CD to convert most video files to the correct format suitable for the Player To install the Video Converter 1 Insert the CD into the CD driv...

Page 10: ...USB port of your computer optional 2 Click on the icon on your Desktop 3 Click on Input File and select a video to convert click Input File click Output File OR Find and select a video from your compu...

Page 11: ...he conversion When complete the converted video will either be on your MP3 Player or the selected Output File location on your computer where you can easily transfer it to the player see Transferring...

Page 12: ...I button to pause the playback To resume playback press the button 6 To return to the previous screen press the button 7 Press and HOLD the M button or the Return button to get back to the main menu...

Page 13: ...Please ensure the volume is turned up and the headphones are properly connected Check if the format of music file is supported by the player Can not record Check if there is enough memory and battery...

Page 14: ...ce the risk of product damage and personal injury FCC Part 15 This equipment has been tested and found to comply with the requirements for a Class B digital device under Part 15 of the Federal Communi...

Page 15: ...y does not cover damage resulting from accident misuse abuse improper installation or operation lack of reasonable care and unauthorized modification This warranty is voided in the event any unauthori...

Reviews: