

Video converter
Videos
Record
Voice
Photos
Settings
Legal information
Troubleshooting
Warranty
1. To record voice memos, select “record” from the main
menu and press the
[ M ]
button to confirm. The voice
memo record screen will be displayed.
2. Press the
[ ]
button to start recording a voice memo.
3. To pause the recording, press the
[ ]
button again.
4. To save the recording and exit to the main menu, press
and
HOLD
the
[ M ]
button.
Note:
You can save the recorded file while the player is
recording or while it is paused by pressing and
HOLDING
the
[ M ]
button.
Record menu
1. While not recording, press the
[M]
button to access the
recording menu where you can select from the
following options:
Local folder
–
save voice memos to the player
Card folder
- save voice memos to the Micro SD Card
REC type
–
Set audio quality
Exit –
exit to record screen
2. Press the
[ M ]
button to confirm your choice.
1. To listen to voice memos, select “voice” from the main
menu and press the
[ M ]
button to confirm. The voice
memo playback screen will be displayed.
2. Use the
[ ]
or
[ ]
button to select a recorded voice
memo, then press the
[ ]
button to start playing the
selected voice memo.
Voice menu 1
While a voice memo is PLAYING, press the
[ M ]
button to
access voice menu 1 where you can select from the
following options:
Repeat –
voice memo repeat options
Replay mode –
voice memo replay options
Exit
–
exit to voice memo playback screen
Voice menu 2
While a voice memo is PAUSED, press the
[ M ]
button to
access voice menu 2 where you can select from the
following options:
Local folder –
browse voice memos
Card folder -
browse voice memos on the Micro SD card
Delete file –
delete a single voice memo
Delete all –
delete all voice memos
Exit –
exit to voice memo playback mode
Note:
You can also find and play recorded voice memos in
the “music” section of the player. Open “music” then
open the “record” folder and search for the voice memo.
Photo controls
(menu)
[ M ]
confirm selection / press and HOLD for main menu
[ ]
moves the selection up
[ ]
return to photo screen / play slideshow
[ ]
moves the selection down
Slideshow
1. To change between manual photo viewing and
slideshow mode, press the
[M]
button while in the
picture list screen.
2. Select “Playback set” and press the
[M]
button to
confirm.
3. Select “Auto play” to enter slideshow mode.
4. Use the
[ ]
or
[ ]
button to adjust the
time between photo slides.
5. Press the
[ ]
button to start the slideshow.
Video controls
(menu)
[ M ]
confirm selection / press and HOLD for main menu
[ ]
moves the selection up
[ ]
return to video playback screen
[ ]
moves the selection down
Video menu
1. While a video is PAUSED, press the
[M]
button to access
the video menu where you can select from the
following options:
Local folder
–
browse video files on the player
Card folder
- browse video files on the Micro SD Card
Delete file
–
delete a single video file
Delete all
–
delete all video files on the player
Repeat –
video file repeat options
Exit –
exit to video playback screen
2. Press the
[ M ]
button to confirm your choice.
Volume
To adjust the video volume, first pause the video, then
press the
[ VOL ]
button to open the volume menu, then
use the
[ ]
or
[ ]
buttons to adjust the volume, then
press the
[ M ]
button to confirm the level and return to
the video playback screen.
In the settings menu you can customize various player
settings such as date and time, language, display settings
and more.
1. To change the player’s settings, select “settings” from the
main menu and press the
[ M ]
button to confirm. The
setup screen will be displayed.
2. Use the
[ ]
or
[ ]
button to scroll to a setting, then
press the
[ M ]
button to make changes to the setting.
3. Press the
[ M ]
button to confirm changes.
Deleting files
1. Connect the player to your computer, and locate
“MP3”.
2. Open
“MP3”
by double clicking on it.
3. Locate the file you would like to delete and
RIGHT
click
on the file.
4. Locate
“Delete”
and
LEFT
click on the selection.
5. Select
Yes
or
No
to confirm or deny deletion of the file.
Or
1. Connect the player to your computer, and locate
“MP3”.
2. Open
“MP3”
by double clicking on it.
3. Locate the file you would like to delete and
RIGHT
click
on the file. Press
DELETE
on the keyboard.
In the unlikely event that this product is defective, or does
not perform properly, you may within ninety (90) days
from your original date of purchase return it to the
authorized service center for repair or exchange.
TO OBTAIN WARRANTY SERVICE:
- Provide proof of the date of purchase within the package
(Dated bill of sale)
- Prepay all shipping costs to the authorized service center,
and remember to insure your return.
- Include a return shipping address (no P.O. Boxes), a
telephone contact number, and the defective unit within
the package.
- Describe the defect or reason you are returning the
product. Your product will be repaired or replaced, at our
option, for the same or similar model of equal value if
examination by the service center determines this
product is defective. Products received damaged as a
result of shipping, will require you to file a claim with the
carrier.
The shipping address of the authorized service center is:
Southern Telecom, Inc.
ATTN: Customer Service (2nd Floor)
14-C 53rd Street
Brooklyn, NY 11232
Should you have any questions or problems concerning
this product, please contact our customer service depart-
ment at:
Customer Support:
1-877-768-8483 (Toll Free)
Monday - Thursday: 9AM - 5PM (EST)
Friday: 9AM - 3PM (EST)
1. To play videos, select “videos” from the main menu and
press the
[ M ]
button to confirm. The video playback
screen will be displayed.
2. Use the
[ ]
or
[ ]
button to select a video then
press the
[ ]
button to start playing the selected
video.
Video controls
(playback screen)
[ ]
previous video / rewind (press and
HOLD
) /
decrease volume
[ ]
play / pause video
[ ]
next video / fast forward (press and
HOLD
) /
increase volume
[VOL]
open the volume menu (only available when
video is paused)
1. To view photos, select “photo” from the main menu and
press the
[ M ]
button to confirm. The photo list screen
will be displayed.
2. Use the
[ ]
or
[ ]
button to select a photo, then
press the
[ ]
button to view the selected photo.
3. Use the
[ ]
or
[ ]
button to scroll through the
photos manually.
4. Press
[ ]
to return to the photo list screen.
Photo menu
1. While viewing the photo list screen, press the
[M]
button to access the photos menu where you can
select from the following options:
Local folder –
browse photo list on the player
Card folder -
browse photo list on the Micro SD card
Playback set –
slideshow settings
Delete file –
delete a single photo
Delete all –
delete all photos
Exit –
exit to photo list screen
2. Press the
[ M ]
button to confirm your choice.
Can not power on
•
The battery may be exhausted, please recharge the battery.
•
Check that the
[POWER]
switch is in the
ON
position.
Files can not be transferred to the player
•
Check if the driver is installed correctly in the computer
by disconnecting and then reconnecting the player to the
computer
•
Check the connection between the player and PC, and
confirm the USB cable is properly connected.
Player not reconginzed by computer
•
Check the connection between the player and PC, and
confirm the USB cable is properly connected.
•
Check that the
[POWER]
switch is in the
ON
position.
No sound from the headphones
•
Please ensure the volume is turned up, and the
headphones are properly connected.
•
Check if the format of music file is supported by the player.
Can not record
•
Check if there is enough memory and battery capacity.
Display is in the wrong language
•
Please ensure you selected the correct language from the
“Settings”
menu.
The buttons do not work
•
Slide the
[POWER]
switch to the left to unlock the player.
I cannot display my .jpg files
•
Many digital cameras and image editing softwares add
hidden data to the .jpg files. This data can prevent the
player from loading the images. Try to eliminate them by
saving the file with another name.
FCC Part 15:
This equipment has been tested and found to comply with the requirements for a
Class B digital device under Part 15 of the Federal Communications Commission
(FCC) rules. These requirements are intended to provide reasonable protection
against harmful interference in a residential installation. This equipment generates,
uses and can radiate radio frequency energy and, if not installed and used in
accordance with the instructions, may cause harmful interference to radio
communications. However, there is no guarantee that interference will not occur in
a particular installation. If this equipment does cause harmful interference to radio
or television reception, which can be determined by turning the equipment off and
on, the user is encouraged to try to correct the interference by one or more of the
following measures:
●
Re-orient or relocate the receiving antenna.
●
Increase the separation between the equipment and receiver.
●
Connect the equipment into an outlet on a circuit different from that to which
the receiver is connected.
●
Consult the dealer or an experienced radio/TV technician for help.
Do not attempt to repair or modify this equipment.
Warning: Changes or modifications to this equipment not expressly approved by
the party responsible for compliance could void the user’s authority to operate the
equipment.
“This device complies with Part 15 of the FCC Rules. Operation is subject to the
following two conditions:
(1) this device may not cause harmful interference, and
(2) this device must accept any interference received, including interference
that may cause undesired operation.”
Copyright Information:
Trademarks and trade names used in this instruction manual are owned by their
respective companies or organizations.
Unauthorized duplication of any recordings whether downloaded from the
Internet or made from audio CDs is a violation of copyright laws and international
treaties.
The making of unauthorized copies of copy-protected material, may be an
infringement of copyrights and constitute a criminal offense. This equipment
should not be used for such purposes.
Click
“User Guide”
Click
“View”
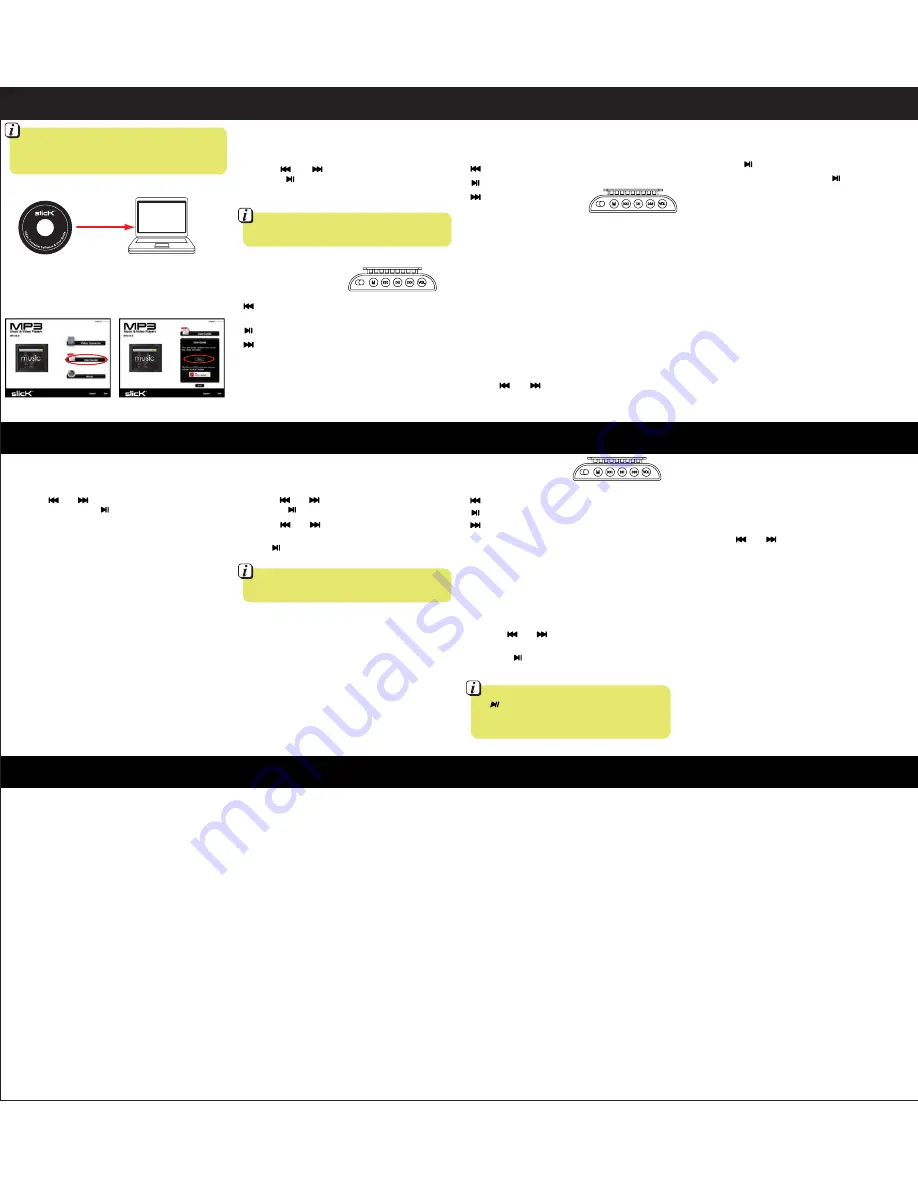
Before transferring video files to the player, you must
convert them to the correct format. Use the Video
Converter on the provided CD to convert most video
files to the correct format suitable for the player.
1. Insert the CD into the CD drive of your computer.
2. Click on
“User Guide”.
3. Click on
“View”
to view instructions on installing
and using the video converter.
To browse video files on the player, refer to
“video menu” – then search in
Local folder (player)
or
Card folder (Micro SD card)
.
To browse photo files on the player, refer to
“photo menu” – then search in
Local folder (player)
or
Card folder (Micro SD card)
.
To switch back to manual photo viewing, press the
[ ]
button to pause the slideshow, then press
[ M ]
to open the photo menu, then select “Playback set”,
then select “Manual play”.


