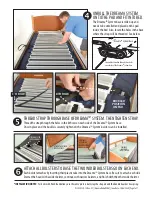
THREAD STRAP THROUGH BASE OF DREAMA
TM
SYSTEM. THEN TIGHTEN STRAP.
Thread the strap through the holes in the 8th row on each side of the Dreama
TM
System base.
Once in place and the buckle is securely tightened, the Dreama
TM
System bolsters can be installed.
UNROLL THE DREAMA SYSTEM
ON TO THE PAD AND FIT INTO BED.
The Dreama
TM
System base is rolled up and
needs to be unrolled and placed on the pad
inside the bed. Also, locate the holes in the base
where the strap will be threaded. See below.
*INSTALLATION NOTES:
For beds with fixed foundations, use the same process but wrap the strap around the bunkie board or box spring.
BUCKLED
POSITION
ON PAD.
Strap will be threaded through these holes
on each side of the Dreama
TM
System base.
8TH ROW
8TH ROW
HEADBOARD
Dreama
TM
System base
ATTACH ALL BOLSTERS TO BASE. THE TWO WIDER BOLSTERS GO ON EACH END.
Each bolster attaches by inserting their plastic tabs into the Dreama
TM
System base. Be sure to attach each side.
Start at the head with a wider bolster, continue with narrow bolsters, and finish with the other wider bolster.
ATTACH THE WIDER
BOLSTER FIRST.
FINISHED
BOLSTER
INSTALLATION
ATTACH BOLSTER
TO DREAMA BASE.
CONTINUE
ATTACHING
ALL BOLSTERS
.
WI 820.120-13 Rev. 01 | [Dreama Retrofit Kit] | Issue Date: 10/26/2020 | Page 1 of 1


