background image

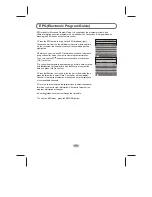
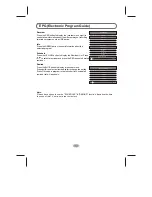
EPG stands for Electronic Program Guide. It is supplied by the program providers and 
offers information about the programs to be broadcast. You can access it in digital mode by 
pressing the EPG button on the remote control. 

EPG (Electronic Program Guide)

Recorder

INFO

Schedule

Remind

OK

PROGRAMME GUIDE

TIME

29 Nov 01:14

Home                King & 1(C/K)(S)              

World                Dream Homes(S)           

Jade                  When Easterly Showers F..

Pearl                 Zhang ZiYi a Conservatio                   

INDEX

3.To check the programs to be broadcast on a future date, scroll up 
with the    button to the date field. Use the    button to select the 
date and press [ OK ] to confirm. 

4.Press the    button to scroll up to the top bar in the display, then 
press the     button to select Time. The top bar will now display 
Channel in the top right corner and the second bar will display one 
of your available channels. 

5.Go to the channel and use the    /    buttons to select the channel 
for which you want to view information. After a brief moment, the 
program information will appear.

6.Use the    /    buttons to scroll through the time slots.

7.To exit the EPG menu, press the RETURN button.

Recorder

INFO

Schedule

Remind

OK

PROGRAMME GUIDE

29 Nov

CH                        11 Home

INDEX

1.Press the EPG button to bring up the EPG interface (right). 
The second bar from the top will display the current date and time. 
On the list below, the channel you are currently watching will be 
highlighted.

2.Before you can view any EPG information, you have to 'activate' 
every channel for which you want to view program information. 
To do this, use the    /    buttons to select a channel, then press 
[ OK ] to confirm. 

01:00-02:30              King & I(C/K)(S)

02:30-02:52              Money Talks(S)

03:08-03:15              Sports Bulletin(S)

03:15-03:40              Late News(S)

-14-

Summary of Contents for 42E66A

Page 1: ...Instruction Manual Instruction Manual 42E66A 42E66A ...

Page 2: ...ettings 20 Setup Settings 19 Back Panel 7 CONTENT INTRODUCTION FUNCTIONS AND FEATURES 4 EXTERNAL SCHEMATIC AND INSTALLATION 6 11 MENU CONTROL 16 21 SPECIFICATIONS 23 TROUBLESHOOTING 22 Positioning The TV Set 5 PREPARATION 5 Inserting Batteries In The Remote Control Handset 5 Antenna And Power Connections 5 EPG Electronic Program Guide 14 15 PERSONAL VIDEO RECORDING PVR 12 13 PC Settings 21 ...

Page 3: ...o reduce the risk of damage to hearing one should lower the volume to a safe comfortable level and reduce the amount of time listening at high levels The battery battery or batteries or battery pack shall not be exposed to excessive heat such as sunshine fire or the like Excessive sound pressure from earphones and headphones can cause hearing loss When the TV is not in use or during movement cord ...

Page 4: ...ms or contact the retailer where the product was purchased They can take this product for environmental safe recycling Correctly dispose symbol OPERATING ENVIRONMENT Do not install this equipment in a confined space such as a bookcase or unit a similar Do not use the set near damp and cold the set from overheating areas Protect Keep away from direct sunlight Do not use the set near dusty places Do...

Page 5: ...00 1024x768 1280x1024 PC formats refresh rate is 60Hz FEATURES BRIEF INTRODUCTION Thanks for your purchase of our digital high definition LED television This product with diverse functions is designed to fulfill the optimum requirements from commercial industrial and household uses LED television possesses the display function of both TV and PC It advanced picture performance smaller in size and l...

Page 6: ...and Alkaline batteries together Note that there are chargeable and non chargeable batteries Do not attempt to charge non chargeable batteries Remove the batteries from the remote control unit if you do not intend to use the unit for a long time Precautions when using batteries PREPARATION 5 Remove the battery cover Insert two AAA Alkaline or equivalent the marking in the battery compartment Replac...

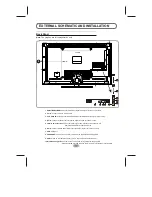
Page 7: ... Power Button 3 Speakers 4 Program Up Down Button 5 Volume Up Down Button 6 Menu Button 7 Source Button 8 Standby Button 4 5 6 7 8 3 2 1 3 EXTERNAL SCHEMATIC AND INSTALLATION Front Panel Note The graphics are for representation only 6 ...

Page 8: ...UDIO input with AV IN 6 AV IN Connect AUDIO and VIDEO input signal from signal source such as DVD 7 USB USB port 8 EARPHONE Audio output speakers will be muted 9 S PDIF Use an AV cable to connect your TV to a compatible audio receiver 10 Wall Mounting Holes The four holes can be used to fix your wall mounting plate use the M6 screw to install the mounting plate for PC and audio input for HDMI YP P...

Page 9: ...the cable not provided with this unit then connect to the antenna input of this unit for best reception 2 If the antenna cable in your home is other than the above two or you have problems in installing the antenna please contact your dealer Notes 1 Current outdoor antenna or usually 75 OHM coaxial antenna cable For better using this kind of antenna cable TV cable uses reception we suggest 2 Flat ...

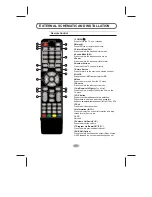
Page 10: ... channel list in DTV or ATV 2 Mute Press to mute or restore the volume 11 Up Down Left Right Press to select or adjust the desired item on the TV menu 14 Information INFO Press to display the current information including screen format source etc 8 QUICK Press to show INFO bar quickly in USB 9 Menu Press to enter or exit from the TV menu 10 Source Press to select the input source mode 13 Exit Pres...

Page 11: ...ent program 24 Freeze Press to freeze or unfreeze the picture 26 buttons Colour These four colour keys are for relative fast teletext function in the bottom of teletext page 26 25 25 USB Play Control Buttons Play Pause Press to pause playback press again to continue playback Fast Backward Button Press to fast reverse Fast Forward Press to fast forward Previous Press to play the previous file Next ...

Page 12: ...AL Press this button to display concealed information such as solutions to riddles or puzzles Press again to remove the information from the display MIX Press this button to superimpose the teletext over the TV program Press again to return to normal teletext mode SIZE Enlarge the teletext display Press this button once to enlarge upper half of the screen Press this button again to enlarge lower h...

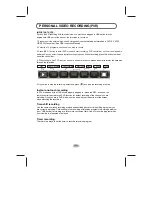
Page 13: ...l stop IMPORTANT NOTE For any type of recording with this television you must have plugged a USB device into the appropriate USB port at the back of the television to record on Instant one touch recording In DTV mode and with a USB device properly plugged in press the REC button on the remote control to activate the PVR function for instant recording of the channel you are watching Once you are in...

Page 14: ...ll your recordings the reminder list will appear See page 15 for more on the schedule 6 Press the power button to switch the TV to stand by It will record your selection automatically If you are browsing the EPG 1 In DTV mode and with a USB device properly plugged in press the EPG button on your remote control to bring up the EPG interface Then follow steps 1 C6 under EPG on page 14 2 When you hav...

Page 15: ... the top right corner and the second bar will display one of your available channels 5 Go to the channel and use the buttons to select the channel for which you want to view information After a brief moment the program information will appear 6 Use the buttons to scroll through the time slots 7 To exit the EPG menu press the RETURN button Recorder INFO Schedule Remind OK PROGRAMME GUIDE 29 Nov CH ...

Page 16: ... press the RED button to delete a reminder Remind Press the BLUE button to display a reminder menu Press to select an item and to change the setting Press OK to add a program to the reminder list An updated reminder list will be shown Reminder Setting 22 Hour Jan Month 01 Date Once Mode 1 SDTV 55 Minute OK BACK RECORDER 00 Minute 23 Hour Jan Month 01 Date 30 Minute 23 Hour Jan Month 01 Date 1 SDTV...

Page 17: ...menu is outlined and detailed to help you get the most from your TV 1 Press MENU on the remote control or on the TV key panel to display the main menu 2 Press and to highlight the desired menu item 3 Press to change the setting 4 Press MENU to save setting and go back to last menu Note on the key panel have the same functions as the corresponding buttons on the remote control Buttons MENU CONTROL ...

Page 18: ...justs how much audio loudness gets sent to the left and right speakers Only can be adjusted when is set to Surround Sound Off Surround Sound Press this option to set or Off Surround Sound On AVL This function may be set as On or Off Auto Volume Level can set the volume automatically corresponding to the input audio 17 AD Switch Press OK button to the AD Switch sub menu AD Switch Press this option ...

Page 19: ...hannels manually press the buttons to select DTV orATV manual search then use the buttons to select the available channels Delete Menu Program Edit Skip OK FAV 11 Home 16 World DTV DTV Move Rename Programme Edit This setting lets you edit channels Select a channel and then use the coloured buttons on the remote control Press the red button to delete the channel the green button to rename ATV chann...

Page 20: ...cord Limit 6Hr Notes This function is only available in some certain models It is on your local TV broadcast service based Time Press OK button to enter the Time sub menu Depending on your need to select Time Zone Clock Sleep Timer and Auto Sleep settings TIME Time Zone Clock Sleep Timer Auto Sleep Beijing GMT 8 01 Jan 13 08 Off On Time Zone Showing the country s time zone Clock Set the TV clock S...

Page 21: ... Control SW Update USB 4 Summer Time During daylight saving time DST please change your selection to On Off Parental Control You can set up parental control function to choose the classifications suitable for your children Choose from the following categories 1 P Content is suitable for preschoolers under age 5 2 C Content is suitable for children age 6 7 3 G For general exhibition All ages may wa...

Page 22: ...nction to adjust the display automatically or 1 AUTO ADJUST Press to auto adjust PC size and position 2 H Position Press to adjust the H Position of the television 3 V Position Press to adjust the V Position of the television 4 Phase Press to adjust the phase of the picture 5 Size Press to adjust the of the picture PC Auto Adjust H Position V Position Phase Size 50 50 50 50 Note These settings are...

Page 23: ...he best resolution or other standard resolutions of Windows system Change Set refresh rate to 60Hz SNOWY DOTS AND INTERFERENCE 1 If 2 Fine tune the antenna is located in the fringe area of a television signal where the signal is weak the picture may be marred by dots When the signal is extremely weak it may be necessary to install a special antenna to improve the reception Adjust the position and ...

Page 24: ... input 75 ohm 1 0Vp p RCA AV audio input 10k ohm 0 5Vrms Preset programs ATV 99 DTV 400 DTV DVB T TV PAL BG D K I AV PAL SECAM NTSC 23 8W 8W 100 240V 50 60Hz 120W 107cm 1920 X 1080 16 3Kg 971 X 220 X 632 7mm o o Working temperature 5 C 45 C Working humidity 20 80 o o Storage temperature 15C 50 C Storage humidity 10 90 Environment only for Tropical climates zone o o Working temperature 5 C 35 C Wor...

Reviews: