background image

5

ASSEMBLY    

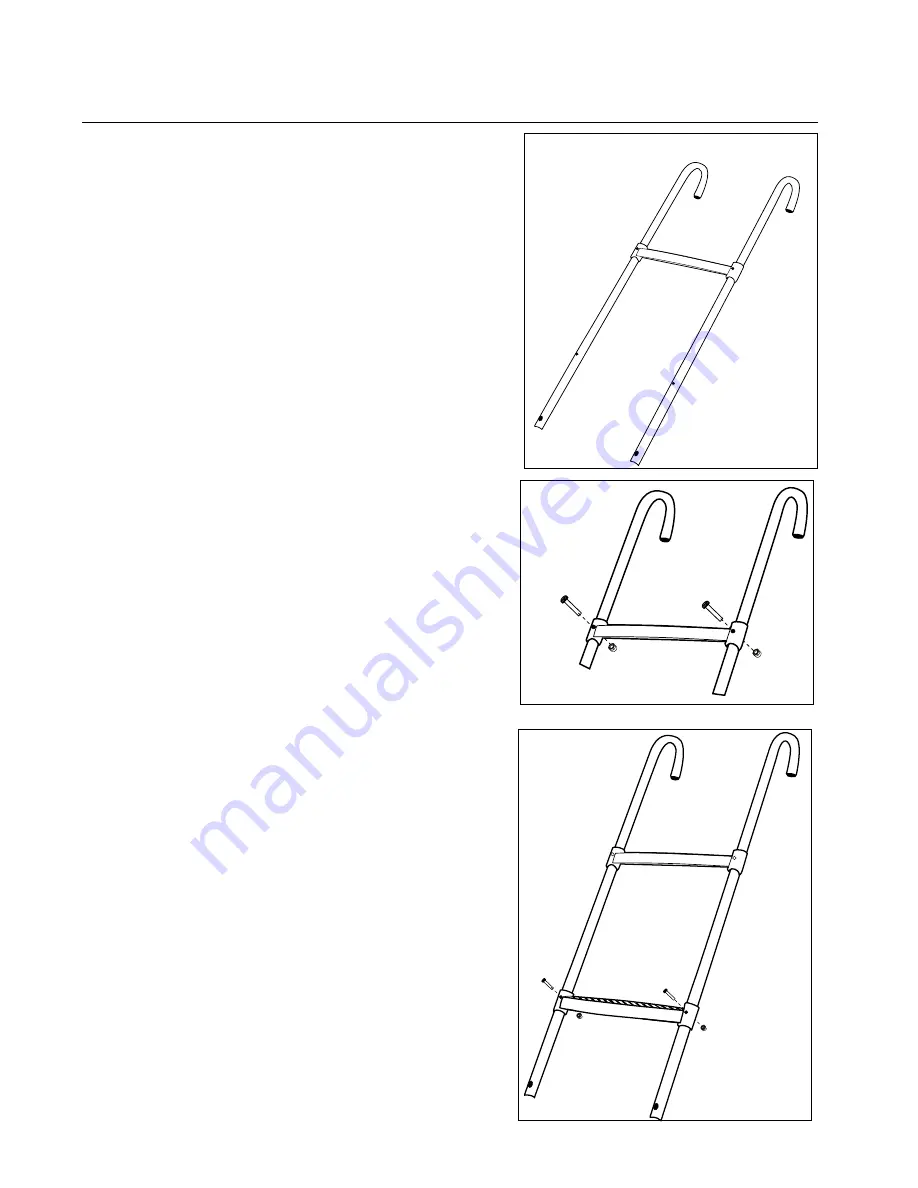
1.  Lay the two curved ladder rails (1) on a clear area.

2.  Place one of the ladder steps (2) onto the bottom of 

each ladder rail. Slide the step up until the top bolt 

holes of the rail and step line up. (Make sure the 

checkered pattern of the step is facing up.)

3.  Insert the M6x40 (3) bolt through the ladder step and 

ladder rail. Tighten an M6 (6) nut on the back of each 

bolt.

4.Repeat steps 2&3 to assemble the second ladder step.

Tools required: adjustable wrench, phillips screwdriver

Use caution not to pinch your fingers.

M6x40 bolt

M6x40 bolt

M6 nut

M6 nut

M6x40 bolt

M6x40 bolt

M6 nut

M6 nut

Summary of Contents for SAL302

Page 1: ...g this equipment Save this manual for future reference User weight limit 275 lbs Ladders allow young children to climb onto the trampoline Trampolines are not for children under 6 years of age Do not use ladder if children under 6 are nearby Remove ladder when trampoline is not in use to prevent unauthorized use Skwalker Holdings LLC PO Box 574 Brigham City UT 84302 ...

Page 2: ...ound level so they will not create a tripping hazard In addition the top of the stakes should be covered if necessary so that users will not be injured by falling on the stakes Even with the use of windstakes trampolines can become damaged and there is no warranty coverage or guarantee The only sure method to protect your trampoline and the surrounding environ ment during high winds is to complete...

Page 3: ... until 5 p m Mountain Time excluding holidays To help us assist you please mention the model number of the product when calling www skywalkertrampolines com CARE AND MAINTENANCE If your ladder becomes dirty spray with water to clean Do not allow use of the ladder until it has dried completely Check all hardware before each use Tighten any bolts or nuts that have become loose before allowing use of...

Page 4: ...fy all the parts used The numbers in the circles to the left of each part will be used to help differentiate the parts in the instructions 1 2 5 6 3 4 7 Key No Qty Description 1 2 Curved Ladder Rails 2 2 Ladder Step 3 4 M6x40mm Bolt 4 2 M6x33mm Bolt 5 4 M6 Washer 6 6 M6 Nut 7 1 Lower Frame Base ...

Page 5: ...ep line up Make sure the checkered pattern of the step is facing up 3 Insert the M6x40 3 bolt through the ladder step and ladder rail Tighten an M6 6 nut on the back of each bolt 4 Repeat steps 2 3 to assemble the second ladder step Tools required adjustable wrench phillips screwdriver Use caution not to pinch your fingers M6x40 bolt M6x40 bolt M6 nut M6 nut M6x40 bolt M6x40 bolt M6 nut M6 nut ...

Page 6: ...sert the M6x33 4 bolt with M6 washer 5 on each side of the frame Secure with an M6 nut 6 on each side 5 To place the ladder on your trampoline simply hook the top of the ladder onto the trampoline frame under neath the spring pad M6x33 bolt M6 washer M6 nut M6 nut M6x33 bolt The assembly of your trampoline accessory ladder is now complete Enjoy ...

Page 7: ...d service center or to products used for commercial or rental purpose No other Warranty beyond that specifically set forth above is authorized by Skywalker Holdings LLC SKYWALKER HOLDINGS LLC IS NOT RESPONSIBLE OR LIABLE FOR INDIRECT SPECIAL OR CONSEQUENTIAL DAMAGES ARISING OUT OF OR IN CONNECTION WITH THE USE OR PERFORMANCE OF THE PRODUCT OR OTHER DAMAGES WITH RESPECT TO ANY ECONOMIC LOSS LOSS OF...

Reviews: