

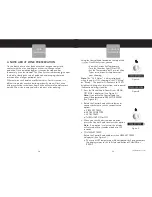


SETUP
After choosing an appropriate location within your home and safely
placing the
One Wine System, it is time to set up your
One Wine System.
1. Before using the
One Wine System for the first time, rinse
the Bottle Pour Assembly. The Bottle Pour Assembly is fully
submersible, and can be washed by hand. (DO NOT PUT IN
DISHWASHER – NOT DISHWASHER SAFE.). Soap can noticeably
affect the flavors of fine wine, which is why most wine connoisseurs
simply give their glasses a hot water rinse. With this in mind, it is
recommended that you clean the Bottle Pour Assembly with a
thorough hot water flush. Rinse until you see water run clear. Dry
with a soft cloth or paper towel or allow to air dry.
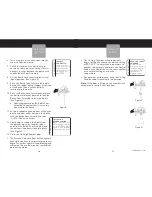
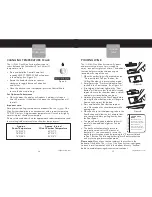
2. To attach the glass door to the unit:
a. Carefully remove the glass door from its
protective packaging. Be sure to place the
door on a soft padded surface so the glass
is not scratched.
b. Identify the top end (short side) of the glass
door that contains the “longer hinge pin”
and hold the door to position this pin in the
upper left corner. (See Figure A.) Grasp the
door securely to ensure you do not drop it.
c. Carefully insert the long hinge pin fully up
into the upper hinge mount located on the
front of the
One Wine System.
(See Figure B.)
d. After the upper hinge pin is fully inserted,
carefully move the lower hinge pin into
place, allowing it to securely rest into the
lower hinge mount located on the front of
the
One Wine System. (
Note:
The
lower hinge pin can most easily be inserted
into the lower hinge mount if the hinge pin is
brought into place from the FRONT RIGHT
SIDE of the hinge mount. (See Figure C.)
SETUP
7
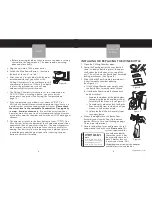
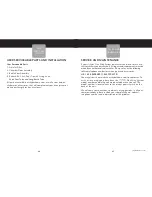
PARTS
6
One Wine System Diagram of Parts
Figure C
skybarhome.com
Figure B
Figure A
1. Wine System
2. Bottle Pour Assembly
3. Pour Tip (with O-ring)
4. Pour Spout
5. Chamber Door
6. Chilling Chamber
7. Drip Tray
8. Control Knob
9. Replace Bottle Button
10.Preserve/Unlock to Pour Button
11.Pour Button
SCROLL / SELECT
12.Main Power Button
13.Power Cord
14.Condensation Tray
15.Bottle Lock Lever
16.Reserve Cup
17.Bottle Stopper
18.Bottle Tube (lower) with filter
19.Bottle Tube (upper)
20.Pour Tube
21. Air Filter (back)
1
2
3
4
5
6
8
9
10
3
4
12
13
20
16
15
17
19
18
SCROLL / SELECT
8
9
10
11
14
11
7
21