background image

Cancel

 - Return to higher-level menu

Reset

 - Restore the settings

Adjustment of the heating and cooling system

Introduction

This chapter contains information on the following subjects:
Climatronic (automatic air conditioning)

83

Auxiliary heating and ventilation

84

In the display some of the settings for the Climatronic, the auxiliary heating
and ventilation can be made.
Description of the individual systems 

» 

Vehicle Owner's Manual 

.

Note

The settings can only be made when the ignition is switched on.

Climatronic (automatic air conditioning)

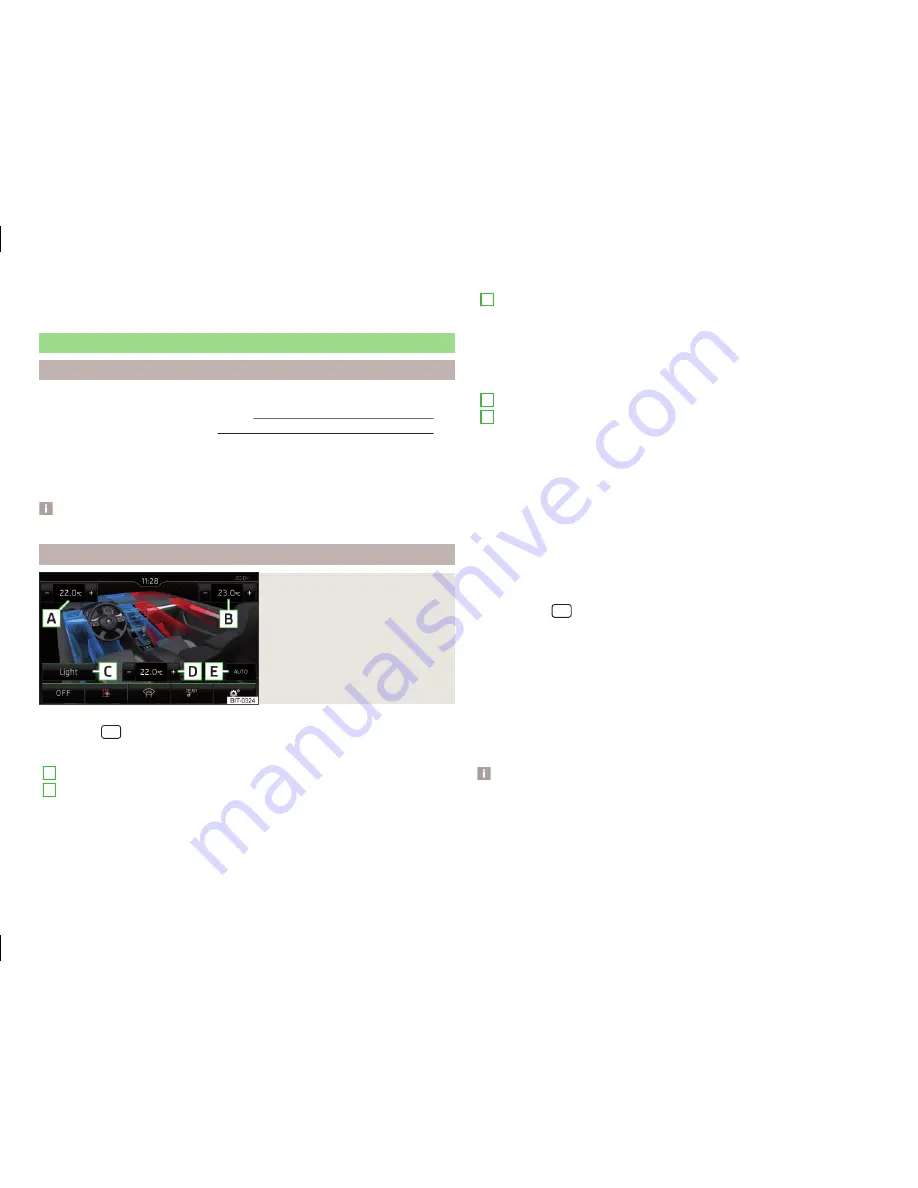
Fig. 61 

Climatronic: Main menu

Call up the main menu

Press the 



 button on the Climatronic control panel.

Function keys and screen


» Fig. 61

A

Set the desired temperature (front - left side)

B

Set the desired temperature (front - right side)

C

Setting the operating performance of the Climatronic

Light

 - Lower operating performance, quiet operation

Medium

 - Basic operational performance

Strong

 - Increased operational performance

D

Set the desired temperature (rear)

E

Currently selected mode of the Climatronic

Colour representation of the air flow from the air vents at the front

(blue colour - temperature below 22.0 ° C / red colour - temperature
above 22.5 ° C)



OFF

 turn off / 

ON

 turn on the Climatronic

Set the auxiliary heater and ventilation

Switch on/off the windscreen heating



Lock / unlock the temperature setting using the rear controls (rear
seats)

Climatronic settings

Set Climatronic

Press the key 




→ 

.

Air con. profile:

 - Set the Climatronic operating power

Light

 - Low power, quiet operation

Medium

 - Base power

Strong

 - High power

Automatic air recirculation

 - Automatic recirculated air mode on/off

Automatic supplementary heater

 - Quick interior heating on/off

Automatic windscreen heating

 - Activates/deactivates the automatic wind-

screen heating

Note

If you do not operate the unit for longer than 10 seconds in the "Climatronic"
menu and it was switched off before the menu was opened, the unit will
switch itself off.

83

Vehicle systems

Summary of Contents for Infotainment Navigation Columbus

Page 1: ...SIMPLY CLEVER Infotainment Columbus Operating Instructions ...

Page 2: ... 3V0012720FA ...

Page 3: ......

Page 4: ...otainment Navigation Columbus systems hereinafter referred to only as Device Please read these Operating Instructions carefully because the operation in accordance with these instructions is a prerequisite for proper use of the unit 3V0012720FA ...

Page 5: ...one Introductory information 39 Pairing and connecting 42 Connection using the SIM card in the external module 46 Dial telephone number 47 Telephone functions 50 Text messages SMS 51 WLAN connectivity and data connection WLAN 53 Data connection 55 MirrorLink MirrorLink 56 Navigation Navigation description 59 New destination 60 My Destinations 62 POI 64 Import custom destinations 65 Map 66 Route gu...

Page 6: ...ovide general information ŠKODA AUTO a s pursues a policy of ongoing product and model development with all vehicles Changes in terms of supply scope are possible at any time with regard to design equipment and technology The information listed in these Operating Instructions corresponds to the information available at the time of going to press It is therefore not possible for legal claims to be ...

Page 7: ...nder 1 s Hold Long press of the button for 2 5 s Text Symbols Symbol Meaning Reference to the introductory module of a chapter with im portant information and safety warnings Continuation of the module on the next page Registered Trademark Marker to the next operation step The text symbol used for the right control dial WARNING Texts with this symbol draw attention to threats of a serious accident...

Page 8: ...ID3 tag An additional feature of a music file which allows for the display of artist title album name etc MAP A Bluetooth profile for the exchange of text messages SMS between the device and a connected device mp3 Compressed audio format mp4 Compressed video format MSC A communication protocol for a USB device Abbreviation Definition MTP A communication protocol for a data device PBAP A Bluetooth ...

Page 9: ...ons Information on use updating and compatibility Read and observe and on page 6 first Refer to the ŠKODAInternet pages http infotainment skoda auto com for in formation on the compatibility of external devices as well as software updates and navigation data Component protection Read and observe and on page 6 first Some electronic control units are equipped with protection components which serve a...

Page 10: ...le The external module is located in the storage compartment on the front pas senger side CD DVD ejection button CD DVD case SD1 card slot SD2 card slot SIM card slot Touch screen The unit is equipped with a touch screen which can be operated with a light touch or swipe of a finger The brightness level of the screen can be set page 15 CAUTION Notes on operating the touch screen The screen is opera...

Page 11: ... discharged or for the protection of the device The unit will inform you by one of the following messages on the screen Warning 12 V battery low Please start the engine or switch off the Info tainment system The vehicle battery is low start the engine or turn the unit off 12V battery almost empty Infotainment system is being switched off The vehicle battery is discharged the device switches itself...

Page 12: ...ration principles 9 Alphanumeric with keyboard 10 Operation via an external device 11 This chapter covers the touch screen and its operation Operation principles Fig 4 Screen area screen display Description of the display Status bar Information and the operation of the current menu Function keys of the current menu Identification of the current menu Return to the higher level menu Slider Position ...

Page 13: ... with your finger By pressing the corresponding button next to the screen e g in the menu Media by pressing the button Switching function with Check box on off Function is switched on Function is switched off Select the menu item function value Selected menu item function value Deselected menu function value G H Set value By pressing the function button with one of the following symbols Touching o...

Page 14: ...lowed page 16 Setting of the mo bile device data transfer Some features of the application e g Entering a navigation point a data con nection must be activated page 55 Note Instructions regarding the device operation via an application is part of the ap plication Voice control Introduction This chapter contains information on the following subjects Function requirements 12 Switching on off 12 Inst...

Page 15: ...on off Read and observe and on page 11 first Switching on voice control Voice control can be switched on in one of the following ways Press the key on the device or Press the symbol button on the multifunction steering wheel Activation of voice control is indicated by an acoustic signal and the device screen will display a collection of basic voice commands for the current menu Switching off voice...

Page 16: ... the additional address exists in the street entered where appropriate It is necessary to spell city and street names if the entered destination is loca ted in a country that has no voice control available for the language The de vice indicates this through a text message on the screen not recognizing a voice command Read and observe and on page 11 first If a voice command is not recognised the de...

Page 17: ...um Folder Track re peat Mix Switch on the random track play back for the current album folder Stop mix Switch off the random track play back for the current album folder Menu Navigation Navigation parameters Voice command Operation Turn on navigation announcements Switch navigation announcements on off Turn off navigation announcements Turn on dynamic route Turn on dynamic navigation Switch naviga...

Page 18: ... Voice control volume setting for voice output Maximum switch on volume Sets the maximum volume after switching on the device Speed dependent volume adjustment Speed dependent volume increase AUX volume Sets the volume for the device connected through AUX Bluetooth audio Volume settings of the Bluetooth Audio profile connec ted device Lowering the entertainment Lowers the audio volume e g radio vo...

Page 19: ...stem Additional keypad language settings Press the key More keypad languages In this menu a keyboard language set can be added to allow the entering of characters other than those in the currently selected language function but ton Unit settings Press the key Units Distance Distance units Speed Speed units Temperature Temperature units Volume Volume units Consumption Consumption units Pressure Pre...

Page 20: ...me Change the device name Paired devices Display the list of coupled Bluetooth Devices Find devices Searches for available devices Bluetooth Audio A2DP AVRCP Turn on off the ability to connect an au dio device e g MP3 player tablet etc System Information Press the key System Information Device part number Part number of the unit Hardware Version of the hardware used Software Version of the softwar...

Page 21: ...Radio Text AM FM Description of the group DAB Preset station buttons for favourite channels Choice of radio range FM AM DAB Choice of storage group for the preferred station Changing the station List of available stations Manual semi automatic station search Radio text display and images presentation DAB Menu Settings Radio Information symbol in the status line Symbol Meaning Traffic information s...

Page 22: ...of the function button A Fig 7 Alphabet alphabetical order according to station name Group Sort according to program identification of the broadcast program Search and select available stations Read and observe on page 18 first Search stations manually In the Radio menu press the function key The scale of the current broadcasting range appears Set the desired station AM FM the desired group DAB in...

Page 23: ...DAB Assign station logo manually A logo can be assigned manually for the preferred station In the Radio menu press the function key Station logos A menu with preset buttons for stations is displayed Press the preset button for the station which a logo is to be assigned to A menu of media SD card USB is displayed In the relevant media select the logo you want to have Remove station logo In the Radi...

Page 24: ...on change function keys Preset list Change between stations stored under the preset buttons Station list Change between all available stations of the selected broad casting range Traffic programme TP Switches traffic programme on off Delete presets Deletes the preset buttons Station logos manual assignment removal of station logos Radio text Switching the text display radio valid only for FM and D...

Page 25: ...everal broadcast stations and if the cur rent station group is not available on any other frequency then when the sig nal is poor the same station will be searched in another channel group Automatic change from DAB to FM With bad DAB reception the device tries to find an FM transmitter The station name is followed by while the station is being received on the FM band The marker disappears when the...

Page 26: ...er in the area C Fig 9 a list of albums is displayed Movement within the album list can be performed by moving a finger across the screen to the right or left or by turning the controller After five seconds since the last operation the display returns to the main menu Note Information concerning the given title appears on the screen if they are stor ed as so called ID3 Tag on the audio source If n...

Page 27: ...Press and hold Play the previous track Press from within 3 seconds after the start of the track playback Finger movement to the right of the screen area A Fig 9 on page 23 Within 3 seconds after the start of the track playback Operation Action Play the next track Press from Finger movement to the left of the screen area A Fig 9 on page 23 Switch on off the random playback from the current album or...

Page 28: ...ire source content source folders Select the audio source A B Sorting according to the track list name Sorting according to the artist s name Sorting according to the album name Sorting according to the track title Sorting according to the podcast name Sorting according to the genre type Sorting according to the composer s name Sort according to audio books name For playback the category and then ...

Page 29: ... memory available and you can save 3 000 files In the internal database the files are sorted according to categories View Jukebox Press the key 1 Fig 10 on page 23 Jukebox Select files folders for import Shows the source folder overview function keys for higher level sour ces folders Parent folder Folder File Import into the Jukebox Show level of the internal device memory Press the key Manage juk...

Page 30: ... this class 1 laser product is so weak that there is no risk of danger when operated correctly This product is designed such that the laser is restricted to the inside of the unit However the installed laser could be classified in a higher class were the housing to be removed For this reason never remove the hous ing of the unit CAUTION Be sure to remove the CD DVD before you try to insert a new C...

Page 31: ...nt rear Read and observe and on page 26 first The USB input audio source can be connected directly or via a connecting ca ble Some audio sources connected to the USB input can be operated from this de vice Installation locations of the USB inputs Fig 16 In the front centre console In the rear centre console The inputs are marked with the symbol Connect the USB audio source Plug the USB audio sourc...

Page 32: ...nd then the desired player Separate the Bluetooth player Terminate the connection in the list of paired devices page 45 If an Apple device is connected as a Bluetooth player and this is connected to the USB input then the Bluetooth connection is dropped The following warning message appears in the screen Bluetooth Audio A2DP Connection cancelled WIFI Read and observe and on page 26 first The devic...

Page 33: ...and on page 26 first Supported audio sources Source Interface Type Specification File sys tem SD card SD reader Standard size SD SDHC SDXC FAT16 VFAT FAT32 exFAT NTFS USB Devices USB 1 x 2 x and 3 x or higher with support of USB 2 x MSC SB stick HDD without special software The MSC mode supporting USB devices MTP Devices with the Android operat ing system or Windows mobile mobile tele phone tablet...

Page 34: ...ources are not supported by the device Files that are protected by Digital Rights Management DRM technology can not be played back by the device Images Image viewer Introduction This chapter contains information on the following subjects Main menu 31 Select image source 32 Operation 32 Image with GPS coordinates 32 Supported image sources and file formats 33 Settings 33 Note Viewing images in the ...

Page 35: ...ouch screen using two fingers and pull apart Turning the knob to the right Operation Action Reduce the image size Touch screen using two fingers and close to gether Turning the knob to the left Moving the image with an en larged display Drag your finger over the screen in the re quired direction Rotate by 90 Touch screen using two fingers and move clockwise or counter clockwise only availa ble wit...

Page 36: ...g the aspect ratio Automatic Full screen display Display time Set the display time for the slideshow Repeat slide show Switching on off the slideshow repeat DVD video Video player Introduction This chapter contains information on the following subjects Main menu 33 Select a video source 34 Video playback 34 DVD menu 34 Supported video sources and file formats 35 Settings 36 First and foremost pay ...

Page 37: ...d 1 inserted SD card 1 SD Card 2 inserted SD card 2 USB 1 Connected to the USB input video source in the front centre con sole USB 2 Connected to the USB input audio source in the front centre con sole Video playback Playback starts automatically when a CD DVD is inserted into the slot in the external module In other cases the video source must be selected and the video file started manually C Ope...

Page 38: ...ication File sys tem SD card SD reader Standard size SD SDHC SDXC FAT16 VFAT FAT32 exFAT NTFS USB Devices USB 1 x 2 x and 3 x or higher with support of USB 2 x MSC SB stick HDD without special software The MSC mode supporting USB devices MTP Devices with the Android operat ing system or Windows mobile mobile tele phone tablet Apple Devices with the operating system iOS iPhone iPod iPad CD DVD CD D...

Page 39: ...r parental settings Management of the PIN code for parental control Parental settings level Settings of the parental control TV tuner TV function Introduction This chapter contains information on the following subjects Main menu 36 Station list Memory list 37 Find available stations and select 37 EPG and teletext 38 Settings 38 The unit has a TV tuner to receive digital TV channels DVB T and DVB T...

Page 40: ...TV tuner press the function key or A B C In the main menu TV tuner turn the control It is the station list is shown Fig 22 Store the station in the station list In the station list press the function key Save A list of function keys is displayed Fig 22 Press the corresponding station key Up to 99 stations can be stored in the memory list Find available stations and select Setting stations In the m...

Page 41: ...urn to start page teletext Symbol Operation Switching between numeric keypad and directional ar rows teletext Movement in the EPG teletext Confirmation Switch to the station to watched according to the EPG entry Display program information for the last 24 hours EPG Display program information for the next 24 hours EPG Display the specified line in the lower teletext page the same colour field or n...

Page 42: ...utgoing calls it is possible to use only the primary SIM card or select one of the SIM cards of the telephone depending on the telephone type The device allows you to work with text messages SMS of the main tele phone or SIM card in the external module with activated telephone services WARNING The national regulations for using a mobile telephone in a vehicle must be observed Possible connection t...

Page 43: ... status of the telephone battery Missed call Current call Incoming SMS Settings Read and observe on page 39 first Press the key Hands free Switching a call to the telephone back to the device the menu item is displayed during a call Select telephone Search for available telephones list of paired tele phones select telephone Find telephone Search for available telephones Bluetooth Bluetooth setting...

Page 44: ... messages on the SIM card or the connected telephone No account Without priority selection of the SIM card or the connected telephone required SIM A list of text messages on the SIM card MAP A list of text messages of the connected telephone Premium telephone Enable disable the use of data and telephone serv ices of the inserted SIM card and connect to the telephone via the rSAP pro file Use SIM c...

Page 45: ... activated telephone serv ices then only one telephone can be connected with the device Depending on the telephone used only those telephone contact lists and text messages SMS are available Note The range of the connection to the hands free system is limited to the pas senger compartment The maximum number of paired telephones is 20 Pairing a new telephone after reaching the maximum number causes...

Page 46: ...ct telephone The following menu appears in the screen Cancel Cancel the coupling Replace Pairing and replacement of the main telephone Add Pairing as additional telephone the menu is not visible when the tele phone is connected via the rSAP profile Select the desired connection type Confirm the coupling After pairing confirmation the telephone connects to the device Pair the telephone when the mai...

Page 47: ... to the device Pairing from the telephone When pairing from the telephone follow the instructions in the telephone owner s manual Search available Bluetooth devices in your telephone Select the Bluetooth device unit The device is displayed in the telephone to be connected to as SKODA BT is replaced with the last four symbols of the vehicle identification number VIN of your vehicle Confirm the pair...

Page 48: ...s free profile HFP A device that supports the connection on the remote transmission of the SIM data rSAP green A device that is connected via the handsfree profile HFP A device that is connected to the remote transmis sion of the SIM data rSAP grey A device that supports the connection via the audio profile white A device that is connected via the audio profile grey A device that only supports the...

Page 49: ...e in the glove box on the front passenger side A SIM card size mini standard size 25x15 mm is to be used CAUTION When inserting an improperly sized SIM card there is a risk of damaging the device Avoid using a an adapter for the SIM card as the SIM card may fall out while driving due to vehicle vibrations There is a risk of damage to the external module Delete all Slot in SIM card and establish co...

Page 50: ...y with the name of your data connection provider Set the parameters for the data connection page 55 Change PIN code Press the key PIN setup Change PIN Enter the new PIN code and confirm Remove SIM card Read and observe on page 46 first Press on the inserted SIM memory card The SIM card jumps into the eject position Remove the SIM card from the slot CAUTION If you let the SIM card protrude out from...

Page 51: ... be made then a ŠKODA service partner should be consulted Search for a contact using the numeric keypad The numeric keypad can also be used for a contact search For example if you enter 32 the unit will display contacts with the letter se quence DA FA EB etc next to the numerical keypad List of telephone contacts Fig 30 List of telephone contacts contact details The contact list contains telephone...

Page 52: ...occurs while importing the following message appears Import failed Please try again and check whether the BT device allows connec tions Refresh list If the telephone is connected to the device again the list is updated automati cally The update can be performed manually as follows Press the key User profile Import contacts During updating the number of imported contacts to the device memory the nu...

Page 53: ...e the microphone Activate the microphone Show caller details if the contact is stored in the list Switch the call to the telephone Press in the menu Telephonethe function button Hands free Switch the call back to the device Press in the menu Telephone the function button Note If the incoming call is answered by the auxiliary telephone and the caller has been imported into your contact list from th...

Page 54: ... telephone services and a telephone is connected to the device then a selection has to be made between the SIM card and the telephone The priority with respect to the use of the SIM card and the connected tele phone can be set as follows In the main menu Telephone press the function key Text message set tings Standard account Select the desired menu item Open a list for quick answer provided short...

Page 55: ...been opened the following functions can be executed Fig 34 Insert a contact in the recipient list Contact search Enter the telephone number Return to view the message After selecting the contact number or entering the telephone number the re cipient list will be displayed in the screen Fig 34 The following functions can be performed by pressing one of the function keys Display the contact list wit...

Page 56: ...e for playing audio files in the menu Media After switching on the ignition the last used WLAN connection appears Switch on off WLAN and select the WLAN mode Enable disable WLAN Press the key WLAN WLAN Select the WLAN mode The mode WLAN Hotspot allows you to connect an external device with WLAN of the device The mode WLAN client allows you to connect the device with WLAN of an ex ternal device If ...

Page 57: ...ction keys are displayed Fig 35 Currently connected WLAN network Delete the WLAN access password from the device memory appears only with previously connected WLAN networks WLAN security type WPA WPA security WPA2 WPA2 security Open Without security without WLAN access password WLAN signal strength if the icon is entirely grey the WLAN network is not available Search for available WLAN networks Ma...

Page 58: ...odule and es tablish the data connection page 46 Data connection via WLAN Connect the device to an external device with activated data services over the WLAN client mode page 54 Settings Press the key Network Network settings The data connection settings according to your respec tive telephone service provider APN settings Access point name Set the access point name User name Setting of the user n...

Page 59: ... switched on over the entire duration of the connection for trouble free functioning of MirrorLink Connect disconnect Read and observe on page 56 first Connection set up Turn on the ignition and switch on the device Connect the equipment to one of the USB inputs Fig 16 on page 28 Press the key Selection Select the desired device By connecting the device to the device the function of the connected ...

Page 60: ...he current running application various function keys of the connected device can be displayed at the most three at the same time A B Display hidden function keys If the icon can be seen in the device screen when the function keys are mut ed then push the controller Display of the running application In the list of applications press the function key Fig 36 on page 56 Ending the application Press t...

Page 61: ...patible The application is not certified Error App MirrorLink connection is not available Check the connection to the USB input No compatible apps were found on the device The MirrorLink may not be supported by the device There is no certified MirrorLink Application available it is possibly that the function MirrorLink is not supported by the device The app is unavailable while the vehicle is in m...

Page 62: ...lites To view the elevation information of the current vehicle position display re quires the reception of GPS signals from at least five satellites Navigation data Navigation data source The navigation data is stored in the internal memory Finding out the version of the navigation data In the main menu press the Navigation function key Version information Update navigation data We recommend that ...

Page 63: ...ss 60 Enter POI 61 Enter destination on the map 61 Enter destination via GPS coordinates 61 Enter destination in route 62 This chapter covers the input options for a new destination target Enter the destination address Fig 40 List of places found If no guidance takes place then press the function key in the main menu Navigation If a route guidance does occur then in the main menu Navigation press ...

Page 64: ...nter destination on the map If no guidance takes place then in the main menu Navigation press the function key Options On map If a route guidance does occur then in the main menu Navigation press the function key New dest stopover Options On map Move the destination onto the cross line position on the map Press the function key Start If the menu setting for the alternative routes is turned on the ...

Page 65: ...stored in the device memory List of registered destinations Fig 43 List of stored destinations Display list of stored destinations Press in the Navigation main menu the function key Destinations The last selected list of registered destinations are displayed The following functions can be performed from the displayed list Destination search by name with more than 5 entries Management of the stored...

Page 66: ... key Manage memory Define home address With a stored home address press the function key Edit With an unstored home address the device request the entry of an address Edit the home address or set one up using the current vehicle position or by entering the address Delete home address Press in the Navigation main menu the function key Manage memory Delete user data Home address Press the function k...

Page 67: ...ng the route is displayed Select the desired POI Press the function key Start If the menu setting for the alternative routes is turned on the guidance for this route type economic fast short must be selected before starting If the destination entry occurs during route guidance the destination change must be confirmed by pressing the function key start in addition to confirming in the following men...

Page 68: ...ted into the de vice memory Custom destinations can be created by means of the ŠKODA application MyDestination For additional information see the following ŠKODA Internet pages D E F G H I http infotainment skoda auto com Custom destination in vCard format In the device memory a custom destination can be imported in the vCard for mat vcf from an SD card or a USB source Import Insert the SD card in...

Page 69: ...tart If the menu setting for the alternative routes is turned on the guidance for this route type economic fast short must be selected before starting If the destination entry occurs during route guidance the destination change must be confirmed by pressing the function key start in addition to confirming in the following menu that appears Delete Press in the Navigation menu the function key Manag...

Page 70: ...les then the map is automatically displayed as 2D and aligned in the direction of north If the scale is increased beyond this value then the map is switched back to the original representation A B C D E Options for map display in the split screen Fig 48 Map in the split screen example of a function key menus Press the function key in the split screen Map or Fig 48 Depending on the context some of ...

Page 71: ... on in the assistance sys tems page 80 Map Orientation The map in the 3D display is aligned only with respect to the direction of travel The map in the 2D display can be oriented to the north or in relation to the di rection of travel A change of map orientation is only possible when the map is centred on the vehicle position the function key or is not shown Change the map orientation Press in the...

Page 72: ...dis played depending on the map display Aligning to the vehicle position in the 2D map display or 3D map dis play Alignment to the destination position in the destination position display Route alignment in the route display Route guidance Introduction This chapter contains information on the following subjects Destination management 70 Route calculation 70 Route change in the map 71 graphical dri...

Page 73: ...of the POI A B C Store destination Press the Store key Name destination and confirm store Edit destination By pressing the function key Edit the following menu is displayed for the desti nation processing Delete Delete the destination Store as Edit the name and then store the destination Favourite Add or remove the destinations as favourites Route calculation Fig 50 Alternative routes Read and obs...

Page 74: ...route in map Touch the screen in the route field and move the cross point to the desired location on the map e g A move Fig 51 The transit point B is added to the route Fig 51 Press the function key A route calculation occurs and route guidance starts Customize transit point Press in the Navigation main menu the function key Change route in map Touch the transit point B and move to a different loc...

Page 75: ...ts Route information Read and observe on page 70 first During route guidance detailed route information can be displayed A B C D Press in the Navigation main menu the function key Route information Depending on the context some of the following information is displayed Information to the final destination Distance to the destination Arrival time at destination1 Remaining travel time to the destina...

Page 76: ...function key D Edit tour Fig 54 Edit tour Open edit tour starts a route guidance Press in the Navigation main menu the function key Edit tour Insert destination in the tour Press the function key A Fig 54 and enter a new destination or Press the function key B and select a destination from the list of registered destinations Each additional destination is added to the list as the final destination...

Page 77: ...lace Delete Edit Start List of traffic reports Fig 55 List of traffic reports The device allows you to receive TMC traffic reports Traffic Message Channel which contain information regarding traffic obstructions During route guidance information messages are issued from the device with respect to traffic congestion Show list Press the button A list of traffic reports is shown Fig 55 The list of tr...

Page 78: ...ce takes place Gray The traffic obstruction is not on the route Red The traffic obstruction is on the route do recalculation of the route takes place and the route passes through the traffic obstruction Orange The traffic obstruction is on the route a recalculation of the route takes place and an alternative route is available Dynamic route The device allows an evaluation of the traffic reports du...

Page 79: ... Switch on off use of toll roads for the route calculation Avoid tunnels Switch on off use of tunnels for the route calculation Avoid routes requiring toll stickers Switch use of routes requiring toll stickers on off for route calculation Available toll stickers Selection of countries for which a valid toll sticker is required routes requiring toll stickers are used for route calculation Map Press...

Page 80: ...ce in demo mode Define demo mode starting point Enter the start point of the route guid ance in the demo mode Cancel Cancel the entry Position Enter the current vehicle position as the starting point Address Enter an address as the starting point Manage memory Press in the Navigation menu the function key Manage memory Sort by Setting the configuration of the telephone book Surname Sort by contact...

Page 81: ...he individual systems Vehicle Owner s Manual Note Settings relating to the vehicle systems can only be made when the ignition is switched on Main menu Fig 57 Function keys in the main menu Function keys in the main menu Fig 57 Selecting the following menu points Convenience consumers Driving data DriveGreen Vehicle status Operation of the radio media TV playback Depending on the vehicle equipment ...

Page 82: ...Vehicle status In the screen information regarding vehicle condition or function of the tyre pressure monitor is displayed Using the function keys select the menu item Vehicle status Function keys and screen Fig 59 A Vehicle representation the zones of the vehicle are shown in different colours corresponding to any warning messages that occur The warn ing messages are displayed once you touch the ...

Page 83: ...additional traf fic signs in the display of the instrument cluster Trailer recognition show road signs Activate deactivate the Dynamic Road Sign Display relevant for trailer operation Top speed2 Set the top speed for towing a trailer Warning2 Activation deactivation and setting for the excessive speed warning Off The warning is deactivated At 0 km h Warning when reaching the speed limit At 5 km h ...

Page 84: ...tion deactivated Interior lighting Fig 60 Interior lighting Press the key Background lighting Description of the function keys Fig 60 Setting the interior lighting Off Switch off the interior lighting White White colour for the interior lighting Red Red colour for the interior lighting Green Green colour for the interior lighting Activation of the brightness setting for all areas at the same time ...

Page 85: ...tal speed display Display of current speed on off Dynamic Road Sign Display Turn on off the display of detected traffic signs Speed warning Winter tyres warning on off Oil temperature Oil temperature on off Reset Since start driving data Reset the single trip memory in the device screen and in the display of the instrument cluster Reset Long term driving data Reset the long term memory in the devi...

Page 86: ...n Medium Basic operational performance Strong Increased operational performance D Set the desired temperature rear E Currently selected mode of the Climatronic Colour representation of the air flow from the air vents at the front blue colour temperature below 22 0 C red colour temperature above 22 5 C OFF turn off ON turn on the Climatronic Set the auxiliary heater and ventilation Switch on off th...

Page 87: ...tly displayed preset time Setting the departure time Day hour minute Only one preset time can be active The activated preset time will be deactiva ted again after it has started automatically For the next start activate one of the preset times The switched on system switches off on expiration of the operating duration or can be deactivated by pressing the icon for direct on off switching or via ra...

Page 88: ...g 81 Comfort flashing 81 COMING HOME 81 Component protection 6 Conditions for coupling 42 Conference call 50 Convenience consumer 78 Cooling system 83 Coupled device SIM card is inserted a connected telephone 44 Couple device no telephone connected 43 Custom destination 65 Custom destinations 65 Custom POI category 66 D DAB 18 Additional information 21 Radio text and image presentation 21 Settings...

Page 89: ...V tuner 38 ESC sport 79 ESC system 79 external module SIM card 46 External module CD DVD 27 DVD Video 34 SD card 28 SIM card 47 Extra window Manoeuvre 71 F Factory settings 17 82 Favourite 70 File formats DVD video 35 Images 33 Media 30 Flagged destination 63 FM 18 Settings 21 Forward calls 40 Frequency range See main menu 18 Front Assist 80 Fuel options 76 Function keys 9 Function problems Mirror...

Page 90: ...isplay 66 Display options 67 Display options in the split screen 67 Fast Map 68 Lane recommendation 76 Main menu 66 Manual scale 68 Map alignment 69 Operation 66 Orientation 68 POI display 76 Road sign 68 Traffic sign display 76 Media 23 Audio source 25 AUX 29 Bluetooth Audio 29 Browser 24 CD DVD 27 File formats 30 Foreword 23 Jukebox 26 List 24 Main menu 23 Multimedia database 25 Operation 23 Pla...

Page 91: ...referred type of route 76 Route calculation 70 Route change 71 Route display 67 Route display in the split screen 67 Route guidance 69 Route information 72 Route options 76 Settings 76 Split screen 60 Status line 77 Stopover 62 Stored destinations 62 Tour 73 Tour memory 74 Traffic reports TMC 74 Transit point 71 Voice control 11 Navigation announcements 76 Navigation data 59 Nav announcements 72 N...

Page 92: ...82 Select a video source DVD Video 34 Select frequency range See main menu 18 Select image source Images 32 Select radio station See main menu 18 Select Source Media 23 Service 82 Settings Additional keyboard languages 16 Bluetooth 17 DAB 22 Data connection 55 Device language 16 Device screen 15 DVD video 36 FM 21 Images 33 Keyboard 16 Manage favourites 49 Media 25 MirrorLink 16 57 Navigation 76 N...

Page 93: ...SAP 39 43 Settings 40 SIM card 39 Telephone 40 Telephone book 48 Telephone conversation 50 Telephone number prefix 47 Telephone search 42 Text messages SMS 51 User profile 40 Voice control 11 Telephone book 48 Telephone connection types 39 Telephone conversation 50 Telephone functions 50 Telephone number 47 Telephone number prefix 47 Telephone search 42 Teletext TV tuner 38 Text messages 51 new 51...

Page 94: ... Stop restore input 13 switching on off 12 Voice command input correction 13 Volume 8 Volume setting 8 W Waiter Voice control 13 Warning messages 79 Warning when locking unlocking 81 WIFI 29 Window operation 81 Window comfort operation 81 Window operations 81 Windscreen Automatic wiping when raining 81 Heating 78 83 Windscreen heating 78 Wiper 81 WLAN 53 Client 54 Enable disable WLAN 54 Hotspot 54...

Page 95: ... any other use either in whole or in part is not permitted without the written consent of ŠKODA AUTO a s ŠKODA AUTO a s expressly reserves all rights relating to copyright laws Subject to change Issued by ŠKODA AUTO a s ŠKODA AUTO a s 2015 ...

Page 96: ...www skoda auto com Columbus Superb anglicky 03 2015 S75 5614 02 20 3V0012720FA 3V0012720FA ...

Reviews: