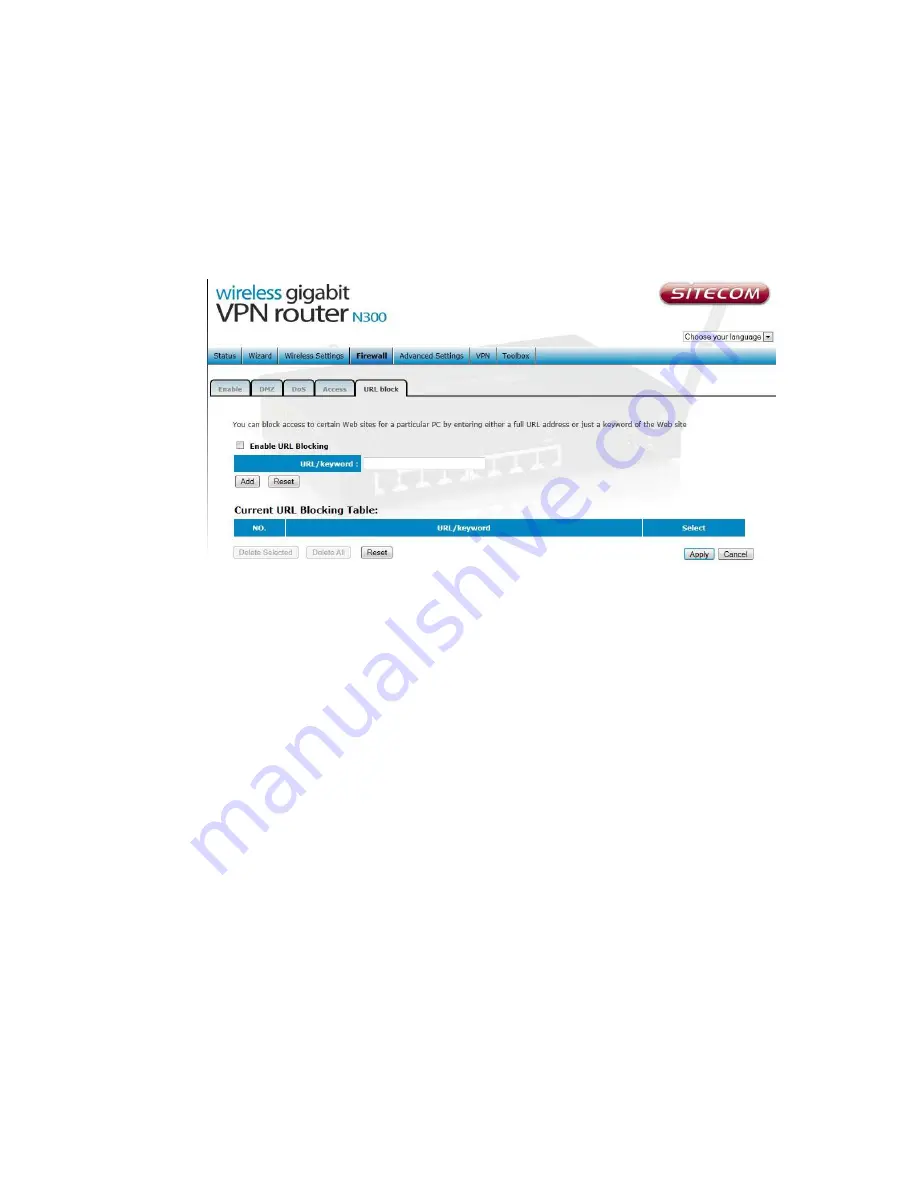
background image


50


URL block 


You can block access to some Web sites from particular PCs by entering a full 

URL address or just keywords of the Web site. 


Enable URL

 Blocking Enable/disable URL Blocking 


Add URL Keyword

 Fill in “URL/Keyword” and then click “Add”. You can enter 

the full URL address or the keyword of the web site you want to block.  


Remove URL Keyword

 If you want to remove some URL keywords from the 

"Current URL Blocking Table", select the URL keyword you want to remove in 

the  table  and  then  click  "Delete  Selected".  If  you  want  remove  all  URL 

keywords  from  the  table,  just  click  "Delete  All"  button.  If  you  want  to  clear 

the selection and re-select again, just click “Reset”.  


Click <

Apply

> at the bottom of the screen to save the above configurations 

Summary of Contents for N300

Page 1: ...WLR 4002B ...

Page 2: ...R 10 3 5 OTHERS 10 4 PRODUCT LAYOUT 11 BACKLABEL 12 LED DEFINITION 13 5 NETWORK SYSTEM REQUIREMENTS 14 6 WLR 4002B PLACEMENT 14 7 SETUP LAN WAN 15 8 PC NETWORK ADAPTER SETUP 17 9 BRINGING UP THE WLR 4002B 21 10 INITIAL SETUP WLR 4002B 21 LOGIN PROCEDURE 21 LAN SETTINGS 23 DEVICE STATUS 25 INTERNET STATUS 26 DHCP CLIENT STATUS 27 WLR 4002B LOG 28 STATISTICS 29 ...

Page 3: ...2 VIRTUAL SERVER 54 SPECIAL APPLICATIONS 56 APPLICATION LAYER GATEWAY 58 UPNP 59 QOS 60 15 VPN 62 STATUS 62 USING THE WIZARD TO CONFIGURE THE WLR 4002B FOR A PPTP VPN TUNNEL 63 USING THE WIZARD TO CONFIGURE THE WLR 4002B FOR L2TP OVER IPSEC VPN TUNNEL 66 CONFIGURING A MICROSOFT WINDOWS 7 VPN CLIENT 70 CONFIGURING A MICROSOFT WINDOWS XP VPN CLIENT 77 CONFIGURING A MACOS VPN CLIENT 85 CONFIGURING A ...

Page 4: ...VER IPSEC 106 USER SETTING 107 EXAMPLE OF CONFIGURING IPSEC SITE TO SITE ARCHITECTURE 108 16 TOOLBOX 112 SITECOM CLOUD SECURITY 112 PASSWORD CHANGE OPTIONS 117 TIME ZONE 118 REMOTE MANAGEMENT 119 FIRMWARE UPGRADE 120 BACKUP SETTINGS 121 RESET 122 DDNS 123 ...

Page 5: ......

Page 6: ...ation contained in this manual was correct at the time of publication However as our engineers are always updating and improving the product your device s software may have a slightly different appearance or modified functionality than presented in this manual ...

Page 7: ...a single wireless channel giving you seamless access to multimedia content The robust RF signal travels farther eliminates dead spots and extends the network range For data protection and privacy the WLR 4002B encodes all wireless transmissions with WEP WPA or WPA2 encryption With the inbuilt DHCP Server powerful SPI firewall the WLR 4002B protects your computers against intruders and most known I...

Page 8: ...rver Mapping DMZ IP Filter ICMP Blocking SPI Avoids the attacks of Hackers or Viruses from Internet Support 802 1x authenticator 802 11i WPA WPA2 AES VPN pass through Provide mutual authentication Client and dynamic encryption keys to enhance security WDS Wireless Distribution System Make wireless AP and Bridge mode simultaneously as a wireless repeater Theoretical wireless signal rate based on IE...

Page 9: ...ed below are missing Do not discard the packing materials in case of return the unit must be shipped back in its original package 1 The WLR 4002B Router 2 A 110V 240V to 12V 1A Switching Power Adapter 3 A Quick Install Guide 4 A CD User s Manual 5 A Warranty card 6 An UTP cable 7 2 antennas ...

Page 10: ...pair the router yourself you might damage the router or endanger yourself 3 4 Disposing of the Router When you dispose of the router be sure to dispose it appropriately Some countries may regulate disposal of an electrical device please consult with your local authority 3 5 Others When using this router please do not let it come into contact with water or other liquids If water is accidentally spi...

Page 11: ...11 4 Product Layout Port Description Power connector Connect the 12V DC adapter to this port LAN 1 7 Connect your PC s or network devices to this port WAN Connect your ADSL Cable modem to this port ...

Page 12: ...s the IP address login details SSID security code and WPS button functionality Button Description OPS BUTTON Press 1 5 seconds for OPS mode Press 10 15 seconds to reset the router Press 15 Seconds to reset the router to factory defaults ...

Page 13: ...he cable is connected LAN Blue Shows the cable is connected LAN Blue Shows the cable is connected LAN Blue Shows the cable is connected WAN Blue Shows the cable is connected WiFi Blue Shows WiFi activity Power Red Shows the device is turned on OPS White Shows OPS activity ...

Page 14: ...t RJ 45 PC with a Web Browser Internet Explorer Safari Firefox Opera Ethernet compatible CAT5e cables 6 WLR 4002B Placement You can place the WLR 4002B on a desk or other flat surface or you can mount it on a wall For optimal performance place your Wireless Broadband Router in the center of your home or your office in a location that is away from any potential source of interference such as a meta...

Page 15: ...15 7 Setup LAN WAN WAN connection ...

Page 16: ...16 LAN connection ...

Page 17: ...17 8 PC Network Adapter setup Windows XP Enter Start Menu select Control panel select Network Select Local Area Connection icon select properties ...

Page 18: ... Select Internet Protocol TCP IP Click Properties Select the General tab The router supports DHCP function please select both Obtain an IP address automatically and Obtain DNS server address automatically ...

Page 19: ...19 Windows Vista Seven Enter Start Menu select Control panel select View network status and tasks select Manage network connections Select Local Area Connection icon select properties ...

Page 20: ...t Internet Protocol Version 4 TCP IPv4 Click Properties Select the General tab The router supports DHCP function please select both Obtain an IP address automatically and Obtain DNS server address automatically ...

Page 21: ...he switch on the back of the device The WLR 4002B automatically enters the self test phase During self test phase the Power LED will be lit continuously to indicate that this product is in normal operation 10 Initial Setup WLR 4002B LOGIN procedure 1 OPEN your browser e g Internet Explorer 2 Type http 192 168 0 1 in the address bar and press Enter ...

Page 22: ...be found on the back of he router 4 Click OK 5 You will see the home page of the WLR 4002B The System status section allows you to monitor the current status of your router the UP time hardware information serial number as well as firmware version information is displayed here ...

Page 23: ...fy a Subnet Mask for your LAN segment 802 1d Spanning Tree is Disabled by default If the 802 1d Spanning Tree function is enabled this router will use the spanning tree protocol to prevent network loops DHCP Server Enabled by default You can enable or disable the DHCP server When DHCP is disabled no ip addresses are assigned to clients and you have to use static ip addresses When DHCP server is en...

Page 24: ...riod is reached IP Address Pool You can select a particular IP address range for your DHCP server to issue IP addresses to your LAN Clients Note default IP range is 192 168 0 100 192 168 0 200 If you want your PC s to have a static fixed IP address then you ll have to choose an IP address outside this IP address Pool Domain Name You can specify a Domain Name for your LAN or just keep the default s...

Page 25: ...25 Device Status View the Broadband router s current configuration settings Device Status displays the configuration settings you ve configured in the Wizard Basic Settings Wireless Settings section ...

Page 26: ...isplays whether the WAN port is connected to a Cable DSL connection It also displays the router s WAN IP address Subnet Mask and ISP Gateway as well as MAC address the Primary DNS Press the Renew button to renew your WAN IP address ...

Page 27: ... address and expiration time for each DHCP leased client Use the Refresh button to update the available information You can check Enable Static DHCP IP It is possible to add more static DHCP IPs They are listed in the table Current Static DHCP Table IP can be deleted at will from the table Click apply button to save the changed configuration ...

Page 28: ... occurred after system start up At the bottom of the page the system log can be saved Save to a local file for further processing or the system log can be cleared Clear or it can be refreshed Refresh to get the most updated information When the system is powered down the system log will disappear if not saved to a local file ...

Page 29: ...29 Statistics Shows the counters of packets sent and received on WAN LAN WLAN ...

Page 30: ...ion Wizard Click Wizard to configure the router The Setup wizard will now be displayed check that the modem is connected and click Next Select your country from the Country list Select your internet provider Click Next ...

Page 31: ...the chosen provider you may need to enter your user name and password MAC address or hostname in the following window After you have entered the correct information click Next Click APPLY to complete the configuration ...

Page 32: ... that are used for the wireless stations to connect to this router The parameters include Mode ESSID Channel Number and Associated Client Wireless Function Enable or Disable Wireless function here Click Apply and wait for module to be ready loaded ...

Page 33: ...le SSID Allows you to enable up to four SSIDs for this router SSID This is the name of the wireless signal which is broadcasted All the devices in the same wireless LAN should have the same ESSID Channel The channel used by the wireless LAN All devices in the same wireless LAN should use the same channel When Auto is selected the router will automatically determine which wireless channel is most s...

Page 34: ...s can associate with this wireless router without WEP encryption When you select Shared Key you should also setup a WEP key in the Encryption page After this has been done make sure the wireless clients that you want to connect to the device are also setup with the same encryption key Fragment Threshold Fragment Threshold specifies the maximum size of a packet during the fragmentation of data to b...

Page 35: ...ompliant wireless nodes Highest to lowest data rate can be fixed Channel Bandwidth is the range of frequencies that will be used Preamble Type The Long Preamble can provide better wireless LAN compatibility while the Short Preamble can provide better wireless LAN performance CTS Protection It is recommended to enable the protection mechanism This mechanism can decrease the rate of data collision b...

Page 36: ...ction and are setup with the same security key SSID Selection Here you choose the SSID for which you wish to set the security Broadcast ESSID If you enabled Broadcast ESSID every wireless station located within the coverage of this access point can discover this access point easily If you are building a public wireless network enabling this feature is recommended Disabling Broadcast ESSID can prov...

Page 37: ...37 Disable When you choose to disable encryption it is very insecure to operate the router ...

Page 38: ...tocol Every user must use a valid account to login to this Access Point before accessing the wireless LAN The authentication is processed by a RADIUS server This mode only authenticates users by IEEE 802 1x but it does not encrypt the data during communication ...

Page 39: ...ll be the higher level of security is used but the throughput will be lower Key Format You may select ASCII Characters alphanumeric format or Hexadecimal Digits in the A F a f and 0 9 range to be the WEP Key Key1 Key4 The WEP keys are used to encrypt data transmitted in the wireless network Use the following rules to setup a WEP key on the device 64 bit WEP input 10 digits Hex values in the A F a ...

Page 40: ...tings and reboot the device WPA Pre shared Key Wi Fi Protected Access WPA is an advanced security standard You can use a pre shared key to authenticate wireless stations and encrypt data during communication It uses TKIP or CCMP AES to change the encryption key frequently So the encryption key is not easy to be cracked by hackers This is the best security available ...

Page 41: ... security standard You can use an external RADIUS server to authenticate wireless stations and provide the session key to encrypt data during communication It uses TKIP or CCMP AES to change the encryption key frequently Press Apply button when you are done ...

Page 42: ... difficulties filling in the fields just click Clear and both MAC Address and Comment fields will be cleared Remove an address from the list If you want to remove a MAC address from the Current Access Control List select the MAC address that you want to remove in the list and then click Delete Selected If you want to remove all the MAC addresses from the list just click the Delete All button Click...

Page 43: ...s two types of WPS WPS via Push Button and WPS via PIN code If you want to use the Push Button you have to push a specific button on the wireless client or in the utility of the wireless client to start the WPS mode and switch the wireless router to WPS mode You can simply push the WPS button of the wireless router or click the Start to Process button in the web configuration interface If you want...

Page 44: ... name SSID of the router Authentication Mode It shows the active authentication mode for the wireless connection Passphrase Key It shows the passphrase key that is randomly generated by the wireless router during the WPS process You may need this information when using a device which doesn t support WPS WPS via Push Button Press the button to start the WPS process The router will wait for the WPS ...

Page 45: ...ers thus limiting the risk of hacker attacks and defending against a wide array of common Internet attacks However for applications that require unrestricted access to the Internet you can configure a specific client server as a Demilitarized Zone DMZ Note To enable the Firewall settings select Enable and click Apply ...

Page 46: ...at the virtual server re directs a particular service Internet application e g FTP websites to a particular LAN client server whereas DMZ re directs all packets regardless of services going to your WAN IP address to a particular LAN client server Enable DMZ Enable disable DMZ Public IP Address The IP address of the WAN port or any other Public IP addresses given to you by your ISP Client PC IP Add...

Page 47: ...of Death Port Scan and Sync Flood If Internet attacks occur the router can log the events Ping of Death Protections from Ping of Death attack Discard Ping From WAN The router s WAN port will not respond to any Ping requests Port Scan Protects the router from Port Scans Sync Flood Protects the router from Sync Flood attack ...

Page 48: ...l clients will be allowed to access Internet accept for the clients in the list below Allow If you select Allow then all clients will be denied to access Internet accept for the PCs in the list below Filter client PCs by IP Fill in IP Filtering Table to filter PC clients by IP Add PC You can click Add PC to add an access control rule for users by IP addresses Remove PC If you want to remove some P...

Page 49: ...dd If you find any typo before adding it and want to retype again just click Reset and the fields will be cleared Remove PC If you want to remove some PC from the MAC Filtering Table select the PC you want to remove in the table and then click Delete Selected If you want to remove all PCs from the table just click the Delete All button If you want to clear the selection and re select again just cl...

Page 50: ...RL address or the keyword of the web site you want to block Remove URL Keyword If you want to remove some URL keywords from the Current URL Blocking Table select the URL keyword you want to remove in the table and then click Delete Selected If you want remove all URL keywords from the table just click Delete All button If you want to clear the selection and re select again just click Reset Click A...

Page 51: ...s the Internet through a single Public IP Address or multiple Public IP Addresses NAT provides Firewall protection from hacker attacks and has the flexibility to allow you to map Private IP Addresses to Public IP Addresses for key services such as Websites and FTP Select Disable to disable the NAT function ...

Page 52: ... IP of the server behind the NAT firewall Type This is the protocol type to be forwarded You can choose to forward TCP or UDP packets only or select both to forward both TCP and UDP packets Port Range The range of ports to be forward to the private IP Comment description of this setting Add Port Forwarding Fill in the Private IP Type Port Range and Comment of the setting to be added and then click...

Page 53: ... the Current Port Forwarding Table select the Port Forwarding setting that you want to remove in the table and then click Delete Selected If you want to remove all Port Forwarding settings from the table just click Delete All button Click Reset will clear your current selections ...

Page 54: ...address and its service port number Enable Virtual Server Enable Virtual Server Private IP This is the LAN client host IP address that the Public Port number packet will be sent to Private Port This is the port number of the above Private IP host that the below Public Port number will be changed to when the packet enters your LAN to the LAN Server Client IP Type Select the port number protocol typ...

Page 55: ...al Server Table below Remove Virtual Server If you want to remove Virtual Server settings from the Current Virtual Server Table select the Virtual Server settings you want to remove in the table and then click Delete Selected If you want to remove all Virtual Server settings from the table just click the Delete All button Click Reset will clear your current selections Click Apply at the bottom of ...

Page 56: ...ons Enable Trigger Port Enable the Special Application function Trigger Port This is the out going Outbound range of port numbers for this particular application Trigger Type Select whether the outbound port protocol is TCP UDP or both Public Port Enter the In coming Inbound port or port range for this type of application e g 2300 2400 47624 Public Type Select the Inbound port protocol type TCP UD...

Page 57: ...l in the Trigger Port Trigger Type Public Port Public Type Public Port and Comment of the setting to be added and then click Add The Special Application setting will be added into the Current Trigger Port Table below If you happen to make a mistake just click Clear and the fields will be cleared Remove If you want to remove Special Application settings from the Current Trigger Port Table select th...

Page 58: ...cations etc In order for these protocols to work through NAT or a firewall either the application has to know about an address port number combination that allows incoming packets or the NAT has to monitor the control traffic and open up port mappings firewall pinhole dynamically as required Legitimate application data can thus be passed through the security checks of the firewall or NAT that woul...

Page 59: ...le or Disable the UPnP feature here After you enable the UPnP feature all client systems that support UPnP like Windows XP can discover this router automatically and access the Internet through this router without having to configure anything The NAT Traversal function provided by UPnP can let applications that support UPnP connect to the internet without having to configure the virtual server sec...

Page 60: ... as rule name Others The rule with a smaller priority number has a higher priority the rule with a larger priority number has a lower priority You can adjust the priority of the rules by moving them up or down Enable Disable QoS You can check Enable QoS to enable QoS functionality for the WAN port Add a QoS rule into the table Click Add then enter a form of the QoS rule Click Apply after filling o...

Page 61: ...n enter the detail form of the QoS rule Click Apply after editing the form and the rule will be saved Adjust QoS rule priority You can select the rule and click Move Up to make its priority higher You also can select the rule and click Move Down to make its priority lower ...

Page 62: ...s IPSec Site to Site Remote to Site and L2TP over IPSec methods to establish VPN connections and the maximum VPN session number is up to 5 Status This page displays the connect status of VPN connection You can select one of them to connect or disconnect the VPN connection To Connect or Disconnect an existing tunnel Select the tunnel from the list by ticking the corresponding check box and click co...

Page 63: ...VPN tunnel 1 In the Top Menu on the right side click VPN 2 In the submenu click Wizard to add a VPN profile 3 Click Next to create a VPN profile 4 In the Name field enter a name for the PPTP VPN tunnel This name is for reference purposes Click Next to continue ...

Page 64: ...02B When WLR4002 is on default settings the LAN IP address is 192 168 0 100 In this case you can select any private IP address other than 192 168 0 x for example 192 168 3 x Remote IP Range Enter an IP range that is on the same subnet as the Server IP address you have entered in the Server IP address field but the range should not include Server IP For example if you specified a Server IP address ...

Page 65: ...65 8 Enable the VPN policy and then click Apply to save the VPN profile ...

Page 66: ...the Top Menu on the right side click VPN 2 In the submenu click Wizard to add a VPN profile 3 Click Next to create a VPN profile 4 In the Name field enter a name for the L2TP VPN tunnel This name is for reference purposes Click Next to continue 5 Click L2TP and click NEXT to continue ...

Page 67: ...the LAN IP address is 192 168 0 100 In this case you can select any IP address other than 192 168 0 x Remote IP Range Enter an IP range that is on the same subnet as the Server IP address you have entered in the Server IP address field but the range should not include Server IP For example if you specified a Server IP address of 192 168 2 1 you can define a Remote IP Range of 192 168 2 100 200 Cli...

Page 68: ...68 8 Enable the VPN policy and then click Apply to save the VPN profile ...

Page 69: ...page of the WLR 4002B If the WAN IP address of the WLR 4002B is not a public IP address but a local IP address for example any IP address in the following ranges 10 X X X 172 16 X X or 192 168 X X In this situation your WLR 4002B is placed behind a NAT enabled modem In this case consult your manual to make sure your modem supports VPN pass through and the GRE47 protocol and set it up to allow acce...

Page 70: ...a Microsoft Windows 7 VPN Client 1 Click the Start button and open the Control Panel 2 From the Control Panel select Network and Internet If your control panel view has been set to Icons you can directly go to step 4 ...

Page 71: ...71 3 From Network and internet select Network and Sharing center 4 Under Network and Sharing Center select Setup a new connection or network ...

Page 72: ...72 5 Click Connect to a workplace and click Use my internet connection VPN ...

Page 73: ...er a name for the VPN client We recommend to select Don t connect now Just set it up so I can connect later Click next to continue 7 Complete the following fields User name Enter the username used to log onto the VPN tunnel Password Enter the password used to log onto the VPN tunnel Click Create to continue ...

Page 74: ...74 8 When the following screen appears click the Close button to close the VPN connection setting 9 Select Change adapter settings on the left side of the window ...

Page 75: ...onfigure the following settings Under the Type of VPN select the Protocol that has been set in the WLR 4002B Point to point tunneling protocol PPTP or Layer 2 Tunneling Protocol with IPsec L2TP IPSec Check unencrypted password PAP Check Challenge Handshake Authentication Protocol PPTP Check Microsoft CHAP Version 2 MS CHAP v2 ...

Page 76: ...76 12 Go to Network and Sharing Center on the bottom right of the windows Under VPN Connection click Connect ...

Page 77: ...77 Configuring a Microsoft Windows XP VPN Client 1 Click the Start button and open the Control Panel 2 From the Control Panel Click on Network Connections ...

Page 78: ...78 3 Click on Create a network from the left side of the window 4 Click Next to continue to setup the VPN client ...

Page 79: ...79 5 Select Connect to the network at my workplace and click Next to continue 6 Select Virtual Private network connection and click Next to continue ...

Page 80: ...80 7 Enter a Company name this name is only for reference purposes 8 Enter the Hostname this should be the WLR 4002B WAN IP address and click Next to continue ...

Page 81: ...81 9 Click Finish to continue you may choose to add a shortcut for this connection on the Desktop by clicking the checkbox before you click Finish 10 Click on Properties ...

Page 82: ...82 11 Click on the Security Tab from the top in the window and select Advanced click Settings to continue ...

Page 83: ...if no encryption Check Unencrypted password PAP Check Challenge Handshake Authentication Protocol SPAP Uncheck Microsoft CHAP MS CHAP Check Microsoft CHAP Version 2 MS CHAP v2 Click OK to continue 13 Click Yes to continue If the VPN type you have configured in the WLR 4002B is PPTP you can skip step 14 ...

Page 84: ...Sec You have also entered a Shared key in the WLR 4002B see step 7 of chapter Using the Wizard to Configure the WLR 4002B for L2TP over IPSec for reference Click on IPSec Settings 14b Check Use pre shared key for authentication Key Enter the shared key you have entered in the WLR 4002B ...

Page 85: ...85 Configuring a MacOS VPN Client 1 Select System Preferences 2 On the System preferences panel Click Network ...

Page 86: ...86 3 Click on the sign on the bottom left 4 Select the VPN interface ...

Page 87: ...me for this profile this name is for reference purpose only 6 Complete the following fields Server address Enter the WAN IP address of the WLR 4002B Account Name Enter the name used to log onto the VPN tunnel this must be one of the users you have set in the VPN user table of the WLR 4002B Click Authentication Settings to continue ...

Page 88: ...d Key If the VPN Type of the VPN tunnel you have set up in the WLR 4002B is L2TP over IPSec You have also entered a Shared key in the WLR 4002B see step 7 of chapter Using the Wizard to Configure the WLR 4002B for L2TP over IPSec for reference Enter the same key in this field Click OK to continue 8 Click on Advanced in the network panel to continue ...

Page 89: ... 9 Select the checkbox Send all traffic over VPN connection Click OK to continue 10 If the VPN tunnel is already connected click Disconnect and Connect again for the changes made in step 9 to take effect ...

Page 90: ...90 Configuring a VPN client on iOS 1 Click Settings on the Springboard 2 Select General on from the panel of the left side and Click on Network ...

Page 91: ...91 3 Click on VPN 4 click on Add VPN Configuration ...

Page 92: ...ter the name used to log onto the VPN tunnel this must be one of the users you have set in the VPN user table of the WLR 4002B Password Enter the Password used to log onto the VPN tunnel Secret L2TP only If the VPN Type of the VPN tunnel you have set up in the WLR 4002B is L2TP over IPSec You have also entered a Shared key in the WLR 4002B see step 7 of chapter Using the Wizard to Configure the WL...

Page 93: ...93 4 Set the Switch to ON to connect to the VPN Network ...

Page 94: ...94 Configuring a VPN client on Android 1 Click on Settings 2 click on More from the Settings menu on the upper left Then Click on VPN ...

Page 95: ... Account Enter the name used to log onto the VPN tunnel this must be one of the users you have set in the VPN user table of the WLR 4002B Password Enter the Password used to log onto the VPN tunnel Secret L2TP only If the VPN Type of the VPN tunnel you have set up in the WLR 4002B is L2TP over IPSec You have also entered a Shared key in the WLR 4002B see step 7 of chapter Using the Wizard to Confi...

Page 96: ...96 4 Click on the VPN network you have just created to connect ...

Page 97: ...nd Delete VPN profiles Add click here if you wish to manually add a new VPN profile Edit to edit an existing profile select one from the list by selecting the corresponding radio button and click Edit Click Apply to save the settings and apply the changes ...

Page 98: ...98 Add Users to an existing Profile Click on Profile Setting Select the Profile for which you wish to modify user settings and click on Edit Then Click on the protocol name you selected to edit ...

Page 99: ...that do not have access to this VPN Tunnel yet The Member box displays users that already have access to this VPN Tunnel To Add or remove users to the VPN Tunnel click the on the username you wish you Add or Remove and press the buttons to the desired box Click Apply Click Apply to save the settings and apply the changes ...

Page 100: ...stack The intended use of this protocol is to provide similar levels of security and remote access as typical VPN products General This page allows you to configure the general VPN settings Name Enter a name for your VPN policy Connection Type Supports IPSec and L2TP over IPSec methods to establish VPN connection PPTP Authentication Select the desired authentication protocol PAP CHAP Auto Select A...

Page 101: ...al VPN settings Name Enter a name for your VPN policy Connection Type Supports IPSec and L2TP over IPSec methods to establish VPN connection L2TP Authentication Select the desired authentication protocol PAP CHAP Auto Select Auto by default User Name Enter the username for authentication Password Enter the password for authentication Network Server IP Enter the VPN Server IP address Remote IP Rang...

Page 102: ...air of security gateways network to network or between a security gateway and a host network to host General This page allows you to configure the general VPN settings Name Enter a name for your VPN policy Connection Type Supports IPSec and L2TP over IPSec methods to establish VPN connection Authentication Type Supports pre shared key method for authentication Shared Key Enter the Shared Key Confi...

Page 103: ...gure the standard negotiation parameters for IKE Phase 1 of the VPN Tunnel Recommended Setting Aggressive Mode Select this option to configure IKE Phase 1 of the VPN Tunnel to carry out negotiation in a shorter amount of time Not Recommended Less Secure DH Group Select a DH Group from the drop down menu Group 1 Group2 Group5 and Group14 As the DH Group number increases the higher the level of encr...

Page 104: ...Forward Secrecy Select Enable or Disable to enable or disable PFS Perfect Forward Secrecy PFS is an additional security protocol DH Group Select a PFS DH Group from the drop down menu Group 1 Group2 Group5 Group14 As the DH Group number increases the higher the level of encryption implemented for PFS Life Time Enter the number of seconds for the IPSec Lifetime The period of time to pass before est...

Page 105: ...to traverse through the translation process during NAT The remote VPN endpoint must also support this feature and it must be enabled to function properly over the VPN Dead Peer Detection Enable DPD Dead Peer Detection to delete the VPN tunnel if there is no traffic detected The VPN will re establish once traffic is again sent through the tunnel ...

Page 106: ...or your VPN policy Connection Type Supports IPSec and L2TP over IPSec methods to establish VPN connection Authentication Type Supports pre shared key method for authentication Shared Key Enter the Shared Key Confirm Enter your Shared Key again for verification L2TP PPTP Authentication Select the desired authentication protocol PAP CHAP Auto Select Auto by default User Name Enter the username for a...

Page 107: ...to add the user to the current VPN user table Reset This button will clear all values from the input boxes Current VPN user table shows all existing VPN users Delete Selected Select a user from the table and Click Delete Selected to delete this user Delete ALL This deletes all current VPN user from the current table Click Apply to save the settings and apply the changes ...

Page 108: ...f configuring IPSec Site to Site architecture In this guide we give an example how to set up a IPSec Site to Site architecture The values in this example are only to give an impression of how to do the configuration ...

Page 109: ...hen click Wizard in the submenu Click Next to continue 2 In the Name field enter a name for the IPSec VPN tunnel This name is for reference purposes Click Next to continue 3 Click IPSec and click NEXT to continue 4 Click Site to Site and click NEXT to continue ...

Page 110: ...Remote Address Enter an IP address that is on the same Subnet as the Local LAN of the remote VPN server In our example the WLR 4002B in location A has a local IP of 192 168 2 1 so we set the Remote address to 192 168 2 0 Remote Netmask Enter the Netmask of the Remote Local LAN In our example the WLR 4002B in Location A has a IP Subnet Mask of 255 255 255 0 click NEXT to continue 6 Enter the Shared...

Page 111: ... Apply to save the VPN profile 8 Repeat these steps 1 7 for the other VPN server 9 Once Both VPN routers have been completely set up Click on Status in the submenu of the VPN menu and click Connect to establish the IPSec Site to Site connection ...

Page 112: ...ted automatically your network and devices are better secured than ever before Your Sitecom device comes with a 6 month free Sitecom cloud security subscription After you have set up your Sitecom device for internet access open the web browser and enter http www sitecomcloudsecurity com in the address bar If the device has been properly configured the following web page should be shown Here you ca...

Page 113: ...s 4 Advertisement blocking With the protection of unsafe websites activated the Sitecom Cloud Security will always check if a website is safe If it is not safe it will inform you that is not safe to enter If you still wish to visit this webpage click on proceed anyway Alternatively click Back to Safety so that your security will not be breached ...

Page 114: ...at any time open http www sitecomcloudsecurity com from your web browser You will be asked for a username and password These can be found on the backlabel on the bottom of your Sitecom router or modem If the login succeeded you can click on Settings to change your security options ...

Page 115: ...115 Or click License to renew your subscription ...

Page 116: ...webpage of your Sitecom product and log in with the supplied credentials these can be found on the back label on the bottom of your Sitecom device Go to Toolbox and select Sitecom Cloud Security Click the Disable radio button and click Apply for the settings to take effect ...

Page 117: ...ds can contain 0 to 12 alphanumeric characters and are case sensitive Current Password Fill in the current password to allow changing to a new password New Password Enter your new password Confirmed Password Enter your new password again for verification purposes Click Apply at the bottom of the screen to save the above configurations ...

Page 118: ...er Address You can set an NTP server address Enable Daylight Savings The router can also take Daylight savings into account If you wish to use this function you must check tick the enable box to enable your daylight saving configuration below Start Daylight Savings Time Select the period in which you wish to start daylight Savings Time End Daylight Savings Time Select the period in which you wish ...

Page 119: ... the host in the Internet that will have management configuration access to the Broadband router from a remote site If the Host Address is left 0 0 0 0 this means anyone can access the router s web based configuration from a remote location providing they know the password Port The port number of the remote management web interface Enabled Select Enabled to enable the remote management function Cl...

Page 120: ...irmware Upgrade This tool allows you to upgrade the Broadband router s system firmware To upgrade the firmware of your Broadband router you need to download the firmware file to your local hard disk and enter that file name and path in the appropriate field on this page You can also use the Browse button to find the firmware file on your PC Once you ve selected the new firmware file click Apply at...

Page 121: ... Factory Defaults selection this will set all configurations to its original default settings e g when you first purchased the router Use the Backup tool to save the Broadband router current configuration to a file named config bin on your PC You can then use the Restore tool to restore the saved configuration to the Broadband router Alternatively you can use the Restore to Factory Defaults tool t...

Page 122: ...122 Reset You can reset the router s system should any problem exist The reset function essentially re boots your router s system ...

Page 123: ...r common DDNS service providers Enable Disable Enable or disable the DDNS function of this router Provider Select a DDNS service provider Domain name Fill in your static domain name that uses DDNS Account E mail The account that your DDNS service provider assigned to you Password Key The password you set for the DDNS service account above Click Apply at the bottom of the screen to save the above c...

Page 124: ...124 ...

Page 125: ...125 ...

Page 126: ...ex php 13 wireless_tools v28 http www hpl hp com personal Jean_Tourrilhes Lin ux Tools html 14 updatedd 2 6 http freecode com projects updatedd 15 igmpproxy v0 1 beta2 http sourceforge net projects igmpproxy 16 pptp client v1 7 1 http pptpclient sourceforge net 17 accel pptp pppd plugin v0 8 3 rc5 http accel pptp sourceforge net 18 ppp v2 4 3 http ppp samba org 19 udhcp v0 9 9 pre http sources bus...

Page 127: ... so they know their rights We protect your rights with two steps 1 copyright the software and 2 offer you this license which gives you legal permission to copy distribute and or modify the software Also for each author s protection and ours we want to make certain that everyone understands that there is no warranty for this free software If the software is modified by someone else and passed on we...

Page 128: ...tion mere aggregation of another work not based on the Program with the Program or with a work based on the Program on a volume of a storage or distribution medium does not bring the other work under the scope of this License 3 You may copy and distribute the Program or a work based on it under Section 2 in object code or executable form under the terms of Sections 1 and 2 above provided that you ...

Page 129: ...generous contributions to the wide range of software distributed through that system in reliance on consistent application of that system it is up to the author donor to decide if he or she is willing to distribute software through any other system and a licensee cannot impose that choice This section is intended to make thoroughly clear what is believed to be a consequence of the rest of this Lic...

Page 130: ...ING WILL ANY COPYRIGHT HOLDER OR ANY OTHER PARTY WHO MAY MODIFY AND OR REDISTRIBUTE THE PROGRAM AS PERMITTED ABOVE BE LIABLE TO YOU FOR DAMAGES INCLUDING ANY GENERAL SPECIAL INCIDENTAL OR CONSEQUENTIAL DAMAGES ARISING OUT OF THE USE OR INABILITY TO USE THE PROGRAM INCLUDING BUT NOT LIMITED TO LOSS OF DATA OR DATA BEING RENDERED INACCURATE OR LOSSES SUSTAINED BY YOU OR THIRD PARTIES OR A FAILURE OF...

Reviews: