background image


17 

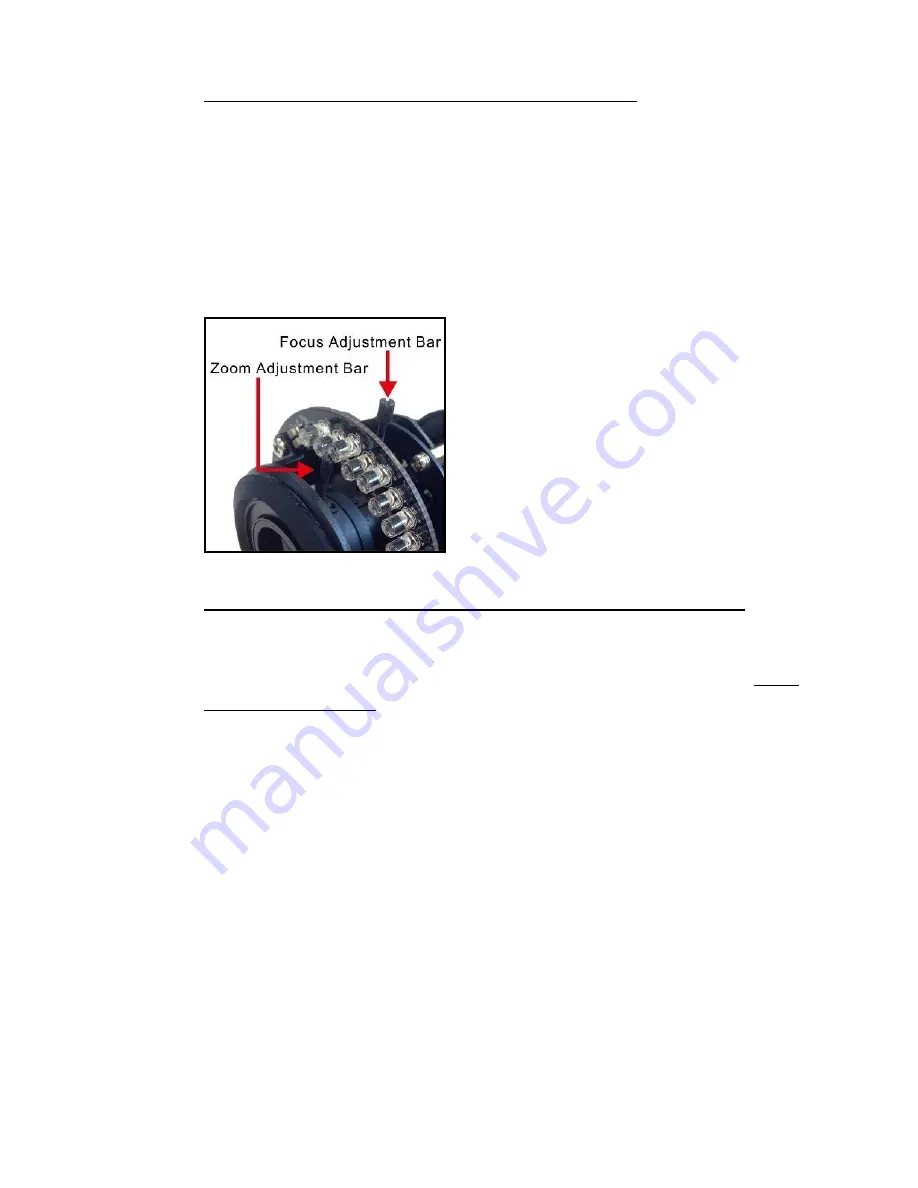
Zoom and Focus Adjustment (Vari-focal Lens Models) 

For 

vari-focal lens

 models, zoom and focus can be adjusted by the adjustment 

bars  on  the  camera  lens  inside  the  dome  cover.  To  adjust  zoom  and  focus, 

please detach the dome cover first. For indoor models, use a plus screw driver 

to loosen the two screws of the camera. For outdoor models, use the supplied 

security torx to loosen the two security screws of the camera. Detach the dome 

cover.  Then  use  the  zoom  adjustment  bar  and  the  focus  adjustment  bar 

(positions shown in the following figure) to adjust zoom and focus. 


Zoom and Focus Adjustment (Motorized Lens / 3x AF Lens Models) 

The  live  image  will  be  displayed  on  the  Home  page  when  the  camera  is 

successfully  accessed.  If  zoom  or  focus  is  not  at  the  desired  position,  please 

use the function buttons on the Home page for adjustment. Refer to the


Hyper 

IP  Camera  Menu  Tree  in  the  supplied  CD  for  more  details  about  the  function 

buttons. 


Summary of Contents for SCI2323

Page 1: ......

Page 2: ...8 2 1 Power Connection 8 2 2 Ethernet Cable Connection 8 2 3 Alarm I O Connection 8 2 4 Waterproof Cable Connector Outdoor Only 9 3 System Requirements 11 4 Access Camera 12 5 Setup Video Resolution 1...

Page 3: ...WDR 3DNR and Day Night ICR technologies to capture clear images in lowlight conditions 1 1 Features Sony Progressive Scan CMOS 3M 4M 6M 8M Sensor Low Latency Streaming Low Power Consumption on Encodi...

Page 4: ...Self Tapping Screw x3 Plastic Screw Anchor x3 Quick Guide CD bundled software and documentation NOTE The supplied self tapping screws are for soft substances materials such as wood For other installa...

Page 5: ...k 4 Pin Alarm I O Terminal Block Quick Guide CD bundled software and documentation NOTE The supplied self tapping screws are for soft substances materials such as wood For other installation environme...

Page 6: ...5 1 3 Dimensions The dimensions of the camera are shown below Indoor Outdoor...

Page 7: ...rd when the camera is powered on 4 BNC For analog video output 5 Alarm Audio I O 1 Alarm In Alarm connection 2 Alarm In 3 Alarm Out 4 Alarm Out 5 Audio Out R Audio Out 6 Audio Out L 7 GND 8 Audio In 6...

Page 8: ...ink Audio In Two way audio transmission Green Audio Out 4 BNC For analog video output 5 Alarm I O 1 Alarm In 2 Alarm In 3 Alarm Out 4 Alarm Out Default Button For the position of the default button pl...

Page 9: ...is in use in the network 2 2 Ethernet Cable Connection For best transmission quality cable length shall not exceed 100 meters Connect one end of the Ethernet cable to the RJ 45 connector of the camer...

Page 10: ...tep 1 Plug the cables to the connectors of the All in One cable and coat the joints with silicone gel There should be no gap between the connectors and the cables For alarm I O connector and power con...

Page 11: ...or cable connection Step 1 Take out the supplied connector from the RJ 45 IP66 plug Loosen the thread lock sealing nut on the plug Then thread the Ethernet cable through the thread lock sealing nut an...

Page 12: ...el CoreTM i5 2430M 2 4 GHz 2 4 GB RAM Recommended 1 Intel CoreTM i7 870 2 93 GHz 2 8 GB RAM Recommended for 8M Models 1 Intel CoreTM i7 3770 CPU 3 4GHz 2 8 GB RAM Operating System Windows VISTA Window...

Page 13: ...92 168 0 250 Step 4 The default IP address of the camera may not be in the same LAN as the IP address of the PC If so the IP address of the camera needs to be changed Right click on the camera and cli...

Page 14: ...browser doesn t allow Viewer installation please check the Internet security settings or ActiveX controls and plug ins settings refer to section Setup Internet Security to continue the process The Inf...

Page 15: ...14 Once the Viewer is successfully installed the Home page of the IP camera will be shown as the figure below Vari focal Lens Models...

Page 16: ...15 Motorized Lens Models...

Page 17: ...16 3x AF Lens Models...

Page 18: ...x to loosen the two security screws of the camera Detach the dome cover Then use the zoom adjustment bar and the focus adjustment bar positions shown in the following figure to adjust zoom and focus Z...

Page 19: ...x 1536 25 30 fps H 264 720 x 576 25 fps 720 x 480 30 fps 3M Advanced H 264 2048 x 1536 50 60 fps H 264 720 x 576 50 fps 720 x 480 60 fps 4M Advanced H 264 2560 x 1440 25 30 fps H 264 720 x 576 25 fps...

Page 20: ...g configuration file to the camera This is especially convenient to make multiple cameras having the same configuration Export Users can save the system settings by exporting the configuration file bi...

Page 21: ...le click on Add or Remove Programs In the Currently installed programs list select Viewer and click on the button Remove to uninstall the existing Viewer Deleting Temporary Internet Files To improve b...

Page 22: ...der ActiveX controls and plug ins set ALL items as listed below to Enable or Prompt Please note that the items vary by IE version ActiveX controls and plug ins settings 1 Binary and script behaviors 2...

Reviews: