background image

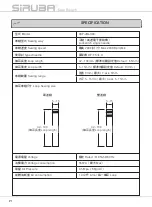
型式

 Model

ASP-JBL-300

車縫型式

 Sewing way

平縫(高速電子套結機)

Lockstitch single needle

車縫速度

 Sewing speed

最高

2000

/

 Max 2000 Rpm/Min

使用針

 Typed needle

風琴牌

DP

×

5  

11

褲耳長度

Loop length

42~100mm (

標準出廠設定值

Default : 65mm )

褲耳寬度

 Loop width

5~15

mm (

標準出廠設定值

 Default: 13mm )

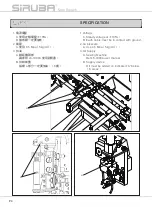
車縫範圍

 Sewing range

垂直

0mm (

最大

) Y axis 0mm

水平

5~15mm (

最大

) X axis 5~15mm


電源電壓

 Voltage

額定

Rated 

±

10

 50/60Hz

消費電力

 Voltage consumption

550VA

(最大

Max

氣壓

 Air Pressure

0.5 Mpa

5Kg/c


氣體消耗量

 Air consumption

1.4

公升

Litre /

每一褲耳

 Loop 

規格

SPECIFICATION

褲耳車縫尺寸

 Loop Sewing size

單道縫

雙道縫

P1

42~100

(

褲耳長度

Loop length)

5~15

42~100

(

褲耳長度

Loop length)

5~15

Summary of Contents for ASP-JBL300

Page 1: ...ASP JBL300 使用說明書與零件圖 INSTRUCTION BOOK PARTS LIST ...

Page 2: ...hould stop using the machine at the moment and cut the power off in order to do the proper repair 4 Strictly forbid to do the extra transformation or alteration We do not have the warranty to the machine which had been transformed or altered Therefore our company will be irresponsible for any compensation if the machine has caused any danger Hazards In order to prevent from the electric shock you ...

Page 3: ...under maintenance 5 The repair within the warranty need to be repair by the worker who well trained 6 While doing the repair or maintain variety of cylinders and pneumatic actuator associated you must unplug the supply air source connector before you do the repair and maintenance However it could be only done by the well trained technician or professional 7 Before ready to start the machine all of...

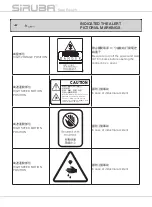
Page 4: ...動部位 HIGH SPEED MOTION POSITION 謹防工傷事故 In case of industrial accident 高速運動部位 HIGH SPEED MOTION POSITION 謹防工傷事故 In case of industrial accident 高速運動部位 HIGH SPEED MOTION POSITION 謹防工傷事故 In case of industrial accident CAUTION 機械作動部份請注意裝上 保護裝置 穿線 換線 調整 清潔 時請注意關閉電源 Moving parts may cause in jury Operate with safety devices Turn off main switch before threading changing bobbin and needle cleaning etc ...

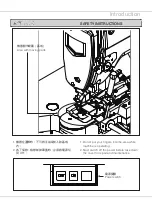
Page 5: ...TRUCTIONS 機器動作範圍 區域 Area with moving parts 1 機器在運轉時 不可將手指等放入該區域 內 2 為了保修 檢修卸掉罩蓋時 必須將電源切 到 OFF 1 Do not put your fingers into the area while machine is operating 2 Must switch off the power before take down the cover for repair and maintenance 電源開關 Power switch Introduction ...

Page 6: ...員絆倒而發生危險 6 為了生命安全 在任何情況下 不可將電源 地線拔掉運轉機器 7 打雷時 為了安全要停止作業 切斷電源 8 離開機器工作地點時或工作結束後一定要將 電源開關轉到 OFF 9 機器運轉下 不可卸下罩蓋類 5 Power cord and pneumatic line pipe need to make sure being fixed and settle down Do not put them disordered on the ground in case of people stumble and cause danger 6 No matter under any circumstances for your life safety do not pull out the power ground wire while operating the machine ...

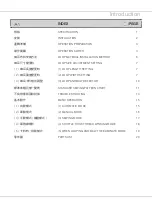
Page 7: ... LOOP LENGTH SETTING 7 2 褲耳寬度變更時 2 LOOP WIDTH SETTING 7 3 褲耳卡料檢出調整 3 LOOP ANOMALY DETECTOR 10 標準車縫花樣一覽表 STANDARD SEWING PATTERN CHART 11 不良現象原因和對策 TROUBLE SHOOTING 13 基本動作 BASIC OPERATION 15 1 自動模式 1 AUTOMATIC MODE 15 2 單動模式 2 MANUAL MODE 16 3 手動模式 補縫模式 3 SEWING MODE 17 4 單捲線模式 4 SHUTTLE HOOK THREAD WINDING MODE 18 5 卡料時 排除模式 5 WHEN LOOPING ANOMALY THE ELIMINATE MODE 19 零件圖 PARTS LIST 20 Introduct...

Page 8: ...定值 Default 65mm 褲耳寬度 Loop width 5 15mm 標準出廠設定值 Default 13mm 車縫範圍 Sewing range 垂直 0mm 最大 Y axis 0mm 水平 5 15mm 最大 X axis 5 15mm 電源電壓 Voltage 額定 Rated 10 50 60Hz 消費電力 Voltage consumption 550VA 最大 Max 氣壓 Air Pressure 0 5 Mpa 5Kg c 氣體消耗量 Air consumption 1 4 公升 Litre 每一褲耳 Loop 規格 SPECIFICATION 褲耳車縫尺寸 Loop Sewing size 單道縫 雙道縫 P1 42 100 褲耳長度 Loop length 5 15 42 100 褲耳長度 Loop length 5 15 ...

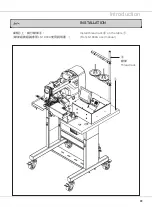
Page 9: ...桌板 上 鎖付線架 線架組裝組請參照 LK 1900A 使用說明書 Install thread rack on the table Ref LK 1900A user manual 安裝 INSTALLATION 線架 Thread rack P2 Introduction ...

Page 10: ...明書 B 供給裝置 指標 a 部分一定要加油 6 處 1 Voltage A Steady voltage at 10 B Earth cable must be in contact with ground 2 Air pressure A Use 0 5 Mpa 5kg c 3 Oil Supply A Sewing Machine Ref LK 1900A user manual B Supply device Oil must be added on indicated a below 6 areas 運轉準備 SPECIFICATION a a a P3 ...

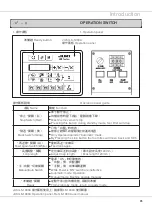
Page 11: ...matic made By Pressing the stop button the foot littes will move back and forth 再送帶 開關 白 Feed Again Switch White 重新再送一次褲耳 Feed loop again 長度調整 開關 Loop length 定位褲耳送料出長度 最大設定長度 120mm Adjust loop length Max length 120mm 手 自動 切換開關 Manual Auto Switch 電源 ON 時切換無效 自動 側 自動運轉 手動 側 成車單獨運轉 While Power is ON switch are ineffective Automatic mode Operation Manual mode Machine operate manually 準備鍵 開關 Ready 從動作停...

Page 12: ...Start switch 2 起動鍵 名稱 Name 機能 Function 起動鍵 Start switch 成車起動 Switch begin 起動鍵說明 Start switch guide P5 ...

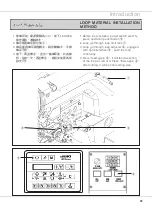
Page 13: ...switch are ON press operation panel button 2 Loop go through loop limit rack 3 Loop go through loop adjuster engaged with sprocket wheel push the loop constantly 4 Press feed again It will feed a section of the loop as left over Press feed again after cutting it will be final setting size 褲耳布料安裝方法 LOOP MATERIAL INSTALLATION METHOD P6 Introduction ...

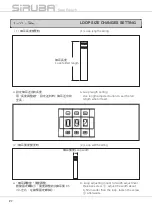
Page 14: ...nt Release screw adjust the width about 0 5mm wider than the loop fasten the screw afterwards 褲耳寬度 Loop width 褲耳尺寸變更時 LOOP SIZE CHANGES SETTING 1 褲耳長度變更時 1 Loop length setting A 設定褲耳送出的長度 用 長度調整鍵 設定送料時 褲耳送出的 全長 A Loop length setting Use length adjuster button to set the full length when it feed 褲耳長度 Loop folded length P7 ...

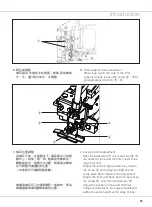
Page 15: ...線與褲耳邊線等高的位置 C Loop position adjustment After loop delivered to presser foot lift the center of loop and foot lifter need to be align Cut line Adjust the left and right position by loosen the screw and tuning knob use the scale plate to measure the adjustment Adjust the front and back position by loosen the screw and trimmed hamper Adjust the position of loop and trimmed hamper to alignment the edg...

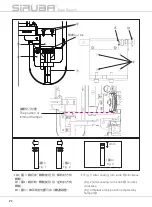
Page 16: ...時 轉動旋扭 逆時針方向 轉動 如 圖 3 褲耳相對位置可由 擋邊調整 圖 2 Fig 2 圖 1 Fig 1 Fig 1 After sewing turn knob clockwise Fig 2 After sewing turn knob counter clockwise Fig 3 Relative loop position adjusted by hamper 圖 3 Fig 3 4mm 擋邊切刀位置 The position of trimmed hamper P9 ...

Page 17: ...當位置 3 Loop anomaly detector Through the new loop to the limit support rack If the Stop button light on press it and it will light off Whether the Stop button light on or not please turn the adjustment screw Then adjust the height to the approprate position P10 Introduction ...

Page 18: ...23 58 12 x 0 23 59 13 x 0 23 60 14 x 0 27 61 15 x 0 27 62 5 x 0 30 63 6 x 0 30 64 7 x 0 30 65 8 x 0 38 關於花樣變更方法 請參照 LK 1900A 使用說 明書 下記顯示為 JBL300 之標準花樣 Regording method of changing pattern refer to LK 1900A user manual Below are standard pattern for JBL300 單道縫 雙道縫 標準車縫花樣一覽表 STANDARD SEWING PATTERN CHART P11 ...

Page 19: ...花樣 落針圖 車縫尺寸橫 x 縱 mm 針數 66 9 x 0 38 67 10 x 0 38 68 11 x 0 46 69 12 x 0 46 70 13 x 0 46 71 14 x 0 54 72 15 x 0 54 73 5 x 0 30 74 6 x 0 30 75 7 x 0 30 76 8 x 0 38 77 9 x 0 38 78 10 x 0 38 P12 Introduction ...

Page 20: ...page 褲耳位置左右偏移 Loop position deviated left and right 褲耳供給機構 送料位 置沒有對準車縫寬 Loop feeding module are not align with sewing machine 調整 褲耳供給機構 的 位置 Adjust loop feeding module position P 9 或 or 花樣 落針圖 車縫尺寸橫 x 縱 mm 針數 79 11 x 0 46 80 12 x 0 46 81 13 x 0 46 82 14 x 0 54 83 15 x 0 54 P13 ...

Page 21: ...端的間 隙為 2mm 1 Adjust the gap between needle and shuttle tip 2 the gap between the wiper and needle tip are 2 mm minimum LK 1900A 使用說明書 LK 1900A user manual 自動機送料時 停止燈 突然亮起 When feeding the Stop Switch will suddenly light on 褲耳有折到 或重疊 The loop has been broken or lapped 將褲耳重新拉出一小截 重新裁剪 Pulling out a small piece of loop and trim it again 1 P 10 其他不良方面 請參照 LK 1900A 使用說明書 Other anomaly refer to the LK 1...

Page 22: ...抬壓腳 褲耳長度設定 起動鍵 ON 褲耳夾取前進 成車降下壓腳 褲耳開夾後退 成車開始 成車停止 撥線桿作動 Switch to automatic mode Power ON Pattern setting Ready button on Wiper sweep aside Loop feed and installed air below Sewing machine presser foot lift Loop length setting Start switch ON Presser foot drop Fixed support retreat backward Sewing begin Sewing stop Wiper sweep aside Loop fixed support feed towards sewing machine ...

Page 23: ...he correct relative position Proceed with the following A Switch power to OFF B Shift the switch button to manual C Press and hold the stop button while press the power switch toon hold the stop button for about 3 seconds then release D Press ready button to set the foot back to original position E Press Feed again to feed a loop G Press start for the next action H Start from step E to repeat abov...

Page 24: ...pattern chart P17 Switch to manul mode Power ON Pattern setting Ready button on Presser foot lift Start switch ON Presser foot drop Sewing begin Sewing stop Wiper sweep aside Place the sewing product onto sewing position 先切手動模式 電源鍵 ON 花樣 NO 設定 準備鍵 ON 成車抬壓腳 起動鍵 ON 成車降下壓腳 成車開始 成車停止 撥線桿作動 手動調整 半成品褲耳位置 ...

Page 25: ...inding Proceed with the following A Switch power to OFF B Shift the switch button to manual or auto mode C Switch power to ON D Press ready to ON E Press ready to OFF G Press rotation until the light stop at reel illustration H Press ready to ON I Press start to operate J Press start again to stop 捲線圖案 reel illustration 同心度 0 3 對稱度 0 3 250 1 000以下 0 8 超過4到16以下 0 2 超過63到250以下 0 5 超過16到63以下 0 3 1 10...

Page 26: ...轉 While loop is breaking or lapping the Stop button will light on and the Auto machine will stop Please follow the procedures as below to relief the situation A Press Stop button the light will go out B Under the SENSOR pulling out the breaking loop and press the FEED AGAIN in order to trim C Press the Start Switch then machine will be started P19 ...

Page 27: ...class Remark Page Date 1 2 3 4 5 E D B C A SM812N WM810 WM8000 SM812N ASP 4336 ASP 4311 SM516N 2 ASP 4301 SM814N 3 ASP 4010 ASP 4011 SM502 2 ASP 4008 ASP 4012 ASP 4007 SM510N ASP 4337 SM360N 2 ASP JBL300 2017 03 23 1 19 ASP 4301 A P20 ...

Page 28: ...SM606 EM040 ASP 4027 SM137 WM40H ASP 4310 SM4106N EM040 ASP 4051 ASP 4305 EM025 2 ASP 4304 ASP 4303 SM404 ASP 4308 ASP 4307 EM025 ASP 4309 SM301 SM412N 2 PM31A ASP 4028 AC024 ASP 4030 ASP 4029 ASP 4032 ASP 4306 EM040 SM3052 2 JA291 2 ASP 4033 ASP 4025 WM310 2 ASP JBL300 2017 03 23 2 19 ASP 4303 A P21 ...

Page 29: ...SM812N 2 WM810 2 WM8000 2 JA291 2 ASP 4312 EM040 2 SM516N 2 ASP 4018 SM619N 2 SM5105N 2 ASP 4302 ASP 4017 EM050 ASP 1089 ASP 4021 ASP 4022 EM070 ASP 4020 ASP 4303 A ASP 4023 ASP 4024 SM5107N AC023 SM404 ASP 4019 SM606 2 PM31C ASP 4301 A ASP JBL300 2017 03 23 3 19 ASP 4302 A P22 ...

Page 30: ... 5 E D B C A ASP 4063 2 ASP 4065 ASP 4064 SM132 2 SM137 2 ASP 4066 ASP 4067 PM31A ASP 4068 kimi SM438 2 ASP 4335 ASP 4075 EM030 ASP 4074 SM6112N SM4106N SM418N ASP 4070 ASP 4052 ASP 4073 JA291 2 AC079 SM614N EM040 ASP 4156 ASP JBL300 2017 03 23 4 19 ASP 4335 A P23 ...

Page 31: ...PARTS LIST Series Parts Group Subclass Remark Page Date 1 2 3 4 5 E D B C A SM5105N WM504 BR1050 2 ASP 4059 ASP 4057 SM6107N ASP 4053 SM310N ASP JBL300 2016 08 19 5 19 ASP 4053 A P24 ...

Page 32: ...PARTS LIST Series Parts Group Subclass Remark Page Date 1 2 3 4 5 E D B C A SM5104N 4 ASP 4157 ASP 4060 SM336 2 ASP 4058 ASP 4061 BR1050 WM504 2 SM5107N BF886JK ASP JBL300 2016 08 19 6 19 ASP 4157 A P25 ...

Page 33: ...Page Date 1 2 3 4 5 E D B C A SM137 SM143 BR1050 2 ASP 4079 ASP 4080 ASP 4081 SM137 ASP 4082 ASP 4083 SM310N 2 SM310N ASP 4078 ASP 4085 SM510N 2 ASP 4159 PM218 2 SM3100N 2 ASP 4084 ASP 4077 ESH001001 SM143 ASP JBL300 2016 08 10 7 19 ASP 4085 A P26 ...

Page 34: ...rk Page Date 1 2 3 4 5 E D B C A SM310N 2 ASP 4158 ASP 4157 A ASP 1044 SM606 ASP 4335 A SM614N 2 WM610 2 WM601 2 ASP 4055 PM31C ASP 4054 SM516N 2 ASP 4085 A SM5104N 2 WM511 2 WM504 2 ASP 4062 ASP 4053 A ASP JBL300 2016 08 19 8 19 ASP 4335 B P27 ...

Page 35: ...bclass Remark Page Date 1 2 3 4 5 E D B C A JA291 AC086 SM132 2 ASP 4101 SM556N 2 ASP 4086 SM140 2 ASP 4315 SM330 ASP 4094 SM132 2 ASP 4109 SM330 2 ASP 4104 ASP 4316 ASP 4111 ASP 4103 ASP 4314 ASP JBL300 2017 03 23 9 19 ASP 4314 A P28 ...

Page 36: ...ark Page Date 1 2 3 4 5 E D B C A SM812N 2 WM810 2 WM8000 2 SM4837 ASP 4014 SM5106N 2 SM4837 ASP 4159 ESH001101 SM510N 2 ASP 4313 SM4837 CP107 ASP 4006 SM319N 4 WM307 4 ASP 4335 B ASP 4302 A ASP 4314 A ASP JBL300 2017 03 23 10 19 ASP 4313 A P29 ...

Page 37: ...609 2 SM606 2 BF903JK WM900 BF902JK BF901JK SK4305 2 SK613 2 ASP 4324 NK66 2 BF907JK 1 BF907JK 2 SK841 2 EM030 ASP 4320 AC077 ASP 4327 BF805 7 BF804JK ASP 4326 ASP 4319 BF904JK SK249 JA291 2 ASP 4318 ASP 4317 M310N 2 ASP 4328 SM419 SK299 ASP JBL300 2017 03 23 11 19 ASP 4324 A P30 ...

Page 38: ...p Subclass Remark Page Date 1 2 3 4 5 E D B C A SM614 ASP 4141 SM616N ASP 4140 NM615 ASP 4321 ASP 4324 A LKS 1900AN SM611N WM601 2 ABF513 ASP 4340 SM410N SM556N ASP 4339 SM430 3 SM418N 2 ASP JBL300 2017 03 23 12 19 ASP 4321 A P31 ...

Page 39: ...es Parts Group Subclass Remark Page Date 1 2 3 4 5 E D B C A SM4106N NM413 SM319N 2 ESH001102 ASP 4114 SM132 2 ASP 4115 PM31B 4 ASP 4159 ASP 4112 CP104 SM132 SM132 2 ASP 4113 ASP JBL300 2016 08 10 13 19 ASP 4112 A P32 ...

Page 40: ...ESH000505 ESH000502 ESH001901 ASP 4250 ASP 4249 SM4051 4 SM4837 6 NM514 4 ECM011002 SM6104N 2 SM318N 4 WM307 4 SM318N 4 ESE001302 2 FE219 SM311N 2 WM307 2 ASP 4248 ASP 0198 SM4837 2 EPS001104 WM4001 4 SM410N 4 ASP 4247 SM310N 2 WM307 2 ECM051001 ASP 4166 NM312 2 SM4055 3 ECN035411 3 ASP JBL300 2016 08 19 14 19 ASP 4248 A P33 ...

Page 41: ...PARTS LIST Series Parts Group Subclass Remark Page Date 1 2 3 4 5 E D B C A JA014 JA058 4 JA061 ASP 539 1 2 ESV011101_2S ASP 4149 JA022 10 JA062 2 ASP JBL300 2017 03 23 15 19 ASP 4325 A P34 ...

Page 42: ...2 3 4 5 E D B C A SK8A1 4 ASP T2 ASP 0210 A ASP 4325 A SM4112N 4 NM615 2 ASP 4160 WM601 2 WM610 2 SM6104N 2 ASP 4150 JA342 JA014 ASP 0210 1 2 WM8000 4 WM810 4 SM821N 4 NK72 4 ASP 0212 4 ASP 0211 4 KX09 4 SW07 4 NK45 8 ASP JBL300 2017 03 23 16 19 ASP 4325 B P35 ...

Page 43: ...M8000 2 SM388 2 ASP 1227 2 SM6108N 2 WM610 2 WM601 2 ASP 4161 WM601 4 WM610 4 SM6108N 4 ASP 4112 A ASP 4341 A SM818N 4 WM810 4 ASP 4002 SM8102N 2 WM810 2 ASP 4116 WM601 2 WM610 2 SM6113N 2 ASP 4009 ASP 4161 2 SM6109N WM601 NM615 ASP 4302 A ASP 4248 A KW40E 3 ASP JBL300 2018 03 13 17 19 內側縫 單針褲耳機 P36 ...

Page 44: ... 夾具夾取 3 車縫供給 壓帶 5 換帶吹氣 6 黑 白 黑 黑 黑 黑 黑 黑 白 白 黑 白 白 壓腳 Setting pressure 0 5Mpa 切刀 SV 2 SV 3 SV 4 SV 5 SV 6 1A 1B 1F 1 2A 2B 3A 3B 4A 5A 6A 6B 6F 6 4 5 2AF 3F 3 2A inlet outlet ASP 4150 AC079 AC086 ASP 4094 JA225 JA225 2 AC077 1 2 3 4 5 6 7 9 10 11 12 13 14 15 33 8 JA225 2 備用 備用 AC023 AC024 ASP JBL300 2017 03 23 18 19 氣壓流程圖 P37 ...

Page 45: ... LIST Series Parts Group Subclass Remark Page Date 1 2 3 4 5 E D B C A 1A 2A 5A 3A 6A 4A 1B 2B 3B 6B JA225 5 2A 2B 3B 3A 1B 1A 6B 6A 4A 5A 5A 3A 3B 6A 6B 5A 3A 3B 6A 6B ASP JBL300 2017 03 23 19 19 氣壓裝配圖 P38 ...

Page 46: ...中與零件圖之產品及外觀的修改恕不事先通知 The specification and or appearances of the equipment described in this instruction book parts list are subject to change because of modification which will without previous notice ASP JBL300 MAY 2018 ...

Reviews: