background image

Step 4 | Assign a Schedule

How to Assign a Schedule to a Radio

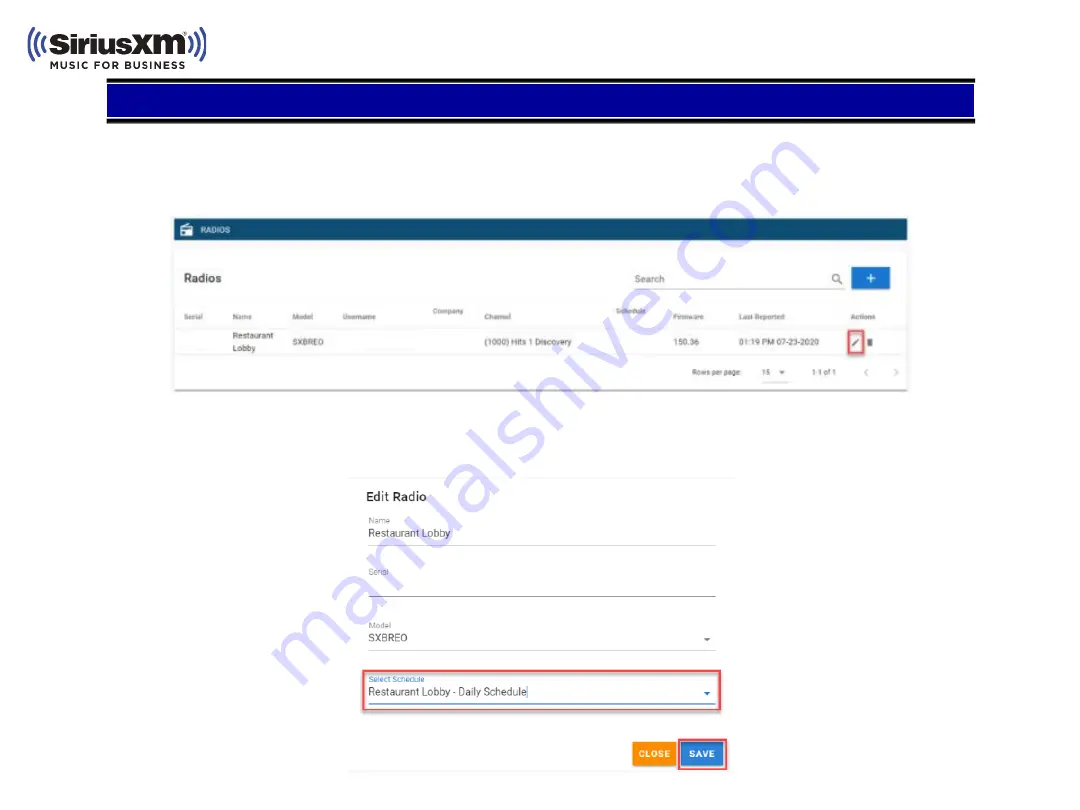
1. Click “Radios” in the left-hand navigation

2. Locate your radio from the list and click the “Pencil icon” to launce the “Edit Radio” pop-up box

3. In the “Edit Radio” pop-up box, use the “Select Schedule” drop down to locate your desired schedule

4. Highlight your desired schedule and click “Save” to complete

5. The player will begin playing the assigned schedule in a few minutes

Summary of Contents for SXBR2

Page 1: ...ing different music styles and tempos over the course of the week is a great way to keep the music fresh and interesting to both customers and employees This guide provides step by step details on how to register your radio with the scheduling portal through enabling remote scheduling Create Your Portal Account Step 1 Add Your Radio Step 2 Create a Schedule Step 3 Assign a Schedule Step 4 Enable R...

Page 2: ... volume over the course of a week s time In order to create a schedule you must have one of the following players GDI SXBR2 SXBREO or SXBREW 2 Create an Account You will need to register with the portal to create an account Click Click Here to Register and complete the Sign Up form Click the blue Sign Up button The website will flash a confirmation if your registration was successfully completed 3...

Page 3: ...etting your time zone ensures the portal changes channels at the proper time Select Time Zone in the left hand navigation Select your time zone and click Save 2 Adding a Radio Next you ll want to add your Radio to the Portal Click the Plus Sign on the right hand side of the page to launch the Add Radio pop up ...

Page 4: ... SXBR2 The serial number is in the Radio Info menu Home Settings Radio Info SXBREO SXBREW SXBR3 The serial number is on a sticker on the bottom of the radio Model The model of your radio The model is listed on the bottom of the radio Select Schedule If you already have a schedule created you can apply it here if not skip this step for now 4 The portal will Create the Radio and add it to the Radio ...

Page 5: ... Add a Day Part pop up box Select a start time this is the time you want the channel to begin playing in your business Select a channel this is the channel that will begin playing at the selected time Select your desired volume level When complete click Save 2 Enter a name for the schedule 3 Click the blue Day Part to begin scheduling time slots ...

Page 6: ...y Part for all days of the week click COPY TO ALL DAYS If you want the Day Parts to be different by day select a different day of the week and build your Day Parts for that day 6 Select your Close time This is when your radio will shut off for the night When all your Day Parts are added select the Pencil icon on the Closed row to program the radio to stop playing music for that particular day ...

Page 7: ...your radio from the list and click the Pencil icon to launce the Edit Radio pop up box 3 In the Edit Radio pop up box use the Select Schedule drop down to locate your desired schedule 4 Highlight your desired schedule and click Save to complete 5 The player will begin playing the assigned schedule in a few minutes ...

Page 8: ...ble Remote Scheduling on your GDI SXBR2 player 1 Navigate to Settings from the home menu 2 Navigate to Remote Scheduling and push the dial to select 3 Select Enable Schedule and press the dial to check the box The player will begin playing its assigned schedule in a few minutes Note Go to http www siriusxm4biz com to change and update schedules ...

Reviews: