


56
17
Тщательный уход за прибором является
гарантией его долгой и исправной службы.
Особое внимание необходимо уделять
жировому фильтру. Как извлечь жировой
фильтр описано в главе "Открытие панели"
.
Снимите жировой фильтр
,
используя
специальную ручку
.
Чтобы установить
металлический фильтр после очистки
на
место
,
выполните ту же операцию в
обратном порядке
.
Чтобы снять угольный
фильтр
,
если он установлен
,
выполните те
же манипуляции, что и с металлическим
фильтром. Угольный фильтр
расположен
непосредственно над жировым фильтром.
Для очистки самого прибора рекомендуется
использовать теплую воду и нейтральное
моющее средство.
Чтобы заменить панель, ее надо сначала
открыть, как описано в главе "Открытие
панели"
;
в модели со световой панелью,
нужно отключить питание и отсоединить
шнур питания от ламп, нажимая на
электрический разъем, расположенный над
панелью. Открутите две контргайки,
которые фиксируют панель
(
рис
. 10)
и
сдвиньте панель вправо, чтобы снять ее с
места. Чтобы вернуть панель в исходное
положение, выполните описанную выше
процедуру в обратном порядке.
Чтобы
заменить
поврежденные
флюоресцентные
лампы
необходимо
отключить устройство от сети, затем
открыть панель, следуя инструкции из
главы “Открывание панели”. Открутит
ь
шесть винтов по периметру панели и
откр
ыть
ее, как показано на рис. 11;
заменит
ь
на лампу стакими же
характеристиками
.
Верн
у
т
ь
на место
панель и винты, которые вы удалили
ранее.
Для замены фидера лампы,
действуйте также как описано выше,
поскольку фидер расположен рядом с
лампами.
Learning the new transmission code:
Once the transmission code is changed in the
radio control unit, the electronic central unit
of the cooker hood must be made to set the
new code in the following way:
- Press the main power-off button of the
hood and then restore power to the electronic
control unit.
- Within the next 15 seconds, press the Light
Button
to synchronise the central unit
with the code:
- The synchronisation between the cooker
hood and the remote control is confirmed by
the light in the hood that lights up.
Emergency button:
In the event that the radio control does not
work, use the emergency button to switch the
appliance off.
After any necessary repairs have been per-
formed, reset the emergency button.
WARNING
The battery should be replaced every year
to guarantee the optimal range of the
transmitter.
To replace the exhausted battery, take the
plastic lid off, remove the battery and re-
place it with a new one, observing the cor-
rect battery polarities.
Used batteries should be discarded in spe-
cial collection bins.
The below product:
Sirius ST2013-32K
complies with the specifications set out in the
R&TTE Directive 99/5/EC.
WARNING
Any adjustments or modifications which
have not been expressly approved by the
holder of the legal conformity certificate
may invalidate the user’s rights relating to
the operation of the device.
17
MAINTENANCE
An accurate maintenance guarantees good
functioning and long-lasting performance. Spe-
cial care needs to be taken with the grease filter:
to access the filter, proceed as described in the
PANEL OPENING chapter.
Remove the grease filter, using the special han-
dle. To refit the grease filter after cleaning,
carry out the same operation in reverse order.
To remove the carbon filter, if fitted, follow the
same steps as for the grease filter. The carbon
filter is located immediately above the grease
filter.
Tepid water and neutral detergents are recom-
mended to clean the appliance, while abrasive
products should be avoided.
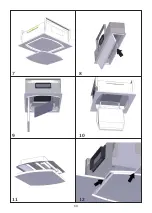
PANEL REPLACEMENT
The panel replacement is done by first open-
ing it as indicated in chapter opening panel;
in the case of the LIGHT panel, you must dis-
connect the power from the mains and un-
plug the power cord of the lamps by acting on
the electrical connector located right above
the panel.
Remove the two locknuts securing the panel
(see fig. 10) and slide the panel to the right to
remove it from its seat.
To place the panel back into position, follow
the above described procedure in reverse or-
der.
REPLACING LAMPS
To replace the damaged fluorescent lamps
you must unplug the product from the mains,
then open the panel by following the instruc-
tions in the chapter “PANEL OPENING”.
Remove the six perimeter screws of the panel
and open it as shown in figure 11; proceed in
replacing the fluorescent lamp using a lamp
with the same characteristics.
Put back into position the panel and the
screws you previously removed.
For the replacement of the fluorescent lamps
feeder, act in the same way as described
above, since the feeder is positioned next to
the lamps.
Learning the new transmission code:
Once the transmission code is changed in the
radio control unit, the electronic central unit
of the cooker hood must be made to set the
new code in the following way:
- Press the main power-off button of the
hood and then restore power to the electronic
control unit.
- Within the next 15 seconds, press the Light
Button
to synchronise the central unit
with the code:
- The synchronisation between the cooker
hood and the remote control is confirmed by
the light in the hood that lights up.
Emergency button:
In the event that the radio control does not
work, use the emergency button to switch the
appliance off.
After any necessary repairs have been per-
formed, reset the emergency button.
WARNING
The battery should be replaced every year
to guarantee the optimal range of the
transmitter.
To replace the exhausted battery, take the
plastic lid off, remove the battery and re-
place it with a new one, observing the cor-
rect battery polarities.
Used batteries should be discarded in spe-
cial collection bins.
The below product:
Sirius ST2013-32K
complies with the specifications set out in the
R&TTE Directive 99/5/EC.
WARNING
Any adjustments or modifications which
have not been expressly approved by the
holder of the legal conformity certificate
may invalidate the user’s rights relating to
the operation of the device.
TIMING
As a result of the new EU65 “Energy label” and
EU66 “ Ecodesign” regulations issued by the
European Commission, which came into force
as from January 1st, 2015 , our products have
been adapted to comply with these new re
quirements.
All of the models complying with the energy
label requirements, are equipped with new
electronics including a timer device for suc
tion speeds control, when the air capacity ex
ceeds 650m³/h.
Internal motor models, with maximum air
capacity higher than 650m³/h, are equip
ped with a timer device that automatically
switches the suction speed from 4th to 3rd
speed, after 5 minutes operation.
External motor models are equipped with re
mote motors that , as for internal motor ver
sions, include a timer device that switches
down the suction speed when it exceeds 650
mᵌ/h. (See External Motors Instructions ).
Remote motors, whose air capacity exce
eds 650m³/h at both 4th and 3rd speed, will
have the following by default timer control
functions: The suction speed is automatical
ly switched from 4th to 2nd speed, after 6
minu tes operation.
If the appliance is working at 3rd speed, it
is automatically switched to 2nd speed, after
7 minutes operation. Operation speeds can
also be changed during operation.
The energy consumption of the appliance in
stand – by mode is lower than 0.5W.
The products are endowed with an electronic
device which allows the automatic switching
off after 4 hours working from the last ope
ration.
15
УХОД
ЗАМЕНА ПАНЕЛИ
ЗАМЕНА ЛАМП
Summary of Contents for SLT955
Page 1: ......
Page 13: ...10 CONTENTS Warnings Use Installation Panel opening Ducting systems Working Maintenance EN ...
Page 63: ...59 1 4 5 6 2 3 ...
Page 64: ...60 7 8 9 10 12 11 ...
Page 65: ...52 13 14 15 61 13 14 15 52 13 14 15 ...
Page 66: ...62 ...


