


Registered in England No. 08405712
VAT Registration No. GB163 04 0349
Siretta Ltd
Basingstoke Road
Spencers Wood
Reading
Berkshire RG7 1PW
sales
fax
email
web
+44(0)118 976 9000
+44(0)118 976 9020
21
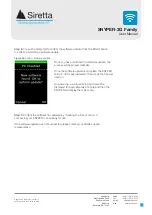
To perform a liveSCAN on your SNYPER-3G Spectrum, follow the steps below:
Step 1.
Step 1. From the ‘Options’ menu, set the SNYPER-3G Spectrum to
ADV:
Advanced
. Highlight ‘Save Settings’ and press OK. liveSCAN is now enabled.
Step 2.
Conduct a survey using an omnidirectional antenna.
Step 3.
When the survey is complete view the results acquired. Use the LEFT/RIGHT
buttons to find the survey results you wish to liveSCAN.
Step 4.
Remove the connected omnidrectional antenna and connect a directional
antenna, or the intended antenna for your installation (recommended).
Step 5.
Press OK to initiate liveSCAN.
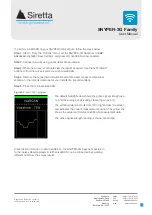
Figure 22
. liveSCAN in progress
The default liveSCAN view shows the active signal strength as a
%, and the average of all readings taken (again as a %).
The vertical white line scrolls from left to right across the screen
and indicates the current measurement position. The yellow line
shows the actual and historical liveSCAN measurement data.
The active signal strength reading is shown at all times.
Press the BACK button to abort liveSCAN – the SNYPER-3G Spectrum will return
to the Survey Results screen. A further liveSCAN can be conducted by selecting
different cells from the survey results.


