Sipura SPA 3000 How To Use Manual Download Page 6

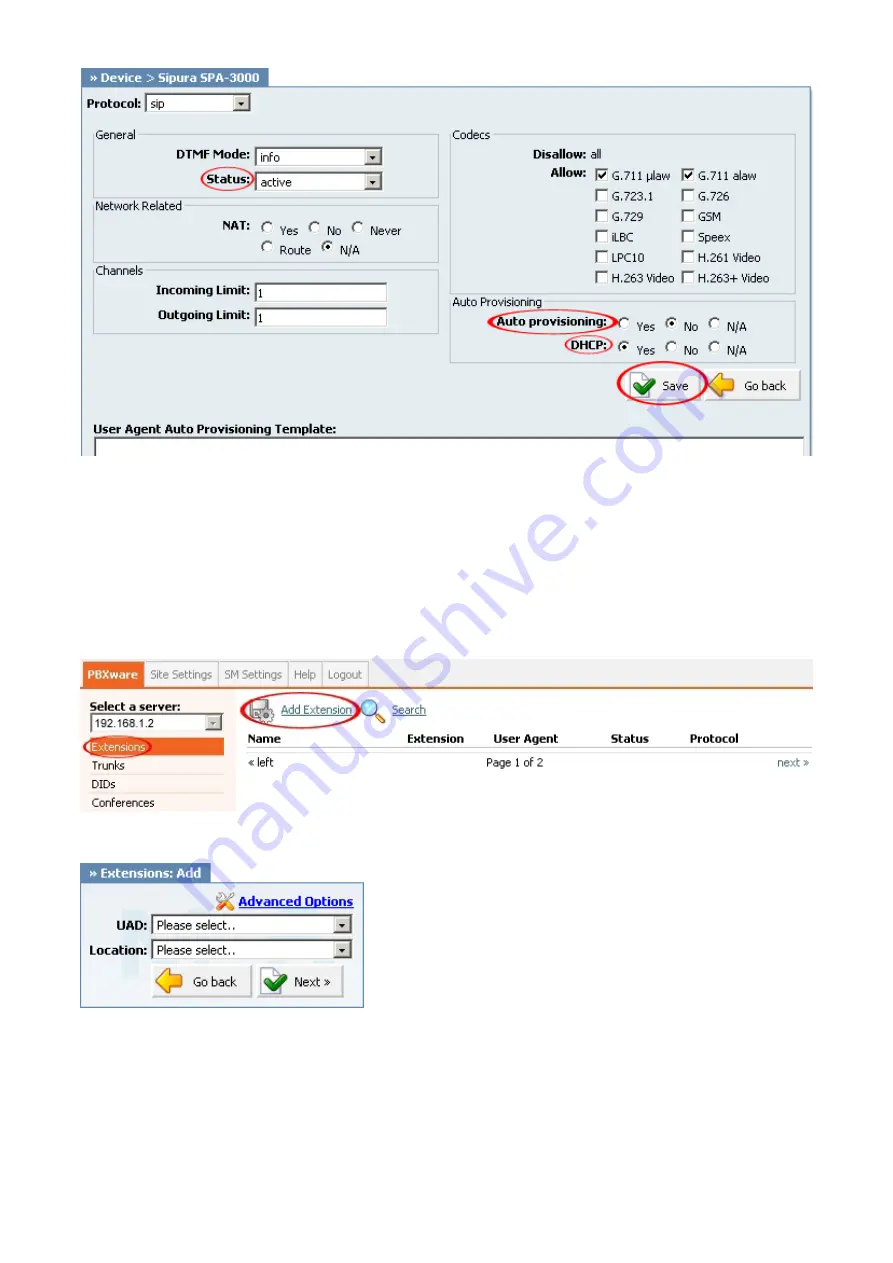
3. Click on the "Save" button to save changes.

Creating Extension

STEP ONE: Add Extension.

1. Navigate to "Extensions". Click on "Add Extension".

2. The standard options window (below) will be shown.

3. Select Sipura SPA 3000 from the "UAD" select box.

4. Select Location: "Local" or "Remote".

Note:

-"Local" is for all extensions registered on LAN.

-"Remote" is for all extensions registered from remote networks, WAN, Internet etc.

Summary of Contents for SPA 3000

Page 1: ...Using the Sipura SPA 3000 as a SIP PSTN gateway with PBXware 3 1 Create A New Provider In PBXware 3 2 Create A New Trunk 3 3 Create A DID For PSTN Line 3 4 Configuring Sipura SPA 3000 4 Glossary Intr...

Page 2: ...ipura SPA 3000 Dial Plan field value needs to be changed using the web interface STEP ONE Sipura SPA 3000 Web Interface 1 Open a new browser window and enter the IP address in order to access the Sipu...

Page 3: ...l Plan field then copy and paste the following value x x xx 3469 11 0 00 2 9 xxxxxx 1xxx 2 9 xxxxxx xxxxxxxxxxxx 5 Click on the Submit All Changes button The Sipura SPA 3000 will reboot for changes to...

Page 4: ...erface login screen Example http 192 168 1 2 an example with IP address 2 Hit Enter on your keyboard 3 Login to PBXware with your e mail address and password STEP THREE UAD status 1 Make sure the UAD...

Page 5: ...2 Make sure Status is set to active Auto provisioning is set to No and DHCP is set to Yes...

Page 6: ...o Extensions Click on Add Extension 2 The standard options window below will be shown 3 Select Sipura SPA 3000 from the UAD select box 4 Select Location Local or Remote Note Local is for all extension...

Page 7: ...ress associated with this extension This e mail address will receive all system notification messages Example john domain com Creating Extension Extensions Add an example with details filled in 2 Clic...

Page 8: ...hanged PIN An auto generated PIN will allow access to voicemail and online self care Registering ATA STEP ONE Electricity and Ethernet Connect the other end of the cable to an analog telephone Registe...

Page 9: ...P address 2 Hit Enter on your keyboard STEP FOUR Configuring your Sipura SPA 3000 1 Click on Admin Login 2 Click on Line 1 3 Enter the following details into their respective fields REQUIRED FIELDS Pr...

Page 10: ...they are not important for registering your Sipura SPA 3000 to PBXware Conclusion If everything is done as above described you should have successfully registered your Sipura SPA 3000 to PBXware Dial...

Page 11: ...r on your keyboard 3 Login to PBXware with your e mail address and password STEP THREE UAD status 1 Make sure the UAD is enabled To check the UAD status navigate to Settings UAD and click on the edit...

Page 12: ...2 Make sure Status is set to active Auto provisioning is set to No and DHCP is set to Yes...

Page 13: ...o Extensions Click on Add Extension 2 The standard options window below will be shown 3 Select Sipura SPA 3000 from the UAD select box 4 Select Location Local or Remote Note Local is for all extension...

Page 14: ...ith this extension This e mail address will receive all system notification messages Example john domain com Auto provisioning Set to Yes MAC Address Sipura SPA 3000 MAC address Example 001646f5f797 C...

Page 15: ...ter with the system The secret value can be changed PIN An auto generated PIN will allow access to voicemail and online self care Registering ATA STEP ONE Electricity and Ethernet Insert a standard RJ...

Page 16: ...2 Dial 110 STEP THREE Sipura SPA 3000 Web Interface 1 Open a new browser window and enter the IP address in order to access the Sipura SPA 3000 administration interface Example http 192 168 1 101 an...

Page 17: ...ke effect Conclusion If everything is done as above described you should have successfully registered your Sipura SPA 3000 to PBXware Dial 123 to verify registration For further information please con...

Page 18: ...WAN IP address Example 89 146 131 130 an example with details filled in 3 Click on the Save button You ll be prompted to click on the OK button to restart PRODUCT for changes to take effect an example...

Page 19: ...e than double the cost of the Sipura unit even before adding the required FXO or FXS modules The only disadvantage is that for PBXware licensing each Sipura SPA 3000 counts against the licensed number...

Page 20: ...e standard options window below will be shown 3 Enter values into the required field text boxes REQUIRED FIELDS Type Select VOIP Protocol Select SIP Name Enter for example Generic SIP FXO Gateway Gene...

Page 21: ...00 Network Related Canreinvite Select No Channels Ensure that Channels are set to incoming and outgoing limits of 1 it s an analog line and can only have one call at a time Incoming Limit Enter 1 Outg...

Page 22: ...IP address of the Sipura SPA 3000 Example 192 168 1 111 Auth Method Select none Register Select Not required Insecure Select very Codecs Disallow Select all Allow Select G 711 ulaw and G 711 alaw...

Page 23: ...4 Click on the Save button OPTIONAL FIELDS Other options or fields should be left blank or as is by default Create A New Trunk STEP ONE Create a new trunk 1 Navigate to Trunks Click on Add Trunk...

Page 24: ...elect the provider name Generic SIP FXO Gataway from the Provider field 4 Click on the Next button 5 Click on the Advanced Options button 6 Enter values into the required field text boxes REQUIRED FIE...

Page 25: ...ncy trunk Select No Username PBXware needs something in these fields so put anything it will not be used Peer Username The Sipura SPA 3000 needs something in these fields so put anything it will not b...

Page 26: ...7 Click on the Save button OPTIONAL FIELDS Qualify...

Page 27: ...STEP ONE Create a DID for PSTN Line 1 Navigate to DID s 2 Click on the Add DID button 3 The standard options window below will be shown 4 Enter values into the required field text boxes REQUIRED FIELD...

Page 28: ...uration if the dial plan points to an extension PBXware will respond with error 404 Not Found because the extensions are not in the same context as the trunk Configuring Sipura SPA 3000 STEP ONE Elect...

Page 29: ...dress of your Sipura SPA 3000 connected to network 1 Dial 2 Dial 110 STEP THREE Sipura SPA 3000 Web Interface 1 Open a new browser window and enter the IP address in order to access the administration...

Page 30: ...5 Navigate down to Proxy and Registration group Proxy IP address of PBXware server Example 192 168 1 2 Register Select no Use Outbound Proxy Select no Use OP Proxy In Dialog Select no Make Call Withou...

Page 31: ...3000 will immediately call the SIP address upon receipt of an incoming call from the PSTN and will not answer the PSTN call until the SIP destination answers the call Leave the remaining dial plans a...

Page 32: ...le Select yes PSTN Ring Thru Line 1 Select no PSTN CID For VoIP CID Select no PSTN Caller Default DP Select 1 PSTN Caller Auth Method Select none 9 Navigate down to FXO Timer Values sec VoIP Answer De...

Page 33: ...oint for devices in a network IP Address Internet Protocol address Local A local area network LAN is a computer network covering a local area like a home office or small group of buildings such as a c...

Page 34: ...de Area Network Web Interface A web interface is the system of controls with which the user controls a device Retrieved from http wiki bicomsystems com UAD_Sipura_SPA3000 Disclaimers About Bicom Syste...

Reviews: