Sequence Mode
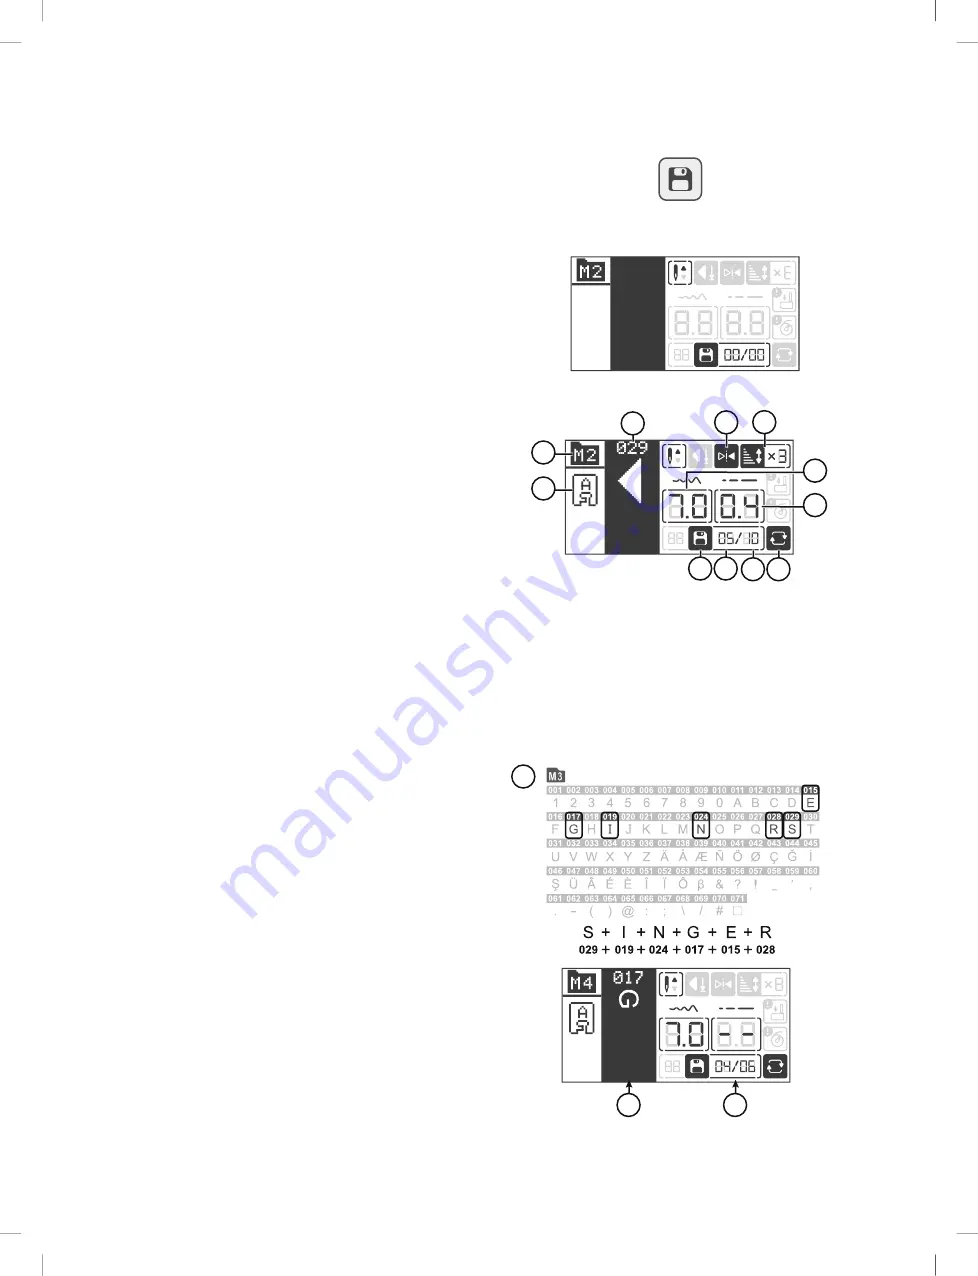
Display in Sequence Mode
Sequence Button
Sequence Mode, no stitches in memory
3
4
5
1
2
9
8
7
6
11 10
Sequence Mode, stitches in memory
Press the Sequence button to enter sequence mode. Any stitch
except buttonholes, eyelets and darning stitch can be combined
in a sequence. The total number of stitches allowed in a
sequence are 40.
1.
Recommended presser foot
— indicate what presser foot
that is recommended to use for the selected stitch to obtain
the best stitch result
2.
Active stitch menu
— Stitches that can be programmed
are found on Stitch Menu 4, Fonts. This menu is selected
automatically when entering programming mode.
3.
Number and graphic of currently selected stitch
4.
The stitch has been mirrored
(also seen in the stitch field
(3))
5.
The stitch has been elongated
6.
Width
of the currently selected stitch.
7.
Length
of the currently selected stitch.
8.
Repeat
— indicate that repeat sequence is activated. The
sequence will be sewn repeatedly until you stop sewing.
9.
Total number of stitches in the sequence
— total number
of stitches allowed (40 positions)
10.
Position of the currently selected stitch
— indicate what
position the currently selected stitch has in the sequence
11.
Sequence Mode
— indicate that sequence mode is active
Note: When the settings shown on the display are set to default,
their corresponding figures will be framed (A). If you change
the settings the frame around the figures will be will be
removed.
Create a Sequence
A
B
C
1. Press the Sequence button to enter Sequence mode.
Activate Stitch Menu 4.
2. Pull out the Stitch Chart to see which stitch number that
refers to which letter/number.
To program “SINGER”, would be stitch number 029, 019,
024, 017, 015, 028 (A).
3. Select the stitch you will use. On the display, you can see
the selected stitch number and what position it has in the
sequence (B).
4. Select another stitch and it will appear as the next stitch in
the sequence.
5. Continue until your sequence is complete.
You can step through the sequence with the navigation arrows.
The selected stitch number is highlighted on the display (C).
English
Summary of Contents for SUPERA
Page 1: ...MANUEL D INSTRUCTION MANUAL DE INSTRUCCIONES INSTRUCTION MANUAL ΕΓΧΕΙΡΙΔΙΟ ΟΔΗΓΙΏΝ SUPERA ...
Page 47: ...MANUAL DE INSTRUCCIONES SUPERA ...
Page 90: ......
Page 93: ...INSTRUCTION MANUAL SUPERA ...
Page 137: ...ΕΓΧΕΙΡΊΔΙΟ ΟΔΗΓΙΏΝ SUPERA ...
Page 142: ......
Page 186: ......


