


WARNING: DO NOT USE RE-CHARGEABLE BATTERIES (i.e. nickel cadmium)
We recommend the use of alkaline batteries.
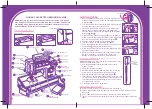
1. Ensure that the on/off switch is in the off position.
2. Turn the sewing machine over and unscrew the battery compartment lid using a
phillips screwdriver(not supplied). Then insert a screwdriver into the slot and pry it
open in the direction of arrow. (Diagram A)
3. Install 3X 1.5 volt batteries (type LR20, LR2 or D) in the compartment as shown in
diagram B.
4. Close the battery compartment cover.
USING A TRANSFORMER
INSTALLING THE BATTERIES
HINTS WHEN USING BATTERIES
A
B
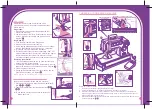
1. Remove the bobbin compartment cover. Diagram
Note: If you are changing the bobbin thread due to change in color
or the thread has run out, it is not necessary to take the bobbin
case out of the machine. Just remove the bobbin and replace it with a new bobbin. Then
continue to step 4 and skip steps 7 to 10.
2. Push the spring loaded latch as shown Diagram
3. Remove the bobbin followed by the bobbin case from the bobbin compartment.
4. Place an evenly wound, full bobbin into the bobbin case. Diagram
(IMPT: The bobbin should be wound counter clockwise.)
5. Lift up the bobbin case lever, gently pull about 8 cm (3 inches) of thread from the
bobbin and slide it across the bobbin case slot as shown in Diagram .
6. Lower the bobbin case lever.
7. Pull the thread using your fingers to feel whether the tension on the bobbin thread
is pressed too tight or too loose. Adjust the tension accordingly.
8. Use the cross screwdriver to adjust the screw (tension) on the bobbin case as
shown in Diagram
(Hint: If the material is thick, the screw on the bobbin case should be loosen. If the
material is thin, the screw on the bobbin case should be tighten.)
9. Place the bobbin case into the bobbin compartment. Diagram
10. Insert the spring loaded latch back to hold the bobbin in the correct position.
11. Fasten the bobbin compartment cover, leaving the end of the thread outside,
towards the front of the cover as shown Diagram
Caution: Never operate the sewing machine with the bobbin compartment open.
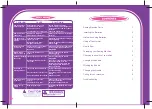
Check your stitches against the illustrations as
shown in Diagram .
CHECKING THE QUALITY OF YOUR STITCH
CHANGING THE BOBBIN
H
1
2
5
6
7
3
4
1. Showing the correct top and bottom stitch.
2. If top stitch is too tight, adjust the tension dial(counter-clockwise).
3. If top stitch is too loose, adjust the tension dial (clockwise).
4. If bottom stitch is too tight, loosen the screw on the bobbin case.
5. If bottom stitch is too loose, tighten the screw on the bobbin case.
2
3
4
1
H
5
1
2
a
b
5
4
6
7
3
bobbin
case
lever
PUSH
Do not mix different types (i.e., alkaline and zinc carbon), old and new batteries
together.
Dispose batteries carefully. Never burn or puncture.
Remove the batteries from the machine when not in use for an extended period
of time.
2. Plug in the transformer in the socket under the
handwheel on the side of your sewing machine as
shown in Diagram
3. Batteries do not have to be removed from the machine
when using the transformer.
Applies to Item # A2106
WARNING: A transformer is not a toy and should be regularly examined for
potential hazards such as damage to the cord, plug, enclosure, etc. In the event of
damage, the transformer must not be used until it has been properly repaired.
We shall not be responsible for any damage caused by the incorrect use of the
transformer.
1. For use with this product, a transformer should meet the following
specifications:
Input: AC120V and 60 Hz
Output: DC6.0V and 700mA.
C
P.5
P.2