

P
ow
er
D
at
a I
n/
O
ut
START
STOP
Y
N
LOCK
DOSE
NEXT
ENTER
OPTIO
NS
?
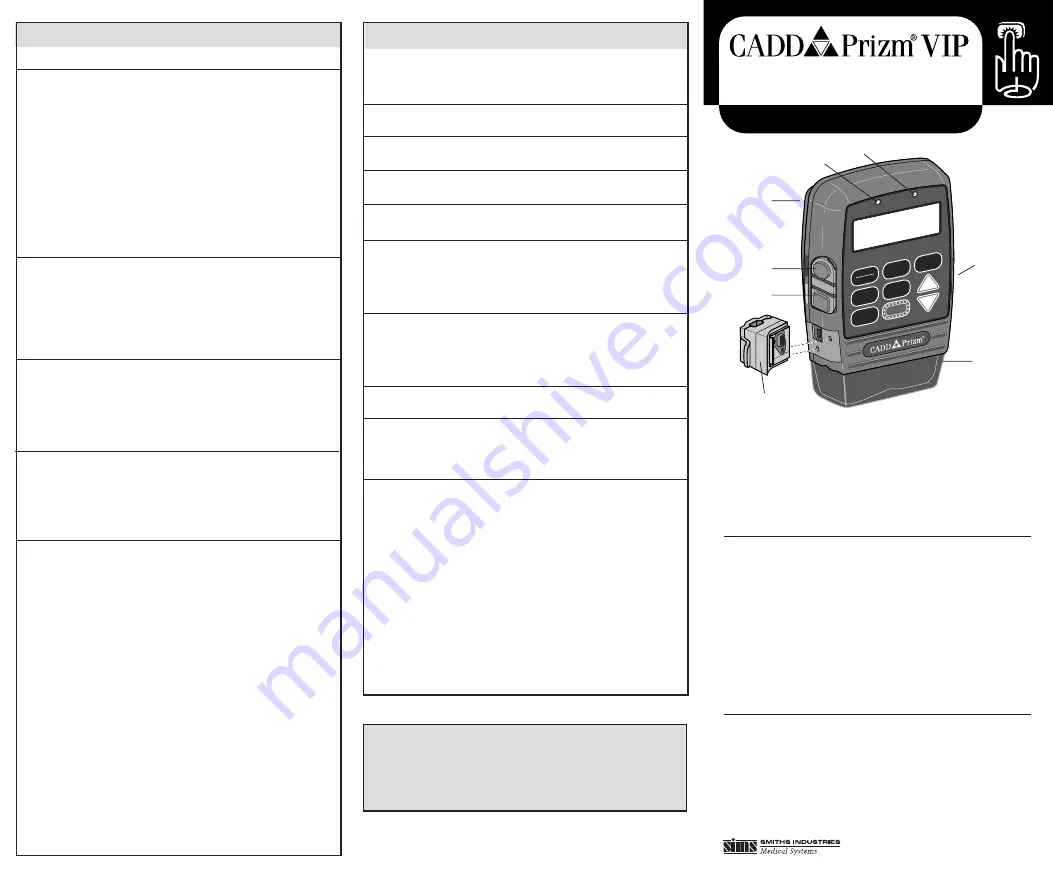
A Green indicator light: blinks when pump is running
B Amber indicator light: blinks when pump is stopped or alarming
C Polemount bracket recess (back of pump)
D Power jack (for power pack or AC adapter)
E Data in/out jack (for remote dose cord, modem cable or printer cable)
F Battery compartment (side of pump)
G Cassette (part of reservoir or administration set that attaches to pump)
H Air Detector
Keypad
STOP/START
Stops and starts the pump
LOCK
Displays or changes lock level (security level)
?
Help key: displays more information about a screen
ENTER
Sets new value; selects choice from menu; clears screen
NEXT
Advances to next programming screen; backs out of an
option or menu
DOSE
Delivers a demand dose
OPTIONS
Displays the Options Menu, pages through options
´
Answers yes; increases values on programming screen;
pages through menus; pages through history screens
Î
Answers no; decreases values on programming screen;
pages through menus; pages through history screens
Using the
Å
Å
Å
Å
Å
(Help) Key
1. For information about screen or alarm, press ? key.
2. If ?
→
appears in lower right corner, press ? to see more help.
3. Press NEXT to exit help.
ALARMS & TROUBLESHOOTING
The CADD-Prizm pump signals with audible alarms and messages on
the display when a condition requires your attention. In addition to
referring to this table, use the ? key while the alarm is occurring for
information about the alarm and corrective action.
Reservoir
Volume Low
Reservoir
Volume Zero
9-volt
Battery Low
9-volt Battery
Depleted
High Pressure
Upstream
Occlusion
(Model 6101 only)
Error Detected
Air In Line
Detected
3 Beeps Every
5 Minutes;
Stopped on
Main Screen
Level of fluid in the reservoir is low. Prepare to
install a new reservoir.
Reservoir volume is 0.0 ml. Press NEXT to stop
alarm. Install new reservoir if appropriate.
9-volt battery is low but pump is operable.
Change battery soon.
9-volt battery is depleted and cannot operate
pump; install fresh battery immediately.
Possible blockage downstream (between pump
and patient), clamp or kink in fluid path. Find
cause and remove blockage to continue. Or,
press STOP/START to stop pump and silence
alarm; remove blockage and restart pump.
Fluid is not flowing from the reservoir to the
pump. Check for a kink, a closed clamp or an air
bubble in tubing between reservoir and pump.
Press STOP/START to silence alarm for two
minutes; remove obstruction and restart pump.
Pump fault occurred. Close tubing clamp,
remove pump from service.
Air in fluid path. Press NEXT to silence alarm.
Make sure tubing is threaded in Air Detector
properly. If fluid path contains air, close clamps,
disconnect from patient and prime fluid path.
Pump is stopped. Start pump if appropriate.
HISTORY AND RECORDKEEPING FUNCTIONS
Extended History will appear in Options only if
it is turned on in the Biomed Toolbox.
1. Press OPTIONS.
2. Press
´
or
Î
until Extended History
option appears.
3. Press ENTER to display Extended History.
4. Press
´
or
Î
to choose Patient Review
or Doses Hour by Hour.
5. Press ENTER.
6. If required, use
´
or
Î
to select review
start time and date, then press ENTER.
7. Press
´
or
Î
to page through history.
8. When finished, press NEXT.
1. Press OPTIONS.
2. Press
´
or
Î
until Event Log option
appears.
3. Press ENTER to display Event Log.
4. Press
Î
to page back through Event Log
entries or
´
to page forward.
5. When finished, press NEXT.
A demand dose must be programmed.
1. Stop the pump.
2. Press NEXT repeatedly until Dose Counters
screen appears.
3. Press ENTER to clear and update date and
time.
1. Stop the pump.
2. Press NEXT repeatedly until Milliliters
Given, Milligrams Given, or Micrograms
Given screen appears.
3. Press ENTER to clear and update date and
time.
1. If applicable, detach remote dose cord
from data in/out jack.
2. Turn printer on.
3. Connect printer cable to data in/out jack
and to back of printer.
4. If necessary, press
´
until Printing
appears.
5. Press ENTER.
6. Press
´
or
Î
to select desired report.
7. Press ENTER.
8. If required, use
´
or
Î
to select desired
start time and date for report, then press
ENTER.
9. When report is finished, detach printer
cable from pump.
To View Extended
History
To View Event Log
To Clear
Dose Counters
To Clear
Units Given
To Print Reports
• Rx Settings
• Extended History
• Event Log
The pump may be running or stopped to view functions or to print.
Deltec
®
, CADD
®
and CADD-Prizm
®
are registered trademarks in the U.S.A. by
SIMS Deltec, Inc. and are registered in certain other countries by SIMS companies.
©1998 SIMS Deltec, Inc. All rights reserved. Printed in U.S.A. 3/98 19806
Deltec
SIMS Deltec, Inc.
St. Paul, MN, 55112 U.S.A.
PCA • Lock Level 1
Quick Reference Card for Clinicians
Model 6100 and 6101 Ambulatory Infusion Pump
This publication is intended as an operating reference only. For detailed
instructions, specifications, warnings, warranty, and additional infor-
mation on operating the model 6100 and 6101 CADD-Prizm pump,
please refer to the Operator’s Manual supplied with the product. Assis-
tance with the CADD-Prizm pump is available 24 hours a day by call-
ing 800-426-2448 in the U.S.A. and Canada.
D
E
C
F
G
A
B
H


