background image

EN

R2009/R3016 Radar system


Quick Reference Card


¼

Note: 

This document covers the products: 

• 

R2009 Radar system with 9” portrait display, paired with Halo, 3G, 4G or HD radar sensors.

• 

R3016 Radar system with 16” widescreen display, paired with Halo, 3G, 4G or HD radar sensors.

• 

R3016 12U/6X Radar system (IMO CAT 3).

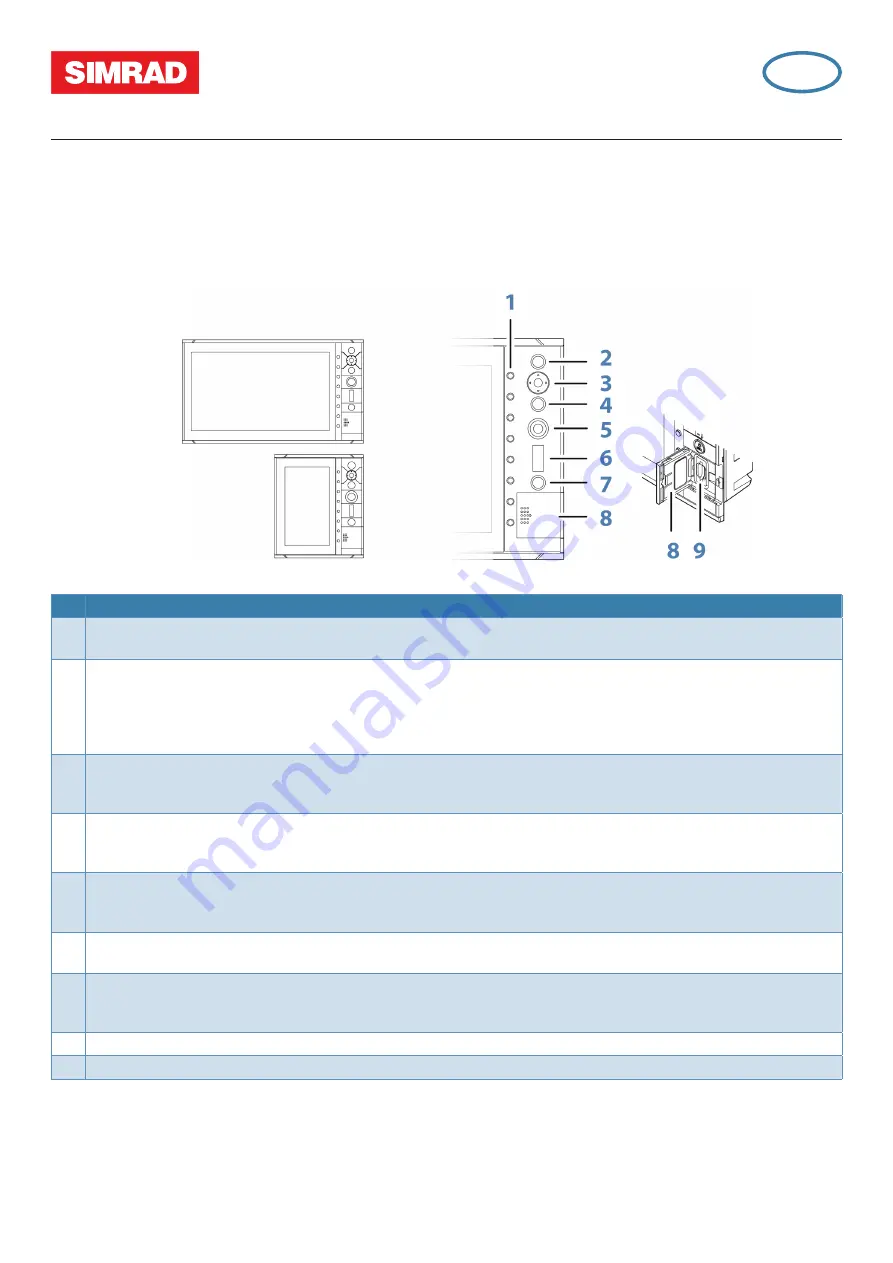
Front panel and softkeys


No. Description 

1

Softkeys


Press a key once to access options for the corresponding function.

2

ENT - Enter key 


With no menu or cursor active: no function. 
With cursor active: press to acquire a target or activate AIS. Press and hold to display options for managing radar and AIS 
targets.  
Menu and pop-up operation: press to select an option or activate/deactivate an option.

3

Arrow keys


With no menu active: press to move the cursor on the radar PPI. 
Menu operation: press to move through menu items and to adjust a value.

4

EXIT - Exit key


With no menu active: no function. 
Menu operation: press to return to previous menu level or to exit a dialog.

5

Rotary knob


With no menu active: behavior will depend on operational mode. 
Menu operation: rotate to scroll through menu items and to adjust values. Press to select or to save settings.

6

RANGE - Range key


Press the indi or - to increase or decrease the radar range.

7

STANDBY/BRILL - Standby/Brilliance key


Press once to display the Standby/Brilliance pop-up, press again to toggle between Standby and Transmit. 
Press and hold to switch the radar system on/off.

8

Card reader door

9

SD card reader

Using the cursor

Show cursor: Press one of the arrow keys.
Hide and reset cursor: Press the 

EXIT

 key.


¼

Note: 

The cursor cannot be activated, deactivated or moved when a menu or a Settings dialog is open.

http://navico-commercial.com

Summary of Contents for R2009

Page 1: ...the cursor on the radar PPI Menu operation press to move through menu items and to adjust a value 4 EXIT Exit key With no menu active no function Menu operation press to return to previous menu level...

Page 2: ...ey bar Reference for softkey func tions 5 Target indicators Overview of target indicator settings 6 Markers Details for active VRM and EBL markers 7 Cursor information Range and bearing from the vesse...

Page 3: ...elected Softkeys panel Press a softkey to display pop up open a sub menu R3016 12U 6X R2009 R3016 Menu AIS GAIN SEA RAIN TUNE EBL VRM Alerts Acknowledge GAIN Auto SEA Auto Sea state TUNE Auto EBL VRM...

Page 4: ...open Scroll AUTO On Off or toggle Sea states AUTO On Off press and hold AUTO On Off RAIN single press Display pop up Adjust Tuning R3016 12U 6X single press Activate Adjust press again when dialog is...

Page 5: ...omatic tuning mode the transceiver performs a tuning of the receiver when the range scale changes Manual tuning should only be used if the automatic tuning fails The tuning should not be performed ear...

Page 6: ...bearings Brilliance User settings menu Save settings Load settings Trails PAST POSN menu Presentation Trails Clear trails Length Past positions Time Interval Offset menu Look ahead Set offset Vectors...

Page 7: ...ejection Target boost Target expansion Target separation Fast scan mode AIS menu Filter all Filter safe Filter speed Filter range Lost warning Guard zone adjust menu Range Depth Bearing Width TT AIS m...

Page 8: ...esponsibility in order to reduce the number of high priority alerts Alert type Icon State Indication Alarm Active not acknowledged not silenced Flashing symbol and descriptive text Audible signal Acti...

Reviews: