Instruction manual
Simrad PI Spread/DepthDual sensor for depth and spread measurements
T E C H N O L O G Y F O R S U S T A I N A B L E F I S H E R I E S
www.simrad.com
(CD012200O)
Page 1: ...Instruction manual Simrad PI Spread Depth Dual sensor for depth and spread measurements T E C H N O L O G Y F O R S U S T A I N A B L E F I S H E R I E S www simrad com CD012200O ...
Page 2: ......
Page 3: ...ves you the necessary information for mounting charging and maintaining the PI Spread Depth sensor It also explains how to set up the PI44 and PI54 catch monitoring systems to receive and display the information provided by the sensor 315549 A 19 November 2007 ...
Page 4: ...ons Warning The equipment to which this manual applies must only be used for the purpose for which it was designed Improper use or maintenance may cause damage to the equipment and or injury to personnel The user must be familiar with the contents of the appropriate manuals before attempting to install operate or work on the equipment Kongsberg Maritime AS disclaims any responsibility for damage o...
Page 5: ...About sensor configuration 13 Default communication channels and update rates 14 Changing a communication channel 14 Changing the update rate 15 PI Configurator 15 DISPLAY PRESENTATIONS 16 Numerical presentation 16 Graphical presentation on PI44 and PI54 17 Depth marker line 17 Spread marker line 18 CHARGING AND MAINTENANCE 20 PI Spread Depth maintenance 20 PI Spread Depth charging 21 How to use t...
Page 6: ...Simrad PI Spread Depth 4 315549 A ...
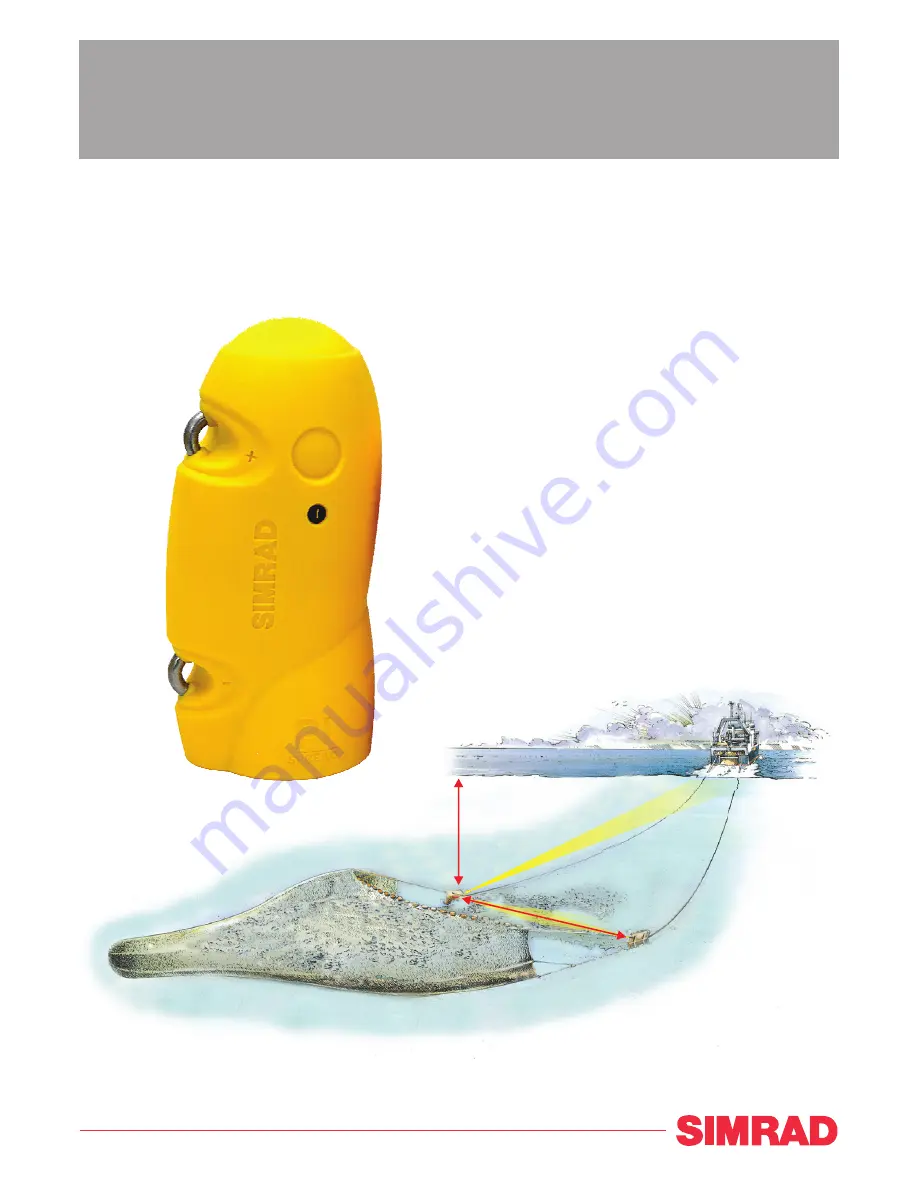
Page 7: ...rawl doors The PI Spread Depth thus contains both a pressure sensor to measure the water depth and a sensor to measure the distance to the Remote sensor on the other trawl door The results from these measurements are transmitted by acoustic signals to the PI catch monitoring system mounted on the vessel Figure 1 The PI Spread Depth sensor application C CD012200L A B E A The Spread Depth sensor is ...
Page 8: ...een developed to be used on both bottom and pelagic trawls The sensor is normally installed on the port trawl door using an adapter Main parts identification Figure 2 PI Spread Depth sensor A Negative charging and fastening lug B Positive charging and fastening lug C Communication link to the vessel D Transverse communication link E Spread Depth set identification F Water switch with sacrificial b...
Page 9: ...label is chosen to remind you that the sensor is mounted on the port trawl door B This information identifies the sensor type Three types are available PI SD300 PI Spread Depth for maximum depth 300 m PI SD600 PI Spread Depth for maximum depth 600 m PI SD1000 PI Spread Depth for maximum depth 1000 m C Order number D Opening for the water to access the pressure sensor E Water switch This is a sacri...
Page 10: ...rboard door Note It is essential that there is a clear line of sight between the two transverse communication eyes one on each sensor and between the top of the Spread Depth sensor and the hydrophone on the vessel The two rubber inserts provided at the bottom of each sensor adapter must not be replaced with any other types or designs It is essential that these inserts provide a secure cradle for t...
Page 11: ...sensor is mounted in a special adapter on the port door B The Remote or Remote Depth sensor is mounted in a special adapter on the starboard door C Communication link between the PI Spread Depth sensor and the PI hydrophone D Communication link between the Remote Depth sensor and the PI hydrophone E Communication link between the two sensors F Angle of attack 315549 A 9 ...
Page 12: ...ration Observe the following basic configuration settings When you put the PI Spread Depth to use you must set it up with two unique sensor numbers Select the same update rate for both and use channel numbers according to the sensor s configuration Write down this configuration for future reference For default settings refer to the table in section About sensor configuration on page 13 On the rece...
Page 13: ...ry Figure 5 PI Spread Depth configuration example Sensor 1 Demo mode Measure 1 Update DUAL NONE NONE NONE NONE NONE Channel Channel SPREAD DEPTH 300M FAST OFF 02 Sensor 2 Measure 2 16 Sensor 3 Sensor 4 Sensor 5 Sensor 6 Sensor setup Accept ENT MENU Exit GAIN GAIN CD012105B02 This example shows how the PI44 or PI54 is set up to receive information from a PI Spread Depth sensor Note that two channel...
Page 14: ...ls and update rates Refer to the table in section About sensor configuration on page 13 As previously stated the PI Spread Depth sensor will occupy two channels on your PI system This means that although the Sensor setup menu shows that six sensors are available the last sensor will not have any measurements left This is because you are offered six measurements and you have already used two of the...
Page 15: ... 2 On the Setup menu select Sensor setup 3 Press the ENT button to allow for changes and then the same button one more time to accept the warning To set up the depth readings from the PI Remote Depth sensor 1 Choose an available sensor 1 to 6 2 Define the sensor type by default None to Single 3 Set Update to the correct update rate 4 Set Measure x1 to the chosen sensor type Depth 300M Depth 600M o...
Page 16: ... Depth 300M 16 Depth 600M 12 Depth 1000M 10 Spread 2 Fast PI Twin Spread 2 and 7 Fast PI Temperature 8 Fast PI SeineSounder Depth 300M 5 Depth 600M 9 Depth 1000M 1 Height 14 Fast Changing a communication channel It may be required to change one or more communication channels and there may be many reasons for this You have more than one of each sensor For example if you have three temperature senso...
Page 17: ...or that is how often it sends information back to the PI catch monitoring system A high update rate will give frequent information updates but the sensor will use more battery power If you need your batteries to last as long as possible you must consider lowering the update rate A low update rate will provide you with fewer information updates but the battery will last very long A high update rate...
Page 18: ...ample 12 S1 m 69 5 q A B C I K L J E E D F H 18 D2 m 25 6 q G 1 1 CD012200D A Sensor identification B Unit of measurement C Distance between the two trawl doors D Distance change per minute E Arrows pointing out means that the distance is increasing arrows pointing in means that distance is decreasing F Visual alarm G Sensor transmission indicator H Interference warning I Depth J Depth change per ...
Page 19: ...ing depth and distance markers Figure 8 Graphical presentation on PI44 PI54 17 5 12 5 10 7 5 5 2 5 15 min 38kHz 1000W MEDIUM T 22 5 C o S 7 2kn DK 1050 m CD012106B D1 m D2 m 167 147 0 5 5 H6 m 225 7 0 50 100 150 200 250 The purpose of the depth and distance markers on the graphical presentation is to keep an eye on how deep the trawl doors are situated and how far apart they are The depth sensor i...
Page 20: ...rker in expansion to On 10 If you wish the PI system to draw a thin white line over and under the marker lines sett Marker white zone to On 11 If you wish to see the height marker only in expanded views set Height marker in main echogram to Off 12 Select requested Height reference The height sensor measures the distance from the headrope to the bottom If you use the echo sounder in the PI system s...
Page 21: ... the ENT button to save the chosen parameters and return to the graphical presentation The Spread marker line is presented on the graphic display with a continuous line The colour of the line is the same as the background colour in the numeric presentation To read the distance between the trawl doors consult the depth range on the right side of the display or the read out in the numeric display If...
Page 22: ...s equipped with a sacrificial brass screw observe the following procedure for replacement 1 Turn the sensor upside down and locate the brass screw 2 Inspect the screw for wear and tear 3 If replacement is required locate a new screw Before a new screw is inserted Aqua Shield or a similar underwater lubricant must be applied Due to the size of the tube we recommend that the grease is applied from a...
Page 23: ...Simrad PI MaxiCharger Table 2 Battery lifetime for the PI Spread Depth sensor Update rate Approximate lifetime between charging Fast 40 hours Normal 80 hours Slow 110 hours Optimal sensor charging temperature is from 10 to 25 C Note Charging sensors at sub zero temperatures can create explosive gasses Simrad assumes no liability for improper charging of sensors or the use of chargers not specified...
Page 24: ...e PI Charger set up to charge a PI sensor Even though the PI Charger is designed for fast charging of the PI sensors it can also charge the PS sensors but only at normal charge rate Daily operation Observe the following procedure for daily operation 1 Attach the charging clamps to the sensor as follows Red clamp Positive fastening lug Black clamp Negative fastening lug On every sensor the polarity...
Page 25: ... one hour to reach 70 battery capacity then approximately three hours to reach 100 capacity Once fully charged a constant trickle charge will compensate for self discharging Note Fast charging only applies to PI sensors Normal charge The PI Charger will first recharge the sensor battery for 16 hours for full battery capacity This mode applies for charging PI sensors outside specified temperature r...
Page 26: ...arging takes place WARNING Charging a sensor at sub zero temperature might develop explosive gases representing a potential danger Simrad assumes no liability for improper charging or the use of other chargers than those approved by us Automatic configuration The charger communicates with the sensor at regular intervals The fast charge cycle is controlled by data exchanged between the PI sensor an...
Page 27: ... Simrad PI MaxiCharger is provided with a small booklet from the manufacturer Mascot Read this booklet before you put the charger to work Daily operation Observe the following procedure for daily operation 1 Connect the charger to 230 Vac and check that the charger lamp is lit in yellow 2 Ensure that mounting materials do not short circuit the charging lugs This may be ropes wires chains or other ...
Page 28: ... battery is fully charged the lamp turns green Trickle charging is now active You can safely allow trickle charging for long periods of time Indicators The Simrad PI MaxiCharger is only equipped with a single indicator lamp this lamp will however change colour to show the status of the charging process Yellow The charger is connected to 230 Vac it has not been connected to the sensor and it is rea...
Page 29: ...a spread marker line 18 I Identification main parts 6 Installation 8 Introduction 5 M Main parts identification 6 Maintenance 20 Marker line depth 17 spread 18 N Numerical presentation 16 P Parts identification 6 PI Charger use 22 PI MaxiCharger use 25 PI32 configuration 10 PI44 configuration 10 PI54 configuration 10 Presentations 16 Procedure configuration PI32 10 PI44 10 PI54 10 Remote Depth 12 ...
Page 30: ......
Page 31: ......
Page 32: ... ISBN 13 978 82 8066 094 7 2007 Kongsberg Maritime AS Kongsberg Maritime AS Strandpromenaden 50 P O Box 111 N 3191 Horten Norway Simrad Telephone 47 33 03 40 00 Telefax 47 33 04 29 87 simrad sales simrad com www simrad com ...