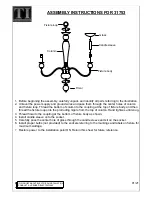
SIMPLIHOME BENTWOOD, Assembly Instructions Manual
The SIMPLIHOME BENTWOOD features an elegant design and sturdy construction, making it a stylish addition to any living space. Assembly is a breeze with our comprehensive Assembly Instructions Manual, available for free download at manualshive.com. Ensure a hassle-free setup by accessing our detailed manual today!
Share
Download


Reviews:
No comments
Related manuals for BENTWOOD

4
Brand: Xo Pages: 5

QUADRO
Brand: Balmani Pages: 4

HOME
Brand: Yo-Yo Desk Pages: 2

Sawyer
Brand: LAZBOY Pages: 10

D71 M80903
Brand: LAZBOY Pages: 10

SFV6015
Brand: Safavieh Pages: 2

SFV4202
Brand: Safavieh Pages: 4

KLINE BH17-084-098-36
Brand: Better Homes and Gardens Pages: 14

PT-7248
Brand: DIVERSIFIED WOODCRAFTS Pages: 3
31753
Brand: Triarch Pages: 1

26175
Brand: KidKraft Pages: 5

Mainstays Moss Falls MSD128059664017
Brand: YOTRIO Pages: 5

Racer Vintage I
Brand: HJH office Pages: 2

JB6SHELFBK
Brand: Officeworks Pages: 9

9437CH
Brand: Zenna Home Pages: 7

ANDOVER MILLS IDT 2737 Series
Brand: Wayfair Pages: 8

Caralyn SFV9512A
Brand: SAFAVIEH COUTURE Pages: 2

9012SS
Brand: Zenith Pages: 10


