background image

/30

O

O

PR

PR

PL

PL

R

R

1

4

O

O

PR

PR

PL

PL

R

Q

Q

O

7

Summary of Contents for WyndenHall Brooklyn + Max AXCRBUR72-MAH

Page 1: ...30 TM TM...

Page 2: ...30 TM TM...

Page 3: ...30...

Page 4: ...30...

Page 5: ...EED HELP For help with assembly or if you are missing a part Please call customer service at 1 866 518 0120 ext 262 9 am to 4 pm EST PRE ASSEMBLY INFORMATION MODEL AXCRBUR72 MAH A BOTTOM SHELF QTY 1 C...

Page 6: ...sembly or if you are missing a part Please call customer service at 1 866 518 0120 ext 262 9 am to 4 pm EST PRE ASSEMBLY INFORMATION MODEL AXCRBUR72 MAH HL LARGE DOOR L R Same QTY 2 J K LL LR L1 HR I...

Page 7: ...r help with assembly or if you are missing a part Please call customer service at 1 866 518 0120 ext 262 9 am to 4 pm EST PRE ASSEMBLY INFORMATION MODEL AXCRBUR72 MAH M LEFT DRAWER SIDE QTY 1 PL PR Q...

Page 8: ...M4 X 12 mm QTY 2 SETS ALLEN KEY QTY 1 ALLEN KEY SCREW M6 X 30mm QTY 34 PHILLIPS SCREW ROUND HEAD M4 X 15mm QTY 29 CAM LOCK PIN CAM LOCK QTY 22 SETS WOOD DOWEL QTY 28 SHELF SUPPORT QTY 12 1 2 3 4 5 6 7...

Page 9: ...30 O PR PL Q R LL L1 L2 J K J K I I HL HR GL GR E N D C BL BR A F...

Page 10: ...30 2 2 2 2 O O O O PR PR PR PL PL PL 2 2...

Page 11: ...30 O O PR PR PL PL R R 1 4 O O PR PR PL PL R Q Q O 7...

Page 12: ...30 11 10 E GR GL 3...

Page 13: ...30 E E GL GL GR GR 3 F...

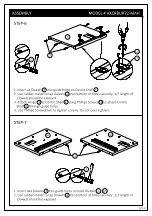
Page 14: ...2 3 3 2 2 2 Use three Allen Key Screws 1 to attach Top Divider F through guide holes from Top Shelf D to pre drilled holes of Top Divider F 3 Use Allen Key 1 to tighten Screws and Bolts Do not over t...

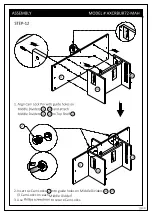
Page 15: ...30 2 Insert six Cam Locks 2 into guide holes on Middle Dividers GL GR 3 Cam Locks on each Middle Divider 3 Use to secure Cam Locks 2 GL GR D D...

Page 16: ...30 HL HR 2 3 3 2 2 3 3 C 3...

Page 17: ...30 GL GR D HL HR HL HR D GL GR 2 2 Insert six Cam Locks 2 into guide holes on Top Shelf D 3 Use to secure Cam Locks...

Page 18: ...R 2 Use three Allen Key Screws 1 to attach each part HL HR GL GR through guide holes from Bottom Shelf C to pre drilled holes of parts HL HR GL GR 3 Use Allen Key 4 to tighten Screws and Bolts Do not...

Page 19: ...30 2 3 2 2 3 3 BL BR...

Page 20: ...30 2 Insert six Cam Locks 2 into guide holes on Bottom Shelf C 3 Use to secure Cam Locks 2 BL BR C C BL BR...

Page 21: ...BL BR HL HR 2 Use three Allen Key Screws 1 to attach each part BL BR HL HR F through guide holes each part BL BR HL HR F to pre drilled holes of Top A 3 Use Allen Key 4 to tighten Screws Do not over...

Page 22: ...30 14 M C BL BR A...

Page 23: ...30 LR L1 L2 LL LR L1 L2 LL 5...

Page 24: ...30 11 10 13 13 J K BL HL J K BR HR E N...

Page 25: ...30 J J K K C GR N...

Page 26: ...30 I I 6 I I...

Page 27: ...30...

Page 28: ...30 15 15...

Page 29: ...30...

Page 30: ...30 TM TM WARRANTY...

Reviews: