ASSEMBLY
STEP 2
Place the Seat (B) on its back on a flat smooth surface. Attach the Mechanism (E) to the bottom of the Seat (B) with four Bolts (1) and four Washers (2).Use Allen Key (4) to tighten.
Page 1: ...SWIVEL OFFICE CHAIR MODEL AXCOCHR 15 BREWER DOUGLAS HAGAN...
Page 2: ...tomer Service at 1 866 518 0120 ext 262 Monday to Friday between 9 am 4 pm EST or go to www simpli home com parts request In order to assist you in a timely manner please have the following informatio...
Page 3: ...recommend the use of power tools for assembly as this could damage the unit Only use manual tools Requires 2 people for ease of assembly SAFETY INFORMATION CARE and MAINTENANCE Wipe regularly with cl...
Page 4: ...MATION PARTS DESCRIPTION NEED HELP For help with assembly or if you are missing a part Please call customer service at 1 866 518 0120 ext 262 9 am to 4 pm EST MECHANISM QTY 1 F E D GAS LIFT QTY 1 BASE...
Page 5: ...RE DESCRIPTION 2 1 NEED HELP For help with assembly or if you are missing a part Please call customer service at 1 866 518 0120 ext 262 9 am to 4 pm EST WASHER M6 X 18mm QTY 4 BOLT M6 X 20mm QTY 12 3...
Page 6: ...ASSEMBLY STEP 1 Place the Base G upside down on a flat smooth surface Attach the Casters H to the Base G Attach Gas Lift F and Gas Lift Cap I to the Base G...
Page 7: ...ASSEMBLY STEP 2 Place the Seat B on its back on a flat smooth surface Attach the Mechanism E to the bottom of the Seat B with four Bolts 1 and four Washers 2 Use Allen Key 4 to tighten...
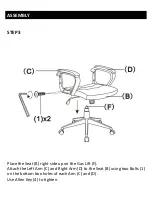
Page 8: ...EMBLY STEP 3 Place the Seat B right side up on the Gas Lift F Attach the Left Arm C and Right Arm D to the Seat B using two Bolts 1 on the bottom two holes of each Arm C and D Use Allen Key 4 to tight...
Page 9: ...ASSEMBLY STEP 4 Attach the Left Arm C and Right Arm D to the Back A using one Bolt 1 on the second hole from the top of each Arm C and D Use Allen Key 4 to tighten...
Page 10: ...Y STEP 5 Straighten the Back A to an upright position Complete attaching the Left Arm C and Right Arm D to the Back A using one Bolt 1 on the first hole of top of each Arm C and D Use Allen Key 4 to t...
Page 11: ...ASSEMBLY STEP 6 Place four Bolt Caps 3 on each Arm C and D...
Page 12: ...ASSEMBLY STEP 7 The tension knob is located under the seat cushion Turn the knob clockwise to tighten the tilt mechanism Turn the knob counter clockwise to loosen the tilt mechanism...
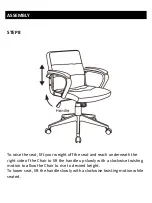
Page 13: ...off the seat and reach underneath the right side of the Chair to lift the handle up slowly with a clockwise twisting motion to allow the Chair to rise to desired height To lower seat lift the handle s...
Page 14: ...ASSEMBLY STEP 9 To tilt the Chair while seated Pull the handle outward to unlock Push the handle inward to lock into position...
Page 15: ...1 866 518 0120 ext 262 from 9 am to 4 pm Monday to Friday Eastern Standard Time or by email at customerservice simpli home com We reserve the right to repair or replace the defective product at its d...