background image

1. Insert 2 Dowels    5   into top corners of each Side   B   .

2. Align pre-drilled holes on bottom corners of Top A with Dowels    5   in Sides   B  .

3. Using Allen Key Screw   1   attach Top A

to Sides   B   and to Divider    E  .

4. Use Allen key  3  to tighten Allenkey Screw . Do not over-tighten .

1. Insérer deux goujons    5  dans les coins supérieurs de chaque Côtés   B  .

2. Aligner les trous prépercés inférieur au dessus

A

avec des goujons    5    dans les Côtés    B .

3. Utiliser des  Vis Allen    1    pour attacher le dessus

A

aux Côtés    B    et au

E  .

4. Utiliser la Clef allen  3  pour Vis allen . Ne pas trop serrer.

Séparateur

7/7

B

STEP 7

ÉTAPE 7

B

ASSEMBLY INSTRUCTIONS / INSTRUCTIONS D’ASSEMBLAGE

NOTICE / AVIS

Please use a screwdriver for the screws. The screwdriver is not included in the pack.

SVP utilisez un tournevis pour les vis. Le tournevis n’est pas fourni avec le produit.

Please use a screwdriver for the screws. The screwdriver is not included in the pack.

SVP utilisez un tournevis pour les vis. Le tournevis n’est pas fourni avec le produit.

KITCHENER

/ WATERLOO / PROVIDENCE

COFFEE TABLE

TABLE À CAFÉ

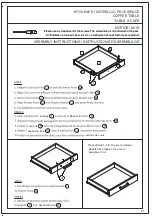
STEP 8

1. Insert assembled drawers into slots on assembled table.

2. Drawers can be inserted into either side

of

opening.

1. Insérer les tioirs assemblés dans les

coulisses du

.

2. Les tiroirs peuvent être insérés dans les

ouvertures de chaque côté du

ÉTAPE 8

table

table

table.

Summary of Contents for 3AXCRGL001

Page 1: ...DE D ASSEMBLAGE KITCHENER WATERLOO PROVIDENCE ITEM NUMBER NUM RO D ARTICLE 3AXCRGL001 Like us on share your pictures and comments to be eligible for exclusive promotions Suivez nous sur partagez vos p...

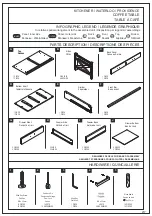
Page 2: ...2 PI CES D E F 1 PIECE 1 PI CE A B Top Dessus Sides C t s C Drawer Side C t s du tiroir Drawer Back Arri re du tiroir Drawer Bottom Bas du tiroir 1 PIECE 1 PI CE Front Bar Barre avant PARTS DESCRIPTI...

Page 3: ...wdriver is not included in the pack SVP utilisez un tournevis pour les vis Le tournevis n est pas fourni avec le produit Please use a screwdriver for the screws The screwdriver is not included in the...

Page 4: ...NSTRUCTIONS D ASSEMBLAGE NOTICE AVIS Please use a screwdriver for the screws The screwdriver is not included in the pack SVP utilisez un tournevis pour les vis Le tournevis n est pas fourni avec le pr...

Page 5: ...OFFEE TABLE TABLE CAF Bottom shelf D into each Side B 3 Insert 4 wood dowel 5 into of each Back panel C Front Bar F and Bottom shelf D 1 Ins rer 4 goujon en bois 5 dans le C 2 3 Aligner les 5 au C F D...

Page 6: ...on Divider E with pre drilled holes on Back panel C 3 Using Allen Key Screw 1 attach Front bar F to Divider E 4 Use Allen key 3 to tighten Allenkey Screw Do not over tighten 5 Use a Phillips screwdriv...

Page 7: ...S parateur 7 7 B STEP 7 TAPE 7 B ASSEMBLY INSTRUCTIONS INSTRUCTIONS D ASSEMBLAGE NOTICE AVIS Please use a screwdriver for the screws The screwdriver is not included in the pack SVP utilisez un tourne...

Reviews: