2
579-1203 Installation Instructions
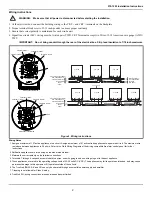
Wiring instructions
1. At the electrical box, connect the building wiring to the CKT + and CKT - terminals on the backplate.
2. Torque terminal block screws 12-15 inch-pounds to ensure proper continuity.
3. Ensure that correct polarity is maintained for each strobe unit.
4. Signal line circuit (SLC) wiring must be twisted pair (TWP). CKT Terminals accept two Wires: 12-18 American wire gauge (AWG)
TWP .
Wiring Notes
WARNING:
Make sure that all power is disconnected before starting the installation.
IMPORTANT: Do not bring conduit through the rear of the electrical box. Strip lead insulation to 7/16 inch maximum.
Figure 2. Wiring instructions
1. Assign a maximum of 127 active appliances to a circuit. Assign a maximum of 51 active strobe appliances to a powered circuit. The maximum wire
resistance between appliances is 26
ohms. Refer to the Field Wiring Diagrams of the driving compatible fire alarm control panel for further
instructions.
2. Notification appliances are rated using an individual module label.
3. Maintain the correct polarity on the terminal connections.
4. Terminals 1 through 4 can each accommodate two wires, one wire going in and one wire going out to the next appliance.
5. These appliances are rated to the operating voltage limits of 23-30
volts DC (VDC). The appliance may fail to operate as intended, and may cause
permanent damage to this equipment if it operates outside of these limits.
6. The TrueAlert IDNAC S/V and SO can only be operated through a compatible power supply and amplifier.
7. T-tapping is not allowed for Class A wiring.
8. TrueAlert SLC wiring connections are supervised and power-limited.
!
S/V Appliance Back Side
Terminal 1: ‘NAC+’
Terminal 2: ‘NAC-’
Terminal 3: ‘Audio+’
Terminal 4: ‘Audio-’
(T-tapping example)
Class A Wiring (See Notes)
From Compatible SLC
Controller (See Notes)
Audio -
Audio +
1
2
SLC +
CKT
CKT
S/V, S/O
3
4
Audio -
Audio +
1
2
SLC -
SLC +
CKT
CKT
S/V, S/O
3
4
SLC -
Audio -
Audio +
To Next Appliance
or Compatible SLC
Controller
(See Notes)
Audio -
Audio +
1
2
SLC -
SLC +
CKT
CKT
S/V, S/O
3
4
Audio -
Audio +
1
2
CKT
S/V, S/O
3
4
Audio -
Audio +
1
2
SLC -
SLC +
CKT
S/V, S/O
3
4
Audio -
Audio +
1
2
SLC -
SLC +
CKT
S/V, S/O
3
4
Audio -
1
2
SLC -
SLC +
CKT
S/V, S/O
3
4
Audio +
Audio -
Audio +
From Amplifier
Audio +
Audio -
Class B Wiring (See Notes)
From Compatible SLC
Controller (See Notes)
From Amplifier
Audio +
Audio -
SO Appliance Back Side
Terminal 1: ‘NAC+’
Terminal 2: ‘NAC-’
Terminal 3: ‘Audio+’
Terminal 4: ‘Audio-’
P2
J2
1
P2
J2
1
P2/J2
P2/J2


