background image


Page 15  


Automatic Input Sensing 

When the Auto Input mode is on, the VS-560 constantly scans the Composite, S-Video, Component and 
HDMI video inputs, waiting for a video input signal.  When you turn on a device (VCR, DSS, etc.) a 
microprocessor in the VS-560 senses the video input, turns on the VS-560 (when it is in the stand-by 
mode) and selects the input. When a second input occurs, the unit will switch to the new input.  If the 
second input is turned off, in approximately 3 seconds, the unit will go back to the first input.  If the first 
input goes off, the unit will turn itself off and return to the stand-by mode in about one-minute and wait for 
an input to become active.   
 
Note: The Automatic Input Sensing only senses video signals

,

 not audio signals

LCD Screen 

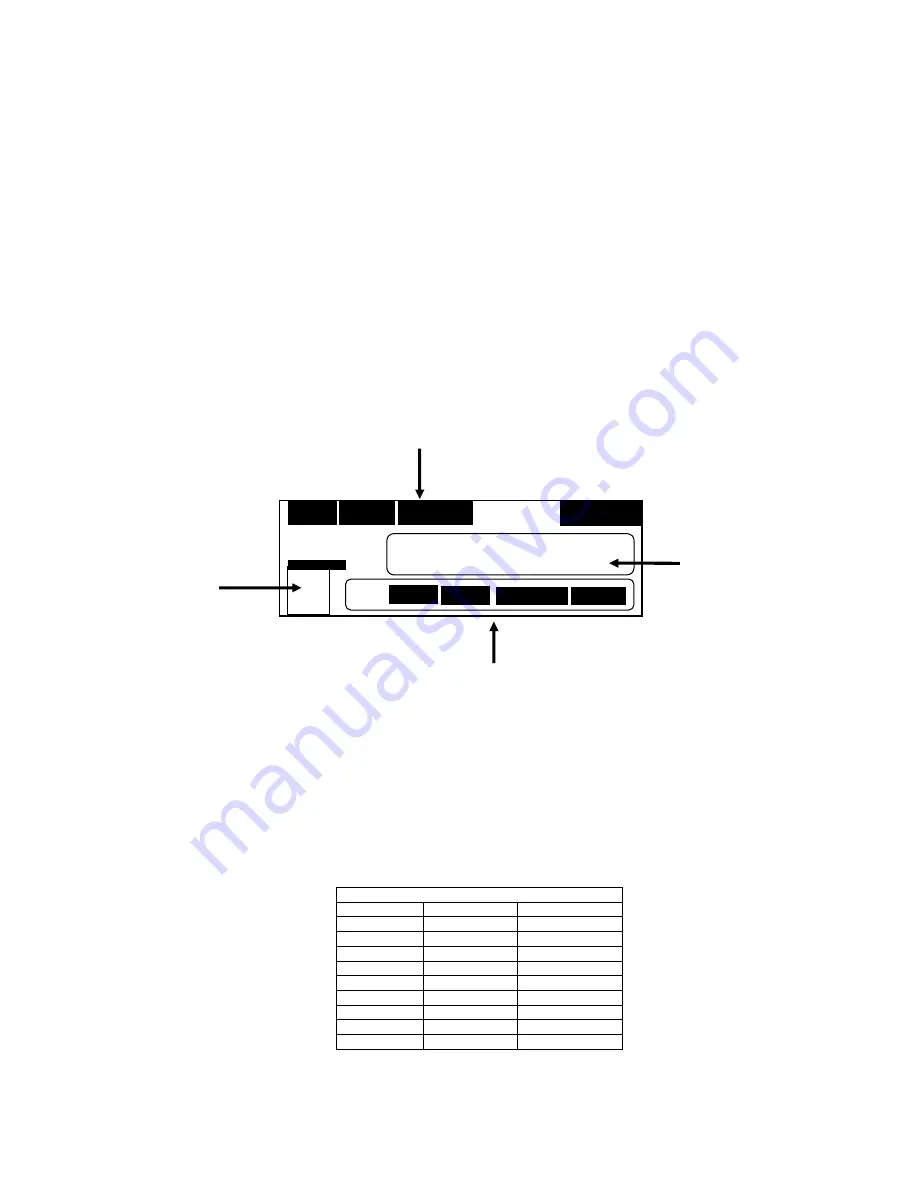
When powering up from Stand by mode, the VS-560 displays settings for various inputs on the LCD screen, 
as shown below. You can either select a pre-programmed name or create your own names for the inputs to 
identify the devices you have connected. 


The VS-560 comes with 29 pre-programmed display names. To select a pre-programmed name 
for any input: 

1)  Select the input you want to name by pressing the CHANNEL < > buttons. 
2)  Press and hold the D.NAME button for 3-4 seconds or until you hear a beep. The six 

character spaces will begin to blink. 

3)  Press the CHANNEL <  > buttons to scroll through a list of pre-programmed names, shown 

in the chart below. Select the desired name from the list. 

4)  To save the name for that input, press and hold the D. NAME button for 3-4 seconds or 

until you hear a beep. 


Pre-programmed display names 
SAT_1 

HDD 

N_64 

SAT_2 

PS_3 

GAMES 

SKY_HD 

PS_2 

TV/CBL 

HD_DVD 

PS_ONE 

CAMERA 

BL_RAY 

PSP 

PC 

DVB 

XBOX 

AUX_1 

PVB 

XBOX360 

AUX_2 

DVD_1 

XBOX 

IPOD 

DVD_2 

WII 

MP4 

DVD_R 

G_CUBE 


Display name 

Input signal  

Volume 
equalization 
setting 

 Conversion Output Status 

CVBS 

CVBS 

COMPONENT 

dB 

   --  --  --  --  --  -- 

INPUT  
SIGNAL 

HDMI 

COMPONENT 

S-VIDEO 

S-VIDEO 

HDMI > SPDIF 

VOLUME 

VS-560 LCD screen 

Summary of Contents for VS-560

Page 1: ...Online Product Registration http www simaproducts com Model VS 560 User Manual 9 Input A V Switcher with HDMI Component Video Digital Audio Automatic Input Mode and Volume Equalization ...

Page 2: ...al Remote Control PN 52466 1 Instruction Manual for VS 560 PN 21793 1 Instruction manual for remote control 2009 by Sima Products Corporation All rights reserved No part of this publication may be reproduced or transmitted in any form or by any means without prior written permission from Sima Products Corp ...

Page 3: ...and Liquid entry Care should be taken so that objects do not fall and liquids are not spilled into the enclosure through openings 14 Damage requiring service The appliance should be serviced by qualified personnel when the power cord has been damaged objects have fallen or liquids spilled into the appliance the appliance has been exposed to rain does not appear to operate normally or exhibits a ma...

Page 4: ...FFERENT VIDEO TYPES 12 BASIC HOOK UP 3 CONNECTING HDMI SOURCES 13 OPERATION 14 POWER 14 AUTO INPUT MODE 14 VOLUME EQUALIZATION ADJUSTMENT 14 DIGITAL AUDIO CONVERSION 14 HOW IT WORKS 15 SIMPLIFIED BLOCK DIAGRAM 15 AUTOMATIC INPUT SENSING 16 LCD SCREEN 16 RS 232C INTERFACE 18 RS 232C CONNECTION 18 RS232 COMMAND STRUCTURE 19 TROUBLE SHOOTING 20 TERMS 20 TECHNICAL SPECIFICATIONS 21 LIMITED WARRANTY 22...

Page 5: ...nal Conversion Simplifies connections and cable hook up Up Converts Composite video to Component video and S Video to Component Digital Audio Conversion Simplifies your hook up by providing outputs for both coaxial and optical Toslink audio signals regardless of the source Digital Audio Splitter Simplifies your hook up by splitting off the digital audio from the HDMI inputs and routes the signal t...

Page 6: ...uts automatically turn on and switch to the most recently active input device Also use this button to set dynamic range levels 3 Volume Adjustment Display name Equalizes audio line levels from a dynamic range of 6 to 6 dB Also use this button to select pre programmed display names or create custom display names 4 IR Receive Window 5 Channel For selecting A V input channels 1 9 Also use to select a...

Page 7: ... 2 Audio Video S video Inputs 3 4 Audio Video Component Input 5 Audio Video S video Outputs 2 Audio Video 2 S video 1 Component HDMI 3 Inputs 1 Output RS 232 Digital Audio Inputs Coaxial 1 3 5 Optical 2 4 Digital Audio Outputs Coaxial Optical Power 5V DC ...

Page 8: ...l See IR Universal Remote Control manual for description of features and operation Note Press the SELECT button to select AUX setting for control of VS 560 The AUX setting contains pre programmed codes for operation of the VS 560 Fig 3 ...

Page 9: ...onent converter You can feed a combination of composite and component to the VS 560 and feed only a component signal to your TV This lets you use just one component input on your TV and all sources will automatically be displayed there S video Conversion The VS 560 has an s video to component converter You can feed a combination of s video and component to the VS 560 and feed only a component sign...

Page 10: ...y Output B to the TV as an s video signal Only one input can be selected at a time The VS 560 does not convert composite video to s video Figure 5 Hook up in typical system Note Remember to always connect the outputs on your VCR DSS DVD etc to the inputs on the VS 560 Likewise connect the outputs on the VS 560 to the inputs on the TV VCR Receiver etc Note If your device does not have a stereo audi...

Page 11: ...on the VS 560 Input 4 is being used as a component video input from the set top cable box along with a coaxial digital audio connection The VS 560 component output goes to the TV monitor along with the left and right stereo audio The digital audio output goes to the stereo receiver Input 1 and 2 are being up converted from composite and S Video and output as component video Figure 6 VS 560 Notes R...

Page 12: ...et top cable box is connected to HDMI input 1 The HDMI output from the DVD player is connected to HDMI input 2 The HDMI output of the VS 560 is connected to the TV s HDMI input allowing you to view either source HDMI carries both the digital audio and video signal Note The VS 560 does not convert composite S video or component video to HDMI Figure 6 VS 560 ...

Page 13: ...e your needs To set the Volume Equalization level for the analog inputs 1 The Volume Equalization setting appears to the left of the input display name 2 To change the setting press and hold the SET button for 3 seconds or until you hear a beep The Volume equalization setting will begin to blink indicating it is ready to be changed 3 Use the Channel buttons to set the Volume Equalization level as ...

Page 14: ...nly the left audio channel is shown Notice how the VOLUME ADJ button allows you to bypass the Volume Equalization circuitry The diagram also shows how the selected video composite S Video or component signal is fed to the output buffer amplifiers and into the converter which then feeds outputs A and B The VS 560 does not convert composite S Video or component video signals to HDMI Simplified Block...

Page 15: ... shown below You can either select a pre programmed name or create your own names for the inputs to identify the devices you have connected The VS 560 comes with 29 pre programmed display names To select a pre programmed name for any input 1 Select the input you want to name by pressing the CHANNEL buttons 2 Press and hold the D NAME button for 3 4 seconds or until you hear a beep The six characte...

Page 16: ...he CHANNEL buttons buttons to scroll through a list of letters numbers and special characters 5 After selecting the desired character for that space press the D NAME button again to move to the second character space Repeat the process to select a character for that space 6 Repeat steps 3 6 until you have created a custom name for that input as shown below 7 To save the name for that input press a...

Page 17: ...it to a home automation system and control the various functions of the unit RS 232C Connection The specifications of the RS 232 port are 9600 baud 1 start 8 bits no parity No handshaking No Flow Control DB 9 Connector Pin Function 5 Ground 2 Transmit 3 Receive Computer DB 9 VS 502 DB 9 ...

Page 18: ...t back is 00 Example SA1 Auto Scan On 1 0 Set Volume Gain SD 1 pass through 1 pass through 0 adjutable 0 adjustable Data sent back is 00 Example SD0 Volume Adjust Activation 6 00 6 6 6db 5 5db 4 4db 3 3db 2 2db Set value of Volume Gain 1 1db range 6 00 6 dB 00 0db pass through Data sent back is 00 01 1db 02 2db Example SV 5 5db 03 3db Example SV04 4db 04 4db Example SV00 0db 05 5db SV 06 6db Chann...

Page 19: ...ice to the VS 560 Is the device producing a video picture Some products do not generate a video signal just a blue screen unless the tape DVD etc is actually playing Is Auto Input turned on IR remote does not work Replace batteries in remote Terms Term Definition Component Video High quality video using 3 cables Y Pb Pr used with DVDs DTV and HDTV Composite Video Standard video signal using RCA st...

Page 20: ...5 Ω 0 5V p p Optical 2 TOSLINK style Outputs Coaxial 1 75 Ω 0 5V p p Optical 1 TOSLINK style Video Inputs Composite Video RCA style phono jack 6 75 Ω unbalanced 1 V p p S Video 4 pin mini DIN 4 Y 1 V p p 75 Ω unbalanced C 0 286 V p p burst signal 75 ohms Component Video RCA style phono jack 2 Y Pb Pr 75 Ω unbalanced HDMI Inputs HDMI 3 View Outputs Composite Video RCA style phono jack 2 75 Ω unbala...

Page 21: ...its loss of use or anticipated benefits or other incidental consequential special or punitive damages arising from the use of or the inability to use this product whether arising out of contract negligence tort or under any warranty even if Sima has been advised of the possibility of such damages Sima s liability for damages in no event shall exceed the amount paid for this product Sima neither as...

Page 22: ...onnected to the inputs and outputs Save for future reference Inputs From VCR DSS etc Component Video Composite Video S Video L R analog audio Digital audio Coaxial Optical 1 2 3 4 5 6 Outputs To TV Receiver etc Component Video Composite Video S Video L R audio analog Digital audio Coaxial Optical View A View B ...

Reviews: