Sim2 SuperCube User Manual Download Page 26

 17 


Engli

sh


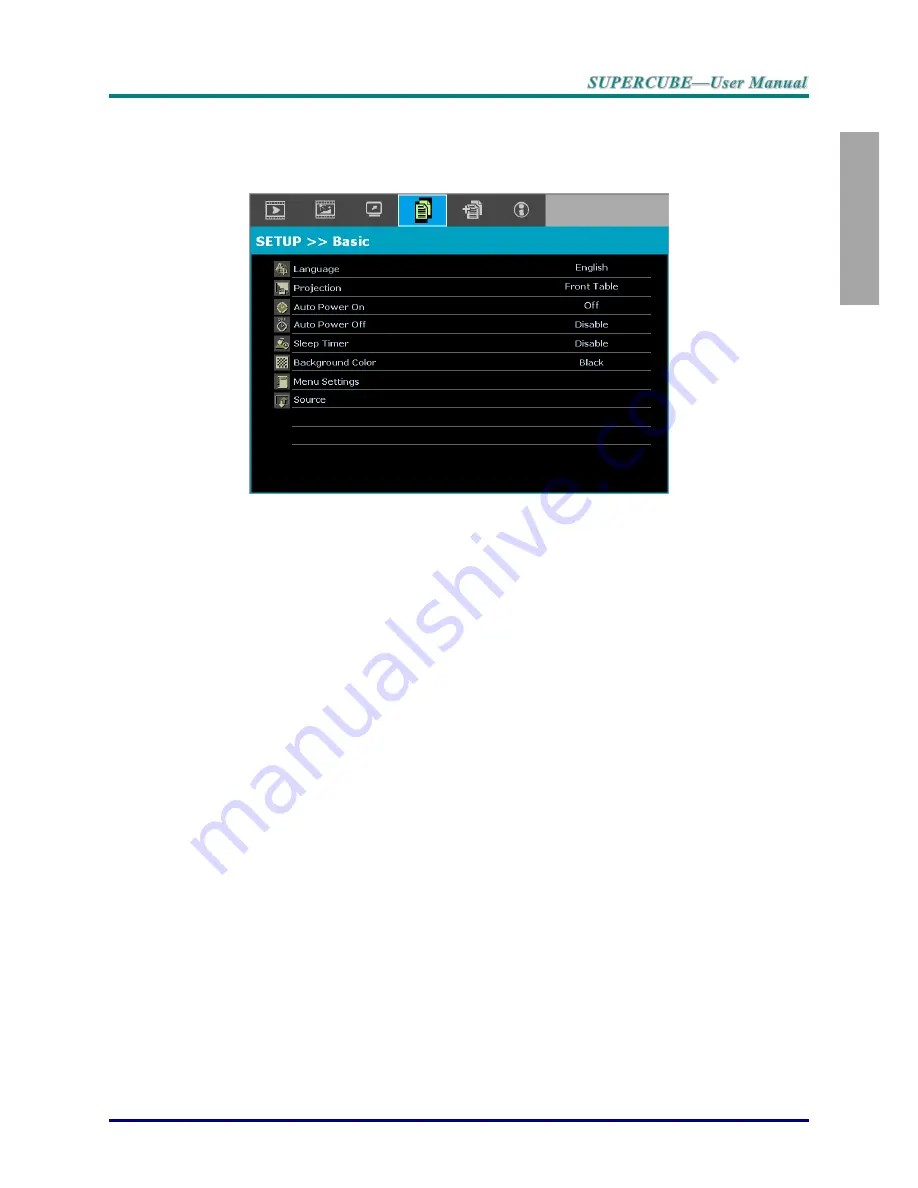
Setting the OSD Language 

Set the OSD language to your preference before continuing. 

1. 

Press the 

MENU


button. Press the cursor ◄► button

 to navigate to 

SETUP>>Basic


2. 

Press the cursor 

▲▼ button until 

Language

 is highlighted.  

3. 

Press the cursor ◄► button until the language you want is 

selected.  

4. 

Press the 

MENU

 button to close the OSD.   


Summary of Contents for SuperCube

Page 1: ...User Guide...

Page 2: ...to the contents hereof and specifically disclaims any implied warranties of merchantability or fitness for any particular purpose The manufacturer reserves the right to revise this publication and to...

Page 3: ...hazardous environment or cause personal injury Throughout this manual component parts and items in the OSD menus are denoted in bold font as in this example Push the Menu button on the remote control...

Page 4: ...ts do not recycle hot air from the exhaust vent When operating the projector in an enclosed space ensure that the surrounding air temperature within the enclosure does not exceed operation temperature...

Page 5: ...fastened to ensure proper connection of the signal wire for achieving optimal display effect The power cord and signal cable should be connected before power on the projector During the projector sta...

Page 6: ...p your face away from the exhaust vent so that you do not suffer from the gas and broken shards of the lamp Cleaning the Projector Unplug the power cord before cleaning See Cleaning the Projector page...

Page 7: ...ojections remain square with advanced keystone correction for angled projections x Input source automatically detected About this Manual This manual is intended for end users and describes how to inst...

Page 8: ...Y OSD MENU SETTINGS 16 OSD MENU CONTROLS 16 Navigating the OSD 16 SETTING THE OSD LANGUAGE 17 OSD MENU OVERVIEW 18 PICTURE BASIC MENU 20 PICTURE ADVANCED MENU 21 HSG Adjustment 22 VividSettings 23 DIS...

Page 9: ...FICATIONS 44 SPECIFICATIONS 44 PROJECTION DISTANCE VS PROJECTION SIZE 45 Projection Distance and Size Table 45 TIMING MODE TABLE 46 PROJECTOR DIMENSIONS 48 REGULATORY COMPLIANCE 49 FCC WARNING 49 CANA...

Page 10: ...appear damaged or if the unit does not work It is recommend that you keep the original packing material should you ever need to return the equipment for warranty service OPTIONAL ACCESSORIES Universa...

Page 11: ...ve IR signal from remote control 2 Lens Projection Lens 3 Focus ring Focuses the projected image 14 4 Zoom ring Enlarges the projected image Important Ventilation openings on the projector allow for g...

Page 12: ...serial port cable for remote control 8 COMPONENT Connect the Component cable from a component device 9 USB POWER For USB charge support DC 5V 10 VIDEO IN Connect the COMPOSITE cable from a video devic...

Page 13: ...turn on off the projector y Screen controllers are supplied and supported by screen manufacturers y Do not use this jack for anything other than intended use Warning As a safety precaution disconnect...

Page 14: ...ling ensure that you use only UL Listed ceiling mounts For ceiling installations use approved mounting hardware and M6 screws The construction of the ceiling mount must be of a suitable shape and stre...

Page 15: ...disrupt remote control operation 2 Be sure nothing obstructs the path between the remote control and the projector If the path between the remote control and the projector is obstructed you can bounce...

Page 16: ...16 9 MHL NA 10 Available Button available for additional functions 11 NA 12 NA 13 NA 14 NA 15 Volume Displays the volume setting bar 15 16 Mute Toggles the built in speaker between on and off 17 3D Op...

Page 17: ...wn Left Right MENU EXIT MHL control buttons When the projector is under MHL mode The keypad on projector should be with the same definition of the key on remote control Remote Control Operating Range...

Page 18: ...the direction of the arrow 2 Insert the battery with the positive side facing up 3 Replace the cover Caution 1 Only use AAA batteries Alkaline batteries are recommended 2 Dispose of used batteries ac...

Page 19: ...lashing Then press the POWER button to turn on the projector The projector splash screen displays and connected devices are detected 4 If more than one input device is connected press the SOURCE butto...

Page 20: ...English 5 When the PQWER OFF message appears press the POWER button The projector turns off Caution Do not unplug the power cord until the POWER LED stops flashing indicating the projector has cooled...

Page 21: ...he ceiling mounting bracket 2 Fasten the mounting bracket to the ceiling accordingly to its producer instructions 3 Mount the projector on the ceiling bracket 4 Open the rear cable compartment and con...

Page 22: ...endicular to the screen x Ensure the cables are in a safe location To adjust the angle of the picture turn the tilt adjuster clockwise or anticlockwise until the desired angle has been achieved In cas...

Page 23: ...a coin or other suitable tool in order to optically adjust the vertical image position The display position can be shifted upward up to 9 and down to 5 elevation of the display Lens shift adjustable...

Page 24: ...ojector only to sharpen the projected image 3 Use the RC via OSD keystone feature to correct image trapezoid wider top or bottom effect 4 The keystone control appears on the display Adjusting the Volu...

Page 25: ...button 2 There are six menus Press the cursor button to move through the menus 3 Press the cursor button to move up and down in a menu 4 Press to change values for settings 5 Press MENU to close the O...

Page 26: ...preference before continuing 1 Press the MENU button Press the cursor button to navigate to SETUP Basic 2 Press the cursor button until Language is highlighted 3 Press the cursor button until the lang...

Page 27: ...y Color R G B C M Y Hue 50 50 Saturation 0 199 Gain 0 199 VividSettings VividMotion Off Low Medium High VividPeaking 0 3 Flash tone 0 5 Display Aspect Ratio Auto 16 9 4 3 Letter Box Real 2 35 1 Keysto...

Page 28: ...Black Blue Purple Menu Setting Menu Position Center Top Right Top Left Bottom Right Bottom Left Menu Display Time 5 10 15 20 25 30 sec Source PC Disable Enable HDMI1 Disable Enable HDMI2 Disable Enab...

Page 29: ...ess the cursor buttons to adjust the display contrast Color Press the cursor buttons to adjust the video saturation Notes This function is only available when Component Video input source is selected...

Page 30: ...u Press to change values for settings ITEM DESCRIPTION Color Temperature Press the cursor button to set the Color Temperature Gamma Press the cursor button to adjust the gamma correction of the displa...

Page 31: ...b menu ITEM DESCRIPTION Primary Color Press the buttons to set the Primary Color Notes There are six sets R G B C M Y of colors to be customized Hue Press the buttons to adjust the Hue Saturation Pres...

Page 32: ...e VividSettings sub menu ITEM DESCRIPTION VividMotion Press the buttons to select different MEMC level VividPeaking Press the buttons to adjust motion adaptive sharpness enhancement 2D Peaking value F...

Page 33: ...or button to adjust the Overscan PC Detail Adjustment Press the ENTER button to enter the PC Detail Adjustment sub menu See PC Detail Adjustment on page 25 White Balance Press the ENTER button to ente...

Page 34: ...mote control to automatically adjust frequency phase and position Frequency Press the buttons to adjust the A D sampling number Phase Press the buttons to adjust the A D sampling clock Horizontal Posi...

Page 35: ...ain Press the buttons to adjust the Red Gain Green Gain Press the buttons to adjust the Green Gain Blue Gain Press the buttons to adjust the Blue Gain Red Bias Press the buttons to adjust the Red Bias...

Page 36: ...n to enter the User Color Temp sub menu ITEM DESCRIPTION White Gain Red Press the buttons to adjust the White Gain Red White Gain Green Press the buttons to adjust the White Gain Green White Gain Blue...

Page 37: ...need 3D content from a 3D DVD BRD or 3D media file 5 You need to enable the 3D source some 3D DVD content may have a 3D on off selection feature 6 You need RF shutter glasses With RF 3D shutter glass...

Page 38: ...enable or disable automatic power On when AC power is supplied Auto Power Off Press the cursor buttons to set the Auto Power Off timer The projector automatically turns off if no input source is detec...

Page 39: ...TEM DESCRIPTION PC Press the buttons to enable or disable the PC source HDMI 1 Press the buttons to enable or disable the HDMI source HDMI 2 Press the buttons to enable or disable the HDMI source Comp...

Page 40: ...button to enter the Lamp sub menu See Lamp on page 32 High Altitude Mode Press the cursor buttons to turn on or off High Altitude Mode Recommended to turn on when the altitude of the environment is hi...

Page 41: ...me Mute Press the buttons to turn on or off the speaker Lamp Press the ENTER button to enter the Lamp sub menu ITEM DESCRIPTION Lamp Mode Press the buttons to adjust lamp brightness Reset Lamp Timer P...

Page 42: ...aption Press the ENTER button to enter the Closed Caption sub menu ITEM DESCRIPTION Closed Caption Enable Press the buttons to turn on or off Closed Caption Caption Version Press the buttons to select...

Page 43: ...CRIPTION Source Displays the activated input source Resolution Displays the native resolution of input source Lamp Hour s ECO Normal Displays the number of hours the lamp has been in use Firmware Vers...

Page 44: ...p bulb may burn out during normal operation and cause glass dust or shards to be discharged outward from the rear exhaust vent Do not inhale or do not touch glass dust or shards Doing so could result...

Page 45: ...odule handle up 6 Pull firmly on the module handle to remove the lamp module and replace the lamp module 7 Reverse steps 1 to 6 to install the new lamp module While installing align the lamp module wi...

Page 46: ...g 1 Press the MENU button to open the OSD menu 2 Press the cursor button to move to the SETUP Advanced menu Press the cursor button to move down to Lamp and press enter 3 Press the cursor button to mo...

Page 47: ...tor interior while cleaning leave unplugged in a well ventilated room for several hours before using 4 If a lot of water gets into the projector interior when cleaning have the projector serviced Caut...

Page 48: ...rely attached x Ensure the attached device is turned on x Ensure a connected PC is not in suspending mode x Ensure a connected notebook computer is configured for an external display This is usually d...

Page 49: ...ballast got error 5 Flashing 8 Flashing OFF Lamp ballast Communication error 5 Flashing 10 Flashing OFF Fan 1 error 6 Flashing 1 Flashing OFF Fan 2 error 6 Flashing 2 Flashing OFF Fan 3 error 6 Flash...

Page 50: ...ce is good by testing with another electrical device 3 Restart the projector in the correct order and check that the Power LED is on 4 If you have replaced the lamp recently try resetting the lamp con...

Page 51: ...ers 3 Have the projector serviced Having the Projector Serviced If you are unable to solve the problem you should have the projector serviced Pack the projector in the original carton Include a descri...

Page 52: ...do I run HDMI cables longer than 10 meters There are many HDMI Adopters working on HDMI solutions that extend a cable s effective distance from the typical 10 meter range to much longer lengths These...

Page 53: ...eo Compatibility NTSC PAL SECAM H Sync 2D 15 30 91 4KHz 3D 101 6KHz V Sync 24 30Hz 47 120Hz Safety Certification FCC B cUL UL CE CCC Operation Temperature 5 35 C Dimensions 316 mm W x 316 mm D x 180 m...

Page 54: ...159 4 35 3 89 7 87 2 221 6 131 2 333 1 134 5 80 69 7 177 1 39 2 99 6 96 9 246 2 145 7 370 1 149 4 84 73 2 186 0 41 2 104 6 101 8 258 5 153 0 388 7 156 9 90 78 4 199 2 44 1 112 1 109 0 276 9 163 9 416...

Page 55: ...2 56 3 800 x 600 37 9 60 3 800 x 600 46 9 75 800 x 600 48 1 72 2 800 x 600 53 7 85 1 800 x 600 76 3 120 1024 x 576 35 8 60 1024 x 600 37 3 60 1024 x 600 41 5 65 1024 x 768 48 4 60 1024 x 768 56 5 70 1...

Page 56: ...7 74 5 1024 x 768 60 2 74 9 1152 x 870 68 7 75 1 SDTV 480i 15 734 60 576i 15 625 50 EDTV 576p 31 3 50 480p 31 5 60 HDTV 720p 37 5 50 720p 45 60 1080i 33 8 60 1080i 28 1 50 1080p 27 24 1080p 28 25 108...

Page 57: ...48 English Projector Dimensions 85mm 3 34 108 5mm 4 27 315mm 12 4 315mm 12 4 174mm 6 85 150mm 5 90...

Page 58: ...quency energy and if not installed and used in accordance with the instruction manual may cause harmful interference to radio communications Operation of this equipment in a residential area is likely...

Page 59: ...3256 Fax 39 0434 383260 Email info sim2 it www sim2 com SIM2 USA 10216 NW 47th Street Sunrise FL 33351 Phone 1 954 442 2999 Email sales sim2usa com www sim2usa com SIM2 BRIONVEGA Co Ltd Room 303 304 N...

Reviews: