background image

5

 |

 |

 5

 20

 20

A5

A7

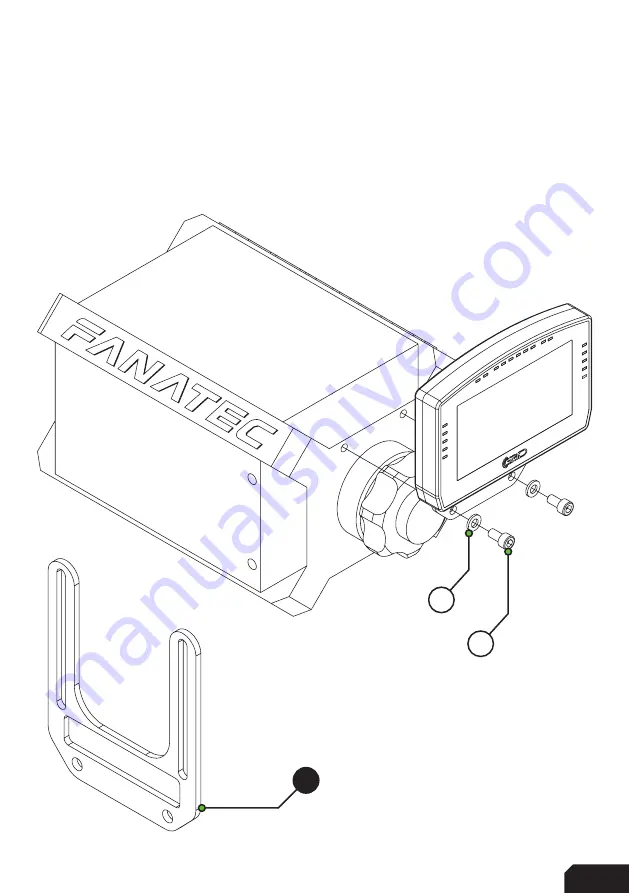
Fanatec DD1/DD2 

Locate the accessory mounting holes on your Fanatec hardware and use the two 

bolts (A4) and washers (A6) from our supplied hardware kit.

A3

Summary of Contents for GRID DDU5

Page 1: ...GRID DDU5 VERSION 1 1 Last updated 28 11 2022 INSTRUCTION MANUAL ...

Page 2: ...l RGB leds Up to 30 FPS 24 bit Colors USB Powered Multiple software options Drivers included Mounting the dash is very easy thanks to the included mounting brackets We offer a wide range of support for most popular hardware In this manual we only display the two mounting brackets included with the dash Please review our website to determine which mounting bracket fits your hardware ...

Page 3: ...rovide several mounting brackets Which ones you have received may depend on your purchase and may be different from the following ones we show However mounting is all more of the same With the instructions for the two included brackets you should be able to mount any specific ones for your hardware ...

Page 4: ...4 4 20 A4 OSW SC1 VRS Remove the existing upper bolts which hold the motor in place Re use these bolts and washers to fix the mounting bracket to the front mount ...

Page 5: ...5 5 20 A5 A7 Fanatec DD1 DD2 Locate the accessory mounting holes on your Fanatec hardware and use the two bolts A4 and washers A6 from our supplied hardware kit A3 ...

Page 6: ...the dash functional specific drivers are needed Drivers can be downloaded from the product page Vocore drivers download Installation To install the display drivers run the downloaded package and specify the location where to install the drivers Press Next ...

Page 7: ...7 7 20 Specify the name of the start menu folder Press Next Review the settings before installation Press Install ...

Page 8: ...longer than expected This usually means a system restore point is being made and should not hinder installation If it does unplug the USB cable to the Dash in case it is connected and try again Make sure you have administrator rights on your system Press Finish ...

Page 9: ...SimHub installation To control the LEDs of the dash SimHub can be used Download the lastest version of SimHub from https simhubdash com Installation Unzip the downloaded file and run the setup file Press Next ...

Page 10: ...10 10 20 Specify the location where to install the software Press Next Make sure all options are checked Press Next ...

Page 11: ...11 11 20 Press Install After installation press Finish ...

Page 12: ...ed the dash with the supplied USB cable to your computer this is required from this point forward Activation To use the display with SimHub it needs to be added as a device Press Devices 1 and Add device 2 when you see are adding a device for the first time ...

Page 13: ...13 13 20 1 2 Press Generic Vocore Screen 1 Confirm by pressing Ok 2 ...

Page 14: ...fic screen 2 option you always know what device you are adjusting In the screenshot above we disabled touchscreen This is enabled by default While on the device page for this screen you can very quickly scroll through dashboards using the Displayed dashboard dropdown 3 For more possibilities and how to make your own awesome dashboards navigate to Dash Studio 4 or see the SimHub documentation NOTE ...

Page 15: ...A sample LED profile can be downloaded from the product page LED profile download First navigate to Arduino 1 on the left side of the screen To configure first press My Hardware 2 If you only have the DDU5 connected select Single aduino 3 ...

Page 16: ...o make sure SimHub can communicate with the LED section of the DDU5 When you have completed the steps on the previous page you should find a Connected 4 indicator on the GE DDU5 line After we have confirmed the connection press RGB Leds 5 in the top row of options ...

Page 17: ...17 17 20 1 Here we can manage LED profiles Press the Profiles manager 1 option and proceed to the next page in this manual ...

Page 18: ...8 20 3 2 Press the import profile icon 2 Browse to the location where you stored the LED profile select it and press Open The load the profile make sure it is selected GRID x DDU5 UNIVERSAL and press Load 3 ...

Page 19: ... for reference There should be enough info in the sample profile to be able to adjust to your liking Just keep in mind you mostly need two values The number of the LED where you want an effect to start and the amount of LEDs to use for said effect in a clockwise direction For further assistance and more information on effects please see the SimHub documentation 1 2 3 4 5 6 7 8 9 10 15 14 13 12 11 ...

Page 20: ...im lab eu discord www gridbysimlab com discord IN THE BOX Part QTY Note A1 Dash DDU5 1 A2 USB B mini cable 1 A3 Bracket Fanatec DD1 DD2 1 A4 Bracket OSW SC1 VRS 1 A5 Bolt M6 X 12 DIN 912 2 Used with Fanatec A6 Bolt M5 X 10 DIN 7380 4 To fit mounting bracket to dash A7 Washer M6 DIN 125 A 4 A8 Washer M5 DIN 125 A 4 Disclaimer for some entries on this list we supply more than required as spare mater...

Reviews: