background image

- 5 -

Warning:

If the control lamp 

i

does not go out after 10 

seconds at the latest, the appliance is defective! 
Immediately remove the plug from the wall socket. 
Do not attempt to repair the appliance yourself. In
this case, contact Customer Services.

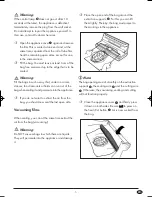
Open the appliance cover 

u

again and remove

the film. This is sealed at one end and, at the
same time, separated from the roll of tube film.
Seal the remaining open sides, except for one,
in the same manner.

Fill the bag. You must leave at least 6 cm of the
bag free, measured up to the edge that is to be
sealed.

Warning:

Fill the bags in such a way that, under no circum-
stances, food remnants or fluids can run out of the
bag when sealing it and permeate into the appliance. 

If you do not want to extract the air from the
bag, you should now seal the last open side. 

Vacuuming films

When sealing, you can at the same time extract the
air from the bag (vacuuming):

Warning:

Do NOT vacuum bags in which there are liquids.
They will permeate into the appliance and damage
it.

Place the open end of the bag around the
extraction supports 

w

. For this you can lift

them lightly. Thereby, the bag must project to
the markings in the appliance.

Note: 

The bag opening must sit smoothly on the extraction
supports 

w

, the sealing wire 

r

and the cutting wire

e

. Otherwise, the vacuuming, sealing and cutting

will not function properly.

Close the appliance cover 

u

and firmly press

it down on both sides. Be sure nno

ott to press on

the Seal/Cut button 

y

. Air is now sucked from

the bag.

IB_SFS_150_A1_46614_LB6  05.03.2010  11:31 Uhr  Seite 5

Summary of Contents for SFS 150 A1

Page 1: ...GMBH BURGSTRASSE 21 D 44867 BOCHUM www kompernass com ID Nr SFS 150 A1 01 10 V2 KITCHEN TOOLS Vacuum Sealer SFS 150 A1 Vacuum Sealer Operating instructions CY CV_SFS_150_A1_46614_LB6 qxd 01 03 2010 16 50 Uhr Seite 1 ...

Page 2: ...SFS 150 A1 w y i q u e t r CV_SFS_150_A1_46614_LB6 qxd 01 03 2010 16 50 Uhr Seite 4 ...

Page 3: ...e film 4 Vacuuming films 5 Storing the appliance 6 Cleaning 6 Cleaning the collector receptacle 6 Cleaning the appliance 6 Maintenance 6 Disposal 7 Importer 7 Warranty and Service 7 Read these operating instructions carefully before using the appliance for the first time and preserve this maual for later reference Pass this manual on to whoever might acquire the appliance at a future date ...

Page 4: ... become damaged im mediately remove the power plug Then arrange for the device to be checked by Customer Services After use or during extended absences ALWAYS remove the plug from the power socket Never leave the appliance unsupervised when it is connected to mains power The appliance is electrically live for as long as the plug is in serted into the wall socket To avoid the risk of fire Use only ...

Page 5: ...break of 80 seconds before continuing to seal further bags Description of the appliance q Collector receptacle w Extraction supports e Cutting wire r Sealing wire t Film compartment cover y Seal Cut button u Appliance cover i Control lamp Commissioning Place the appliance on a non slip and stable surface Insert the power plug into a wall power socket Inserting the film Open up the cover to the fil...

Page 6: ...a water bath or similar It is construed for temperatures of a maximum of 60 C Fold the appliance cover u up Pull out as much film as is required for the task at hand Then close the appliance cover u Firmly press the appliance cover u down Note The bag opening must sit smoothly on the sealing wire r and on the cutting wire e Otherwise the sealing and cutting will not function properly Press and hol...

Page 7: ...n out of the bag when sealing it and permeate into the appliance If you do not want to extract the air from the bag you should now seal the last open side Vacuuming films When sealing you can at the same time extract the air from the bag vacuuming Warning Do NOT vacuum bags in which there are liquids They will permeate into the appliance and damage it Place the open end of the bag around the extra...

Page 8: ...le q as soon as soiling is visible Open the appliance cover u Fold up the extraction supports w Carefully pull the collector receptacle q out of the appliance using the lateral grips Clean it in a lukewarm washing up solution and the allow then collector receptacle q to dry well Replace the collector receptacle q and fold the extraction supports w down Cleaning the appliance Clean the appliance on...

Page 9: ...patch for your goods be assured The warranty covers only claims for material and maufacturing defects but not for transport damage for wearing parts or for damage to fragile compo nents e g buttons or batteries This product is for private use only and is not intended for commercial use The warranty is void in the case of abusive and improper handling use of force and internal tampe ring not carrie...

Reviews: