- 7 -
Insert the CD, slide the ON/OFF switch on the micro-
>
phone to the position "ON", start CD playback and off
you go.
Karaoke with an Audio CD
Naturally, you can also sing along to a normal Audio CD.
However, you must then know the texts, and the Balance function
(see "Setting the sound quality") is not available.
Sound quality adjustments
(see "Setting the sound quality“):
Add in the Echo Sound, to give your voice an echo effect.
•
Only with CD+Gs: Adjust the sound volume of the instru-
•
ments and the vocals (Controller BAL in a middle position =
Instruments and Vocal with the same sound volume).
Only with CD+Gs: Adjust the Auto Voice Control
•
(Controller AVC).
Monitor adjustments
At the rear of the device there are three controllers for
adjusting the monitor:
Adjust image synchronisation
Adjust brightness
Adjust contrast
Important! - Microphone Feedback
With feedback one is dealing with the background noises that
occur when a microphone is held too close to a loudspeaker.
Therefore, ensure that when you are singing the microphone is
kept as far away from the loudspeakers as possible. To avoid
these unpleasant noises when changing the CD, switch the micro-
phone off with its ON/OFF switch (OFF position).
Karaoke with a cassette
Note:
When playing back a karaoke cassette you need to know the text of
the song, as a text reproduction on the monitor does not take place.
Connect a microphone and switch the device on.
>
Slide the switch FUNCTION into the position "TAPE".
>
Insert the cassette, slide the ON/OFF switch on the micro-
>
phone to the position "ON", start cassette playback and
sing.
Sound quality adjustments
(see "Setting the sound quality“):
Add in the Echo Sound, to give your voice an echo effect.
•
Adjust the playback speed of the cassette (Controller
•
PITCH).
Only for karaoke cassettes: Adjust the Auto Voice Control
•
(Controller AVC).
Recording karaoke on a cassette
Prepare the recording as described above.
>
Press the pause button
>
;
and the recording button
=
(the button
4
engages together with the
=
button).
Slide the switch FUNCTION into the position "CDG.
>
Insert the CD, slide the ON/OFF switch on the micro-
>
phone to the position "ON" and start CD playback.
Press the Pause
>
;
button. Both the voice (Microphone)
and the CD playback are now being recorded.
Camera function
You can use the integrated camera during a karaoke per-
formance. The camera image will be shown on the monitor.
This function is not available in the operating mode "TAPE".
Switch the device on. If a colour image is to be shown on
>
a connected television set, slide the switch VIDEO OUT
into the position "CAMERA".
To show the image on the integrated black and white
>
monitor, slide the switch MONITOR into the position
"CAMERA".
Fold out the VIDEO CAMERA and remove the protective
>
cap from the camera lens.
The camera image is now shown on the monitor resp. the
>
connected television set.
The camera can be swung to the left and right, up and
>
down. On the outer adjusting collar on the camera lens
you can adjust the focus.
Connecting external devices
Important!
When connecting external devices, e.g. a television set, use
only cinch plugs/cables that are suitable and designated for
the task.
Connect external appliances only when they are switched off.
Your portable Karaoke Machine if fitted with input and output
sockets for the connection of external devices (see the fold-out
page). To be able to play back the sound and image data
from the connected device over your facility, you must select
the connections to which the external device is to be connected.
For this, the operating mode switches VIDEO OUT and
MONITOR are available.
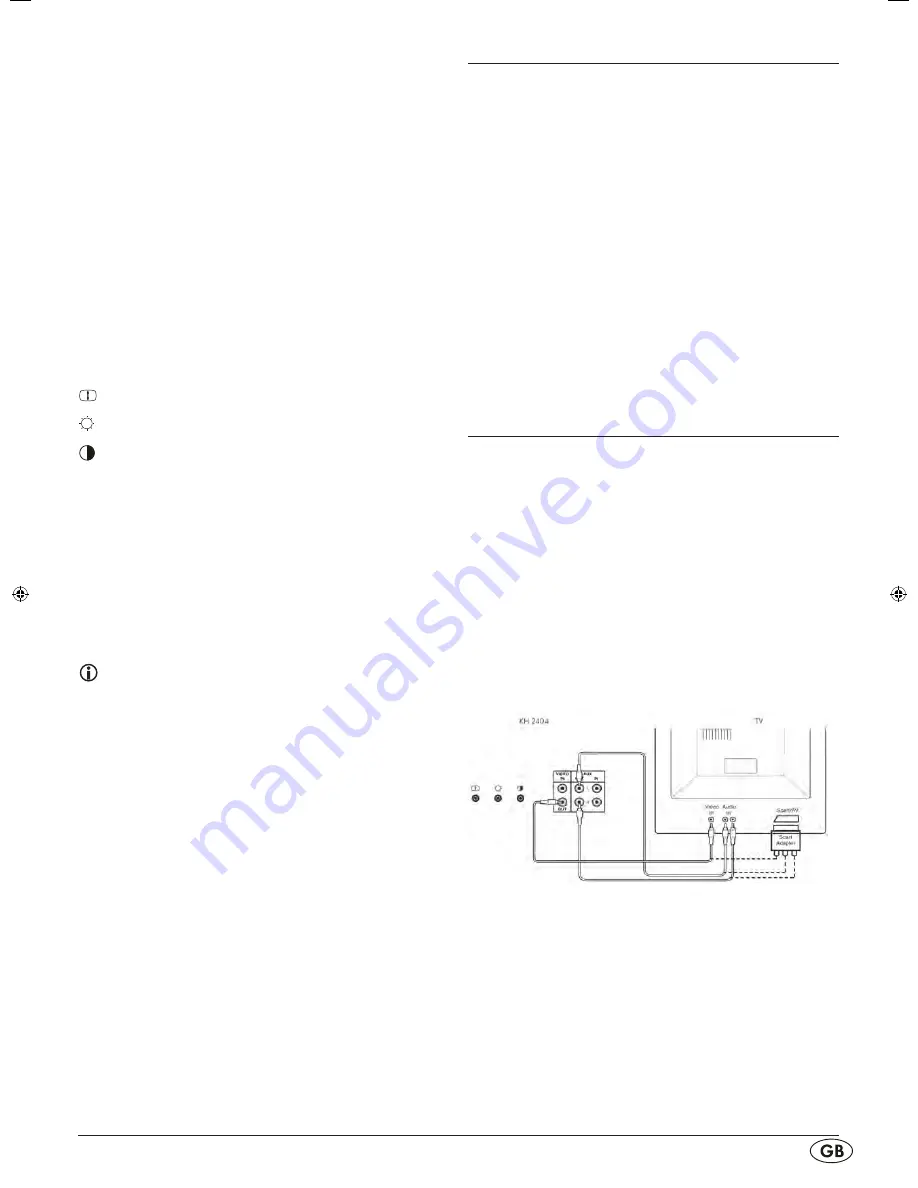
Connection example for a television set or a monitor
Using cinch cables, connect the Audio/Video-In sockets of
>
the television set or monitor with the sockets AUX OUT /
VIDEO OUT on the portable Karaoke Machine.
Alternatively, you can also utilise the AV socket with the
supplied Scart adapter.
Using the switch VIDEO OUT determine what is to be
>
presented on the connected television set.
On the television set, adjust the appropriate input sockets
>
(e.g. AV3, EXT3, Front AV).


