background image

10

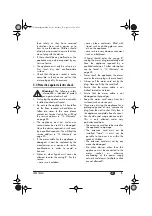
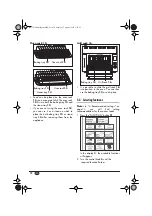
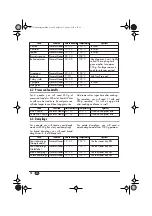
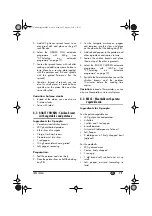
Oven rack 15:

• Food can be placed on the oven rack

15

 in an oven-proof dish. The oven rack

15

 fits into both the baking tray 

13

 and

the steam tray 

14

.

• If you are not using the oven rack 

15

,

you can use it as a stand on which to
place the hot baking tray 

13

 or steam

tray 

14

 after removing them from the

appliance.

Grill rack 16: 

• It is possible to slide the grill rack 

16

into position in the oven. You can then
use the baking tray 

13

 as a drip tray.

5.4 Selecting functions

Note:

 In “6. Recommended settings” on

page 

13, you will find setting

recommendations for the various foods.
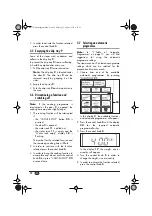
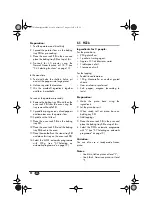
1. Press the “FUNCTION” button 

21

In the display 

3

, the available functions

will appear.

2. Turn the control knob 

5

 until the 

 required function flashes:

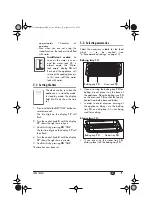
Baking tray 

13

Oven rack 

15

Baking tray 

13

Steam tray 

14

Oven rack 

15

Baking tray 

13

Grill rack 

16

 RP57458 Dampfgarer LB6  Seite 10  Montag, 27. August 1956  9:07 21

Summary of Contents for 57458

Page 1: ...6WDLQOHVV 6WHHO 6WHDP 2YHQ 6 2 6WDLQOHVV 6WHHO 6WHDP 2YHQ 2SHUDWLQJ LQVWUXFWLRQV 53 DPSIEDFNRIHQB RYHUB LQGG ...

Page 2: ...Be sure to note the fold out page SDBO 1850 A1_10_V1 7_GB RP57458 Dampfgarer LB6 Seite 1 Montag 27 August 1956 9 07 21 ...

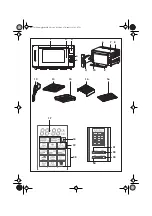
Page 3: ...3 4 5 7 14 17 1 13 18 19 20 11 10 9 6 2 15 24 23 22 21 8 12 16 RP57458 Dampfgarer LB6 Seite 1 Montag 27 August 1956 9 07 21 ...

Page 4: ...RP57458 Dampfgarer LB6 Seite 2 Montag 27 August 1956 9 07 21 ...

Page 5: ...5 1 Names of parts see fold out page 1 Door handle 2 Door 3 Display window 4 Menu keys 5 Control knob 6 Steam vent 7 Casing 8 Warning Hot surfaces 9 Drip tray 10 Water valve 11 Water tank 12 Tray removal handle 13 Baking tray 14 Steam tray 15 Oven rack 16 Grill rack 17 Display for time temperature or weight 18 Display Water tank empty 19 Function displays 20 Automatic programme displays 21 FUNCTIO...

Page 6: ...uching hot surfaces 3 Safety Information 3 1 Terms used The following signalling terms are found in these Operating Instructions Warning High risk Disregarding the warning may cause injury to life and limb Caution Medium risk Disregarding the warning may cause damage to property Note Low risk Circumstances that should be taken into account when dealing with this appliance 3 2 General information B...

Page 7: ...be allowed to enter the casing 7 For this reason never use it outdoors never place containers filled with liquid such as drinking glasses vases etc on the appliance never use in a very damp environment such as a bathroom If liquid should enter the casing 7 unplug the mains plug immediately and have the appliance repaired by a qualified technician Further information can be found in 13 Warranty on pa...

Page 8: ...he service address in 13 Warranty on page 25 3 5 Protection against injury Warning To avoid injury please observe the following information Ensure that it is not possible for anyone to trip over or to get caught up in or step on the mainscable The surface of the oven can become very hot during operation It is thus advisable to use oven gloves or some sort of protection to avoid any risk of burning...

Page 9: ...ng up Note As the appliance and heating elements are supplied with a thin film of grease there might be a small amount of smoke and odour the first time the appliance is used This is not harmful and will stop after a short while Please ensure in the meantime that there is sufficient ventilation 1 Unpack the appliance from the packaging 2 Remove the transport packaging 3 Remove the accessories and pac...

Page 10: ... cool down 16 Clean the appliance again Observe here the information in the section entitled 9 Cleaning on page 23 5 Operating Note When using the steaming function of the oven steam will constantly escape through the steam vent 6 Make sure that this steam can escape freely 5 1 Preparing the appliance 1 Insert the mains plug into a wall socket that complies with the technical data see 12 Technical...

Page 11: ... this by pressing 24 TIME The last two digits on the display 17 will then flash 4 Turn the control knob 5 until the display 17 shows the right time in minutes 5 Confirm this by pressing 24 TIME The time has now been set 5 3 Selecting accessories Select the accessory suitable for the food which is to be cooked see 6 Recommended settings on page 13 Baking tray 13 If you are using the baking tray 13 fo...

Page 12: ...le to slide the grill rack 16 into position in the oven You can then use the baking tray 13 as a drip tray 5 4 Selecting functions Note In 6 Recommended settings on page 13 you will find setting recommendations for the various foods 1 Press the FUNCTION button 21 In the display 3 the available functions will appear 2 Turn the control knob 5 until the required function flashes Baking tray 13 Oven rac...

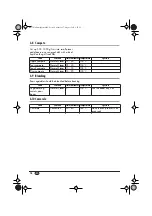
Page 13: ...gh temperatures can lead to the coagulation of protein Fruit will quickly go soft and mushy if it is defrosted too quickly If you are defrosting whole fruit it should be allowed to thaw out slowly in the refrigerator With this programme it is possible to defrost fruit which is to be further processed e g for marmalades smoothies or purees The basic setting for defrosting is 120 C cooking temperatu...

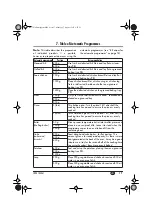
Page 14: ...lected function and the remaining cooking time will flash 2 In order to continue with the function selected press the control knob 5 3 In order to bring the cooking function to a complete stop do not press the control knob 5 but press CANCEL STOP 23 a second time 5 7 Selecting an automatic programme Note In 7 Table of Automatic Programmes on page 17 you will find suggestions for using the automatic ...

Page 15: ...ings The values given for the cooking time and temperature are standard values These may vary depending on the type of food to be cooked It also depends on whether for example you prefer vegetables with a bit of a bite or slightly softer Note If the cooking programme is interrupted or the door 2 is opened the cooking time may take slightly longer If the food is not fully cooked when the cooking ti...

Page 16: ...toes Normal Steam 30 45 100 C diced approx 3 cm lightly salted The cooking time given applies for approx 300 g For larger amounts cook for a longer period Asparagus Normal Steam 20 35 100 C Spinach Normal Steam 7 10 100 C only fresh spinach Celery stalks Normal Steam 25 30 100 C Courgette Normal Steam 10 15 100 C in slices Mange tout Normal Steam 10 15 100 C Food Function Time in minutes Temperatu...

Page 17: ...key schnitzel Normal Steam 20 25 100 C Use the steam tray 14 Kasseler pork Normal Steam 40 60 100 C Use the steam tray 14 Food Function Time in minutes Temperature Specifics Roast pork Convection 60 80 160 C Use the baking tray 13 Roast veal Convection 50 70 160 C Use the baking tray 13 Kasseler pork Convection 40 60 160 C Use the baking tray 13 Filet of pork Convection 40 50 180 C Use the baking t...

Page 18: ...pple compote Normal Steam 15 20 100 C Pear compote Normal Steam 25 30 100 C Peach compote Normal Steam 10 15 100 C Plum compote Normal Steam 15 20 100 C Food Function Time in minutes Temperature Specifics Vegetables e g carrots peas beans Normal Steam 5 100 C Use the steam tray 14 Food Function Time in minutes Temperature Specifics Casserole Convection 30 60 160 C Place in oven proof dish on oven ra...

Page 19: ...alian pizza Turn the pizza 180 after half the cooking time has passed to ensure the pizza is evenly cooked L thick Thick American pizza Turn the pizza 180 after half the cooking time has passed to ensure the pizza is evenly cooked Butter Melting butter 50 g Slice up room temperature butter into smaller pieces and place in an oven proof dish Leave it to stand when the programme comes to an end to b...

Page 20: ...ice on the oven rack 15 6 Close the door 2 7 Select the STEAMED FISH automatic programme with 600 g see 5 7 Selecting an automatic programme on page 12 8 Place 20 g butter in an oven proof dish and put it in the oven for the last 4 minutes of cooking for melting 9 When the cooking time has expired remove the rice and fold in the melted butter and herbs 10 Spoon the rice mixture onto the plates for...

Page 21: ...the potatoes and slice thinly 2 Place the potato slices on half the baking tray 13 3 Cut the courgette mushrooms pepper and tomatoes into thin slices and place on the other half of the baking tray 13 4 Add salt and pepper to the potatoes and other ingredients and season to taste 5 Season the chicken breasts and place them on top of the other ingredients 6 Select the ROAST CHICKEN automatic program...

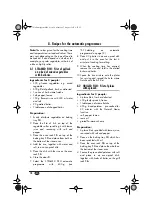
Page 22: ...ck in the oven 13 Place the meatballs on the steam tray 14 and place this tray on the oven rack 15 14 Select the MEAT automatic programme with 500 g see 5 7 Selecting an automatic programme on page 12 8 5 PIZZA Ingredients for 2 people For the pizza base 250 g plain flour 1 packet of raising agent Approx 150 ml lukewarm water 1 tablespoon of oil 1 teaspoon of salt For the topping Peeled tinned toma...

Page 23: ...ribute mixture on baking tray 13 4 Place the oven rack 15 in the oven and place the baking tray 13 on top of this 5 Select the CAKE automatic programme with 600 g see 5 7 Selecting an automatic programme on page 12 Variation Make a dough using 250 g flour garnish with plums and a sprinkling of crumbs 8 7 POTATOES Potatoes with Alpine cheese Ingredients for 2 3 people 1 kg hard boiled potatoes 200 m...

Page 24: ...amme on page 12 8 Sprinkle with chopped parsley when cooked 8 9 SOUP Chicken soup with rice noodles Ingredients for 2 3 people 600 ml water 200 g chicken filet cut into pieces 250 g vegetables carrots beans leek alternatively frozen soup vegetables 50 g rice noodles Salt spices herbs Sherry to taste Preparation 1 Add the vegetables water and salt to an oven proof glass dish 2 Place the oven rack 15...

Page 25: ...nutes You could add a few drops of mild washing up liquid 3 Carefully dry all parts after cleaning Note The grill rack 16 the oven rack 15 and the tray removal handle 12 can all be cleaned in the dishwasher The baking tray 13 and the steam tray 14 are not suitable for use in the dishwasher due to their special coating 9 3 Cleaning the water tank 11 and the drip tray 9 1 Pull the water tank 11 forw...

Page 26: ...in your country Dispose of the packaging in Germany via the collection of the dual system Grüner Punkt Fault Cause Remedy Appliance cannot be switched on Child safety is activated Release child safety see 5 9 Child safety on page 13 Faulty fuse or wall socket Select another wall socket Faulty appliance Have repairs carried out at a specialist workshop or dispose of the appliance Further informatio...

Page 27: ... been manufactured in accordance with strict quality guidelines and checked before leaving the factory Nonetheless should operational faults occur please contact the Service Centre first Please do not send in any appliance before contacting our Service Centre To enable us to process your request quickly please have ready your proof of purchase and the product number for this appliance SDBO 1850 A1 ...

Page 28: ...RP57458 Dampfgarer LB6 Seite 26 Montag 27 August 1956 9 07 21 ...

Page 29: ...RP57458 Dampfgarer LB6 Seite 27 Montag 27 August 1956 9 07 21 ...

Page 30: ... R HU DQGHO PE KQHK IH DPEXUJ 6 2 B Ɇ 1B 53 DPSIEDFNRIHQB RYHUB LQGG ...

Reviews: