background image

6

Step 5:

Step 6:

2

1

3L

3L

1

6

6

1

3L

3R

2

C16

C16

B14

B14

B14

silvercrossbaby.com

6

Summary of Contents for Notting Hill

Page 1: ...Assembly Instructions IMPORTANT THE ASSEMBLY OF THIS PRODUCT REQUIRES TWO PEOPLE IMPORTANT KEEP THESE INSTRUCTIONS FOR FUTURE REFERENCE Notting Hill Dresser ...

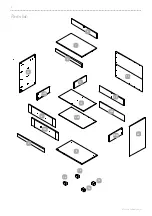
Page 2: ...2 Parts list 1 2 3L 3R 4 6 17 5 8 15 16 15 16 12 11 14 13X2 9LX3 9RX3 10X2 7X2 silvercrossbaby com ...

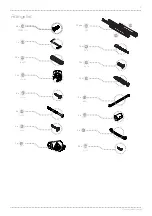
Page 3: ...x 35 B14 38 x 15 x 16 D3 32 x 3 x 16 R23 4 x E31 4 x 6 x 95 4 x 22 R20 6 x Z 50 1 x 400 Q21 3 Pair x QL QR 7 x 50 A3 16 x 3 x 16 R21 18 x C16 32 x 400 T3 2 x D5 4 x 3 x U EUR 6 x 13 R103 24 x silvercrossbaby com 3 x 13 R24 22 x ...

Page 4: ...4 silvercrossbaby com Step 1 D3 D3 D3 D3 D3 D3 D3 D3 D3 B14 B14 B14 B14 B14 B14 B14 B14 B14 B14 B14 B14 B14 1 2 1 2 Step 2 B14 B14 B14 B14 B14 D3 D3 D3 D3 D3 C16 C16 C16 C16 C16 C16 C16 C16 C16 3L 3R ...

Page 5: ...R103 R103 R103 R103 QL QR 5 Step 3 silvercrossbaby com R103 QL QR 3L 3R QL QL QR QR R103 R103 2 1 3L D3 C16 B14 B14 D3 3L C16 Step 4 D3 D3 D3 D3 D3 D3 D3 D3 B14 B14 B14 6 6 ...

Page 6: ...6 Step 5 Step 6 2 1 3L 3L 1 6 6 1 3L 3R 2 C16 C16 B14 B14 B14 silvercrossbaby com 6 ...

Page 7: ...silvercrossbaby com Step 8 Step 7 B14 B14 B14 B14 B14 15 15 16 16 7 16 E31 E31 E31 D5 D5 E31 A3 A3 E31 E31 E31 E31 3R 1 2 15 15 16 16 16 B14 D5 D5 ...

Page 8: ...8 Step 9 silvercrossbaby com 5 4 Step 10 C16 C16 C16 C16 C16 C16 C16 C16 C16 C16 4 5 D3 D3 4 4 4 5 1 2 3L 3R D3 ...

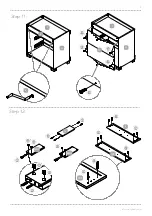
Page 9: ...9 Step 11 1 17 1 R24 6 6 3L 3L Step 12 silvercrossbaby com 12 8 D3 D3 D3 D3 D3 C16 C16 C16 C16 C16 C16 B14 B14 B14 B14 9LX3 9RX3 7X2 7X2 R24 R24 R24 R24 ...

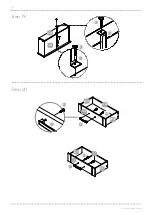
Page 10: ...10 silvercrossbaby com A3 A3 A3 A3 A3 A3 A3 B14 B14 B14 B14 9LX2 9RX2 10X2 7X2 10X2 9LX2 9RX2 9R 9L 11 12 C16 Step 13 Step 14 Step 15 ...

Page 11: ...silvercrossbaby com Step 17 silvercrossbaby com Step 16 8 12 12 11 11 9L 9R 8 8 9L 14 11 13X2 Step 18 11 13X2 14 R21 R21 R21 R21 10X2 11 10X2 ...

Page 12: ...Step 19 silvercrossbaby com Step 20 8 13X2 R23 R23 T3 T3 R20 R20 R20 U U U 9LX2 9RX2 7X2 9R 9L 11 10X2 12 10X2 ...

Page 13: ...hat the dresser is connected to the wall using the wall strap provided All walls are different composition and it is important the correct fittings are used Wall fittings are not supplied with this furniture and it is advised to consult a professional before fitting ...

Page 14: ...by com Step 22 Step 23 Z50 Z50 14 Fix the wall strap to the furniture as shown with the fittings provided do not use these fittings to connect to the wall Consult a professional before fitting the strap to the wall ...

Page 15: ...Notes 15 ...

Page 16: ...nger It must be lifted and moved by at least two people Before use ensure the changer is on a level stable surface Do not allow children to climb on the changer The changer can be cleaned with a damp cloth Never use bleach abrasive or strong detergents Thoroughly dry immediately after cleaning WALL STRAP INFORMATION Never modify or change the wall strap in any way Never use any other fittings othe...

Reviews: