background image

2

Package Contents

CyberSerial 4S PCIe

 adapter and spare enhanced low

profile bracket

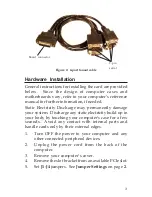
4-port fanout cable and "Y" split power cable

Driver CD and user's manual
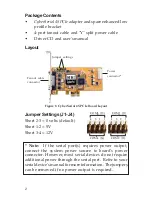
Layout

Figure 1: CyberSerial 4S PCIe Board Layout

Jumper Settings (J1-J4)

Short 2-3 = 0 volts (default)
Short 1-2 = 5V
Short 3-4 = 12V

* Note:

  If the serial port(s) requires power output,

connect the system power source to board's power

connector. However, most  serial devices do not require

additional power through the serial port.  Refer to your

serial device's manual for more information.  The jumpers

can be removed if no power output is required.

Power
connector

*

Fanout cable
connector

Jumper settings

1

2

3

4

2

3

4

COM1 (J1)

1

COM3 (J3)

COM4 (J4)

COM2 (J2)

Summary of Contents for JJ-E40011-S2

Page 1: ...lane width Installs in any available PCI Express slot and provides four 9 pin RS232 serial ports via a fanout cable Spare enhanced low profile bracket is included to work in low profile chassis 32 by...

Page 2: ...ts default Short 1 2 5V Short 3 4 12V Note If the serial port s requires power output connect the system power source to board s power connector However most serial devices do not require additional p...

Page 3: ...your system Discharge any static electricity build up in your body by touching your computer s case for a few seconds Avoid any contact with internal parts and handle cards only by their external edg...

Page 4: ...your system smanufacturerforthelatest systemfirmware update Our board comes with a PCI Express bridge chip which may not be understood by your system At the time this manual was written many system a...

Page 5: ...insert the driver CD For XP w SP1 or earlier Server 2003 go to step 2 For XP w SP2 or later Server 2003 wSP1 or later select No not this time click Next 2 Select Install the software automatically Rec...

Page 6: ...front of Ports COM LPT CyberSerial 16Cxxx should be displayed four times 3 Double click Multifunction adapters SIIG CyberPro 4S PCI board should be displayed Changing COM Port Address Some serial devi...

Page 7: ...ed or replaced Step 1 Submit your RMA request Go to www siig com click Support then RMA to submit a request to SIIG RMA If the product is determined to be defective anRMAnumberwillbeissued SIIGRMAdepa...

Page 8: ...backed by an extensive manufacturer warranty High quality control standards are evident by the overall ease of installation and compatibility of our products as well as one of the lowest defective ret...

Reviews: