

Signamax Connectivity System _______________________ ___ _____________ 098-8040
www.signamax-us.com
www.signamax-eu.com
Quick Reference Sheet
Notes:
1. Note that (
x)
denotes a number key for the selected port number (x = 1 ~ 2). You can use either the top row number keys or the number pad for the hotkey commands.
2. When the binding of PC & Audio/Mic port switching is enabled by the hotkey sequence: ScrLk + ScrLk + Q, any PC and Audio/Mic switching are bound together. To remove this binding, hit ScrLk + ScrLk + W.
Hotkey convention:
The hotkey notation
ScrLk + ScrLk + (key)
, denotes that you should hit the individual key consecutively one at a time, not simultaneously.
Mouse Troubleshooting
: If your mouse hangs or behaves abnormally, you can hit the following hotkey commands for mouse reset:
(a)
When you are using a PnP OS such as Windows 98 Second Edition or later Windows operating systems such as Win2k, WinXP, etc., hit
ScrLk + ScrLk + End
for mouse reset.
(b)
When you are using a non-PnP OS such as Linux, NT4.0, etc, just hit one of the following hotkey commands for mouse reset according to your mouse configuration on the non-PnP OS --
ScrLk + ScrLk + M + 1 for a 2-key mouse setting; ScrLk + ScrLk + M + 2 for a 3-key wheel mouse setting; ScrLk + ScrLk + M + 3 for a 5-key wheel mouse setting.
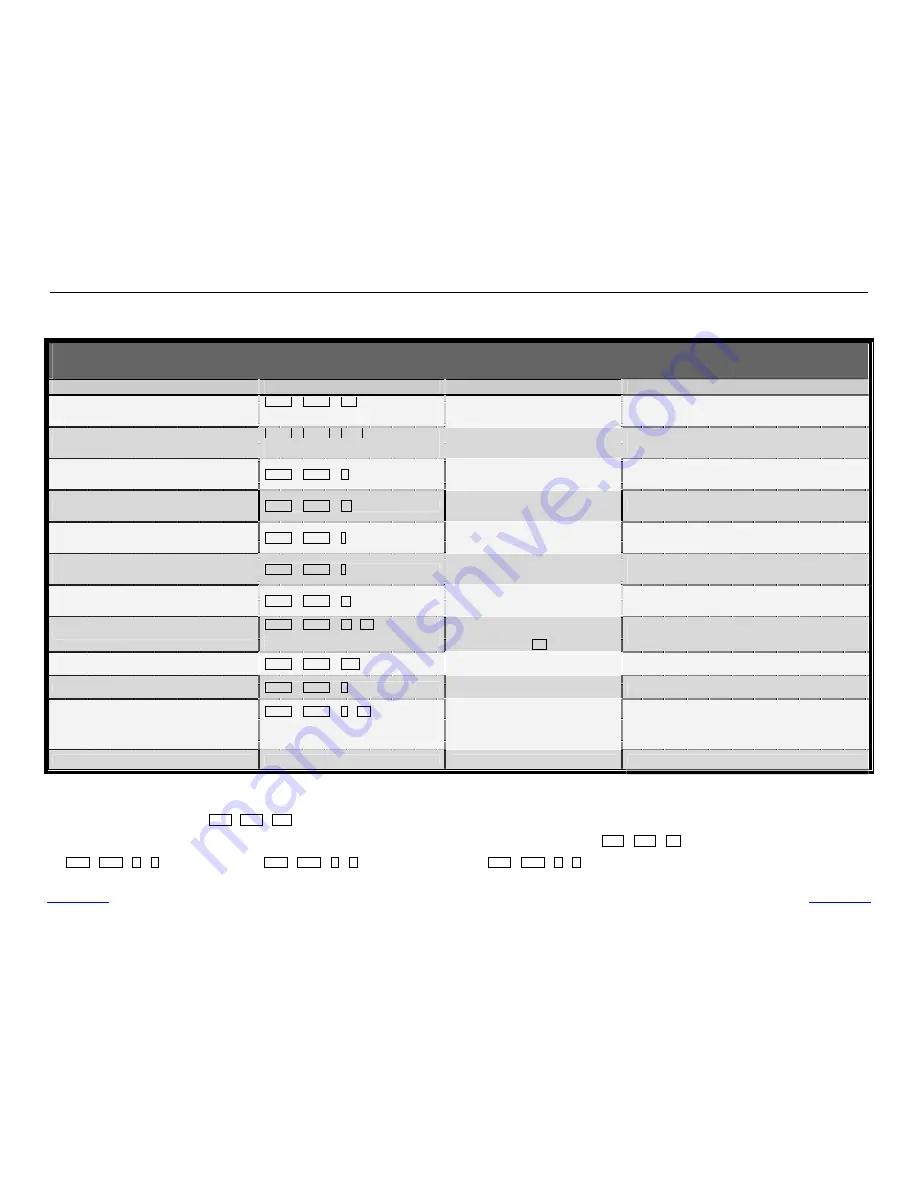
098-8040 4-port Slim Palmtop PS/2 KVM Switch Operation Commands for Hotkeys/ Face-Panel Buttons
Hotkey sequence = [ScrLk]
*
+ [ScrLk]
*
+
Command key(s)
* User-definable Preceding sequence = SCROLL LOCK
,
CAPS
,
ESC
,
F12
or
NUM LOCK
Command
Hotkeys
Face-panel Buttons
Description
Select PC Channel
(Joint-select PC port and Audio/Mic port, if binding
is enabled)
2
ScrLk + ScrLk + (x)
1
(x is a top-row number key)
x = 1 ~ 2 or 1 ~ 4 for PC channel no
--
Select the active PC channel
(Joint-select PC & Audio/Mic port, if binding is enabled)
Select Audio/Mic Channel
ScrLk + ScrLk + (Fx)
(Fx is a function key)
x = 1 ~ 2 for Audio mic channel no
--
Select the active Audio/Mic channel
(Joint-select PC & Audio/Mic port, if binding is enabled)
Bind PC & Audio/Mic Switching
[default]
ScrLk + ScrLk + Q
--
Enable the binding of PC and Audio/Mic switching. (Once
this feature is enabled, PC and Audio/Mic switching is bound
together) [factory default]
Unbind PC & Audio/Mic Switching
ScrLk + ScrLk + W
--
Disable the binding of PC and Audio/Mic switching
Next lower PC channel
(Joint-select PC port and Audio/Mic port, if binding
is enabled)
2
ScrLk + ScrLk +
↑
(arrow up)
Press the face-panel button to switch to
next PC channel -
Select the next lower PC channel
(joint-select PC port and Audio/Mic port, if binding is
enabled)
Next higher PC channel
(Joint-select PC port and Audio/Mic port, if binding
is enabled)
2
ScrLk + ScrLk +
↓
(arrow down)
Press the face-panel button to switch to
next PC channel1
Select the next higher PC channel
(joint-select PC port and Audio/Mic port, if binding is
enabled)
Previous PC channel
ScrLk + ScrLk +
Å
(Backspace)
-
-
Toggle between the previous channel and current channel
Define Hotkey Preceding Sequence
ScrLk + ScrLk + H + (y)
y
=
SCROLL LOCK, CAPS, ESC,
F12 or NUM LOCK
Press and hold down last button (Button 2
/ Butotn4) for over 8 seconds, then release
the button and press
(y)
key
Select the hotkey preceding sequence among 5 alternative
keys
Console Mouse/Keyboard Reset
ScrLk + ScrLk + End
--
Reset keyboard and mouse on the console side
Autoscan
ScrLk + ScrLk + S
--
Autoscan through every connected channel for quick screen
browsing of each channel (scan delay = 5 sec.).
Autoscan with Programmable Delay Time
ScrLk + ScrLk + S
+
(x)
1
x = 0~9
1
Æ
10” ; 2
Æ
20” ; 3
Æ
30” ; 4
Æ
40” ; 5
Æ
50”
6
Æ
60” ; 7
Æ
70” ; 8
Æ
80” ; 9
Æ
90” ; 0
Æ
100”
-
-
Autoscan with a user-defined delay time within a range of 5 ~
100 seconds
Stop Autoscan
Press any key on keyboard
Press any button
Terminate Autoscan activity