


20
2. OLED Display Brightness
After selecting and saving BEST or LAST Target, the rangefinder will then index to the next programming
mode which is OLED Display Brightness. Your current selection will be flashing (AUTO is default). You
can toggle between LO1, LO2, LO3, MED1, MED2, MED3, HI1, HI2, HI3 or AUTO by pressing the RANGE
button. You can confirm your selection by pressing and releasing the MODE button - which will cause
the Display Mode to stop flashing and save your selection. The rangefinder will then index to the next
programming mode which is Line of Sight (LOS) or Angle Modified Range (AMR). If you do not press and
release the MODE button the rangefinder will save your displayed setting (Brightness Level Selected or
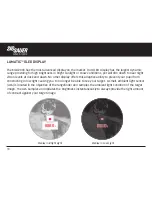
AUTO) and turn off. AUTO is the preferred OLED Display Brightness mode as it activates the proprietary
Lumatic™ display which utilizes the on-board ambient light sensor and twenty (20) possible display
intensity settings to automatically calibrate the display brightness relative to the ambient lighting
conditions. In bright conditions the display will be calibrated to power-on at max brightness, while in
dim conditions the display will be calibrated to power-on at the dimmest setting to protect your eye from
bright light in twilight or dark ambient lighting conditions.
3. Line of Sight (LOS) or Angle Modified Range (AMR)
After selecting and saving OLED Display Brightness, the rangefinder will then index to the next
programming mode which is LOS or AMR. Your current selection will be flashing (AMR is default). You
can toggle between LOS and AMR by pressing the RANGE button. You can confirm your selection by
pressing and releasing the MODE button – which will cause LOS or AMR to stop flashing and confirm your
selection. The rangefinder will then index to the next programming mode which is Unit of Measure. If